Fixing Knitting Mistakes (Knitting Class: Part 6)
Oops! Everyone makes mistakes in their first projects as a knitter. We'll teach you how to fix the most common ones!

Learning to knit can be overwhelming, and making mistakes is a part of the learning process that happens to everyone during their first few projects. There are so many things to know about skeins of yarn and knitting needles and knit stitch and purl stitch. When you make your first mistake, you may feel that it’s easier to throw in the towel, rip out your project, and forget you ever tried.
We’re here to tell you that it’s okay. Unless you are the most amazing knitter on the planet who never, ever, messes up on anything, chances are, you will make knitting mistakes. We do it all the time.
But, these mistakes do need to be addressed. After learning to read knitting patterns and create them, fixing knitting mistakes is a vital skill. Each knitting tutorial will help you work through one common knitting mistake, and to know more for next time! The tutorials include fixes for dropped stitches, too many stitches, twisted stitches, mixing up knit and purl, tight knitting, and losing count of rows.
Knitting Class: Table of Contents
How to Tink
Let's say you've found a mistake a few stitches back on the same row. You don't need to rip out your knitting and start over, and frogging is too much; all you have to do is tink! (That's knit backward.) Here's how:
How to Fix a Pulled Stitch
Once your stitch is finished and off your needle, you might think it's totally safe from error, but in fact, you can still run the risk of pulling stitches. This usually happens while you're still knitting the fabric, but it can really happen at any time. Basically a pulled stitch is just an individual stitch that has come undone and threatens to unravel the entire row. It might sound scary, but there's an easy fix. Here's how:
How to Fix a Twisted Stitch
A twisted stitch can happen if you accidentally knit in the stitch the wrong way or if the stitch drops off the needle and you put it back on your needle the wrong way. You may notice a twisted stitch by sight, but more often, when you try to knit into it, it feels different, tighter.
This is a super easy fix, especially if you catch it before you knit that stitch again. When you get to that stitch in your work, simply slip the loop off the needle and turn it around before putting it right back. Done!
If you don’t notice a twisted stitch and continue knitting over it, it’s not a huge deal, it’s not super noticeable. However, if you are a perfectionist, you can allow that stitch to unravel down to where the mistake was made and then follow the instructions for recovering a dropped stitch, making sure to correct the twist along the way.
How to Fix a Dropped Stitch
Everyone drops stitches from time to time, so if you count your stitches and come up short, don’t worry. Examine your work for any places that look odd, or where there may be a hole. You should be able to see the loop from a dropped stitch in your project.
It is easiest to fix a dropped stitch if you catch it right away, as it drops off the needle. If the stitch has not unraveled yet, simply pick the stitch back up onto your needles. Pick it up with the right needle if you just finished working the stitch. Pick it up with the left needle if it is the next stitch you are to knit. Make sure the loop is on the correct way or you might end up with a twisted stitch. Look at the loops around it for correct placement—front loop towards or way from the needle points.
Sometimes, though, the stitch will drop and begin unraveling and all you can see are yarn ladders. Again, don’t panic. The easiest way to pick up a dropped stitch, and the way we lay out here, involves using a crochet hook. If you do not have a crochet hook, you can learn how to pick up a dropped stitch with knitting needles.
First, carefully set your work down on a flat surface for stability and grab your crochet hook.
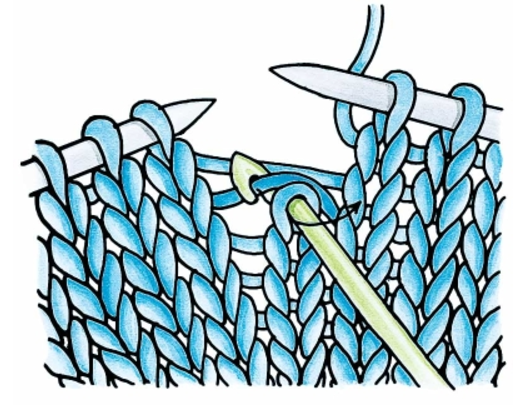
Fixing a Dropped Stitch in Stockinette: Insert the crochet hook into the dropped stitch from front to back. Hook the nearest ladder with your hook and bring it through the stitch. One stitch completed. Repeat this process all the way up the ladder until completed (see photo below).
Fixing a Dropped Stitch in Garter Stitch: You will need to switch what direction you hook these stitches each time to achieve the same texture as the rest of your piece. Insert your crochet hook into the dropped stitch from front to back for the bump on the back of the work. Insert your crochet hook into the dropped stitch from back to front for a bump on the front. Either way, hook the nearest ladder with your hook and bring it through the stitch. Alternate front to back and back to front all the way up the ladder until completed.
With other stitch patterns, just follow where the “bumps” should be. For a bump on the front, put the hook back to front. For a bump on the back, put the hook front to back.
However, sometimes you miss a dropped stitch and knit over it for a while. If this is the case, use the above procedure, but instead of yarn ladders, you’ll need to pull up a bit of yarn in the next row up each time you hook. It will make your project a bit tight in that area, but you will have your stitch back.
More Common Knitting Problems
You have too many stitches
If you do your stitch count at the end of a row and realize you have one too many, you will need to figure out where you went wrong. Check your work for any holes or places where the stitches look kind of odd. These are the places where you added a stitch, usually by making an extra loop of yarn over the needle. Or you may have knit the first stitch of a row twice (see next section).
If the mistake is nearby, you can you can “unknit” stitch by stitch until you reach the place where you added a stitch. To do this, insert your left needle into the “bump” of each completed stitch, pulling it onto the left needle. Tug on the working yarn as you go to undo your work. Once you reach the place of the mistake, correct it, and then start knitting again.
If the mistake was made a long time ago, and you need to correct the mistake, you will have no other option but to rip out your knitting to that place. Lay your project on a flat surface and slowly tug the working yarn to undo your work. Correct the extra stitch, put your stitches back on the needle, and continue knitting.
You knit the first stitch of a row twice
You can accidentally knit the first stitch twice because first stitches are often looser than others, making it look like two loops. Avoid this problem by carefully inserting your needle on every first stitch and counting your stitches after each row.
If you do find an extra stitch and realize you doubled up on the first stitch, correct this mistake by knitting the first two stitches of the next row (or whenever you notice it) together. Depending on your pattern, it might not be noticeable.
If it is noticeable and bugging you, you can “unknit” or rip out to the mistake (both described above).
You knit when you were supposed to purl
If you are working on a row and notice that in the previous row, you knit a stitch when you were supposed to purl, or visa versa, don’t despair. What you need to do is swap the loops to switch the bump from one side of the fabric to the other.
Knit to the place in your work, and stop right before completing that stitch. Set your work down on a flat surface. Carefully slide the stitch off the left needle. Pull the “bump” loop up and over the loop that was just on the needle, push it through that same loop, and then place this new loop back onto the needle. You just switched the two loops, effectively switching the stitch from purl to knit or knit to purl.
If you don’t notice a knit/purl switch and continue knitting, you can fix it. Slip the stitch off of the needle and allow that stitch to unravel down to where the mistake was made. Follow the above instructions for recovering a dropped stitch, making sure to correct the stitch along the way.
You have tight knitting tension
It is super common for new knitters to knit really tight because it can feel like you have more control when everything is tight. But, if you knit too tight, you will have trouble getting your needle into the stitches and your projects will be very stiff. There are a few things you can try.
First, be sure that you wrap your yarn around the thickest part of the needle, not the tip.
Second, after you knit a stitch, pull up a little bit on the completed stitch, making the loop a little longer.
Third, relax. Knitting is a learning curve, so your first projects won’t be perfect. It is better to get in the habit of looser knitting now before you run into problems later.
You lost count of rows
If you need to knit a certain number of rows for a project, it is best to keep track of rows as you go, either on paper or using a row counter. However, if you lose track or just want to know, there are ways to count. If you are knitting garter stitch or stockinette stitch, it is very easy.
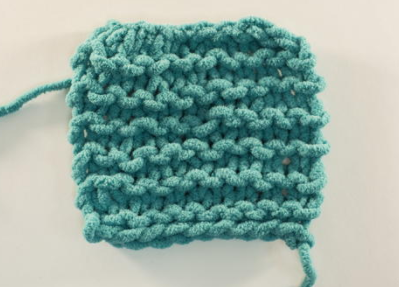
In garter stitch, when you look at one side, each set of wavy bumps is a row and so is each depression between bumps. The swatch below shows a cast-on row, 12 garter stitch rows, and then a cast-off row. Another way to think about this is that each row of bumps on each side is a row, so you could count the number of bumps on one side, then flip over and count the number of bumps on the other to get your row count.
In stockinette stitch, it’s even easier to count rows. Flip to the bumpy side and count the rows of bumps. And that’s it! The picture below shows a cast-on row and then two stockinette rows (including the one on the needle).
Hopefully, with these handy fixes under your belt, you feel a lot more confident that you can fix knitting mistakes as you go along.
Ready for Part 7?
Your Recently Viewed Projects

Thanks for your comment. Don't forget to share!
The Designing Peng uin
Aug 25, 2016
more easy to follow instructions - and this is a lot easier than the way I was taught, using the needles -- love it
quanahs 5032097
Mar 04, 2016
Even the most experienced knitters have to fix a mistake from time to time. Its great to learn how to pick up and fix a missed stitch instead of frogging back many rows to correct the stitch. For those who don't know the term frogging, its removing your knitting from the needles and pulling out the knit portion until you reach the mistake rip it rip it. Of course then you have to pick up all the stitches again so you can move forward.
grannylillie63
Mar 31, 2011
I would like to know how to save a pattern to my computer or instructions that I have read.
Report Inappropriate Comment
Are you sure you would like to report this comment? It will be flagged for our moderators to take action.
Thank you for taking the time to improve the content on our site.