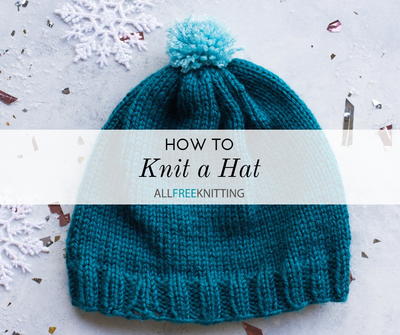
What is Steeking?
Don't fear the scissors! Steeking is an incredible way to alter or enhance your knit items.

If you're the kind of person who wishes she could knit everything in the round, then, boy, do we have some exciting news for you. There's this technique called "steeking" in knitting that will allow you to knit something on circular or double-pointed needles, and then later on turn it into something that appears to have been knitted flat.
But exactly what is steeking? When you steek, you take a pair of scissors to your knitting and cut up a column of stitches in order to open up your work. If all the blood drained from your face at the very thought of cutting up your precious knitting, believe me, you're not alone. Steeking is a terrifying concept for someone who has never tried it before. Imagine spending days upon days knitting up a beautiful sweater in the round just to slice it down the center… eek!
I'm not about to tell you to dive right into steeking and start ripping apart your fabulous new pullover. Instead, here's a great way to practice steeking: using yarn you don't really care about or have any plans for, knit up a tube in the round. This can be any width, on any size needles with any cast on number. Just make sure your tube is stockinette stitch—in the round, that means knitting every row.
Did you know steeking is often used in fair isle knitting? Check out our list of gorgeous fair isle projects and learn more about the technique here:17 Fair Isle Knitting Patterns
How to Steek
There are a few simple materials you'll need in order to try steeking.
- A crochet hook in the proper size for your yarn
- The same yarn you used to knit up your tube
- A sharp pair of scissors
-
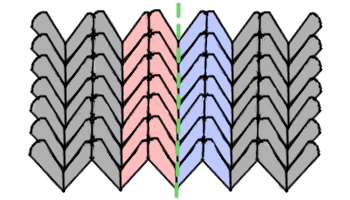
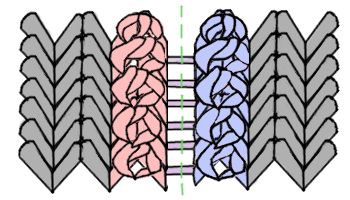
Identify your steek column and securing stitches
Often, the pattern will tell you where you will be steeking. For the purpose of practice, you can pick literally any stitch column in your tube. Eventually, you will be steeking directly down the center of the stitch column you chose. This is identified in the image below with the dotted green line. The two legs of stitches on either end of this line are the stitches you will be securing. These each compromise half of the stitch that you are cutting down the center, and half of the stitch either to the left or right of it. -
Secure the surrounding stitches
In our image, the first column of surrounding stitches is the red column, and the second is the blue. In order to secure these stitches, you must know how to chain in crochet. Check out this handy guide from AllFreeCrochet.com if you don't know how.- Create a slip knot and attach to your crochet hook.
- Insert your crochet hook through the topmost of the lefthand surrounding stitches, under both legs (the red column in the guide image; this encompasses the left half of your steek column and the right half of the column of stitches just to the left of it).
- Pull a loop through this set of stitches. Two loops are now on your crochet hook.
- Pull another loop through both of these two loops on your hook. There is now one loop on your hook, and the first stitch is secured.
- Insert your crochet hook through both legs of the next set of surrounding stitches down. Be sure you're inserting your crochet hook from the same direction you did in step 2.
- Repeat steps 3 to 5 until you reach the bottom of the column.
- Once you have reached the last stitch, cut your yarn and pull through your final loop to fasten off.
- You will repeat these steps for the "blue" column, or the column to the right of your steek line. This will leave you with two crocheted chains along your steek line. Your stitches have been secured, and you're ready to cut your work.
-
Steeking
It may help to pull the two crocheted chains apart from each other slightly to better see the ladder in between them. You will be cutting along these stitches. Simply take your scissors and cut upwards from the bottom (along the green dotted line in this picture).
With that, you have steeked for the first time! Bear in mind that this crochet chain method isn't the only way to secure the stitches around your steek line. If you're not a fan of the way the crochet edge looks, you can play around with various methods involving knitting needles or tapestry needles.
Steeking a Sweater
Now that you know how exactly what is steeking and how to steek any piece of fabric, you can utilize this technique in the most popular way: turning a knit-in-the-round pullover into a cardigan. This technique is most often found in fair isle sweater knitting, as this allows for knitting colorwork in the round and expedites stockinette stitch knitting, as there is no purling involved.
Once you've steeked down the center of your sweater, you can leave it as-is, or you can pick up the stitches on the edges and add a ribbed, garter, or stockinette stitch border, and even include buttons on one side and buttonholes on the other! The world is your oyster.
Another way you can use steeking on your sweater is to add armholes; this is a less common technique where the body of the sweater is knit all in one piece, without binding off or holding stitches to the side for the armholes, and instead, steeking creates the opening for the arms. Different patterns should offer guidance on how exactly steeking should present itself in any given pattern, and you may find yourself surprised at the unique ways steeking can be used to enhance or alter a garment.
Patterns to Steek
Just because steeking isn't written into a pattern doesn't mean it's off-limits. In fact, know that you know how to steek, you can customize patterns like never before! Steeking in knitting has no rules. It's a destructive act by design, after all! Here are a few examples of patterns you could knit up and steek to your heart's content.

The Modern Icelandic Sweater is an excellent candidate for steeking. Since it involves intricate colorwork along the shoulders, it would be much easier to turn it into a cardigan via steeking than knitting this pattern back and forth. You can even create just a simple notch below the collar for a more behemian look, rather than cutting all the way down the front of the sweater.

Steeking is actually an incredibly useful technique for children's knits, because it allows for the knitting pattern to fit the child for many years. If you knit the Girls Fair Isle Knit Sweater Pattern just a little too big for your munchkin and then steek the center to turn it into a cardigan, the extra room allows for more growth of your child. In fact, if you used a stretchy yarn, it would eventually turn into a lovely 3/4-sleeve cardigan even into her preteen years.

Steeking isn't just for sweaters! While we love the plush warmth of the Colorwork Tube Scarf knit the way it is, if you decide that you would rather have a wider, thinner scarf, it's an excellent idea to steek this scarf lengthwise, which will convert it from a tube to a standard, flat scarf. Do bear in mind that the wrong side of the colorwork can be visible this way, depending on how it lays while on, however. This is also a technique that could work with a standard stockinette stitch tube scarf, where the wrong side will only look like garter stitch.

Just because steeking is primarily used with colorwork doesn't mean it has to be! Let's be honest: purling is a pain, and knitting stockinette stitch in the round is so much easier and faster. If you want a knit vest pattern, but don't want to deal with all that purling, this Chic Summer Tank knits up in a flash in the round, and you can simply steek down the center to turn it into a lovely vest.
Your Recently Viewed Projects
Thanks for your comment. Don't forget to share!
RachelAnne
Jun 20, 2018
What a thorough tutorial. The idea of steeking has always been terrifying, and I had no idea where to begin. But this gives me a concept for how to go about it, and I think I could get the technique down with some practice.
Report Inappropriate Comment
Are you sure you would like to report this comment? It will be flagged for our moderators to take action.
Thank you for taking the time to improve the content on our site.