How to Read a Knitting Chart
If you've ever wondered how to read a knitting chart, this guide will teach you how.

Although they might seem complicated, knitting charts are just another way to represent written knitting instructions in a visual format. Writing up knitting instructions in this way takes up less space and also makes each stitch easier to read. Charts are also a necessity for colorwork because it's difficult to show complicated patterns of color with words alone.
Just because a knitting pattern uses a chart does not mean it’s a difficult or complicated pattern, either. Quite the opposite actually! Many people find that, once they know the ins and outs of reading a knitting chart, they can knit through patterns that they'd previously thought too difficult with great ease.
Once you understand the basics of how to read knitting charts, it shouldn’t be too hard to start your first charted knitting pattern. It may take a bit of practice to get the hang of knitting from a chart, but once you do, you’ll be completing knitting charts left and right. From cable knitting patterns to colorwork knitting patterns, you’ll be tackling big, bold, beautiful knitting patterns and taking your knitting skills to new heights.
Follow these tips and steps to learn how to read a knitting chart. Then you'll be ready to tackle any knitting pattern with a chart with confidence!
Step 1: Learn the anatomy of your knitting chart
Each Square is a Stitch
The first thing to know about knitting charts is that each square is a stitch. So, each symbol or square on the chart represents one stitch or maneuver you will make with your needles.
Remember Your Key
Most knitting charts are accompanied by a key explaining what each symbol represents. The symbols used in knitting charts are not always standardized, so check the key first to be sure you understand what stitches will be used.
Identify Your Wrong Side and Right Side Rows
The chart will likely make it very clear which rows are the right side rows and which are wrong side rows. Typically, the right side rows are the odd-numbered rows in the chart; however, if the cast on is included in the chart, this might not be the case. Keep in mind that many knitting charts only show the right side rows for simplicity.
Note: Right side rows are read right-to-left and wrong side rows are read left-to-right.
Identify Your Design Elements
When you glance at the pattern, the general shape of the design elements should be apparent. This is what makes knitting charts so great -- you can very easily see how your individual stitches and rows come together to create the pattern.
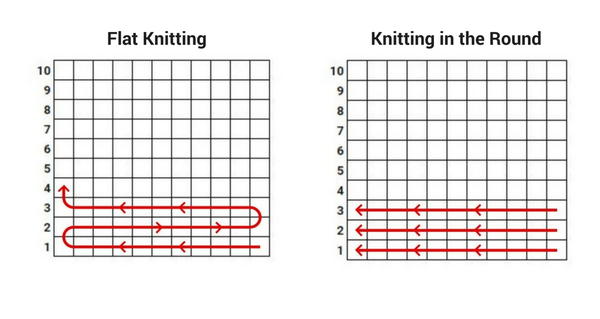
Step 2: Are you flat knitting or knitting in the round?
If you are flat knitting, your chart will be pretty straightforward to read -- each row is one row of knitting. Projects that are knit in the round, however, follow slightly different rules when it comes to knitting charts.
Flat Knitting
For knitting charts that are knit flat, the right side (odd) rows are read from right-to-left and the wrong side (even) rows are read left-to-right. This means you will read the pattern from the bottom righthand corner and follow the stitches in a back-and-forth direction, snaking up to the top of the chart.
Note: These rules for flat knitting charts change slightly if the chart only shows the right side rows. Scroll down to the next section to learn more about how to read right-side-only charts.
Knitting in the Round
For knitting charts for circular knitting patterns, there are no wrong side rows, so all rows will be read from right-to-left and from the bottom to the top.
Step 3: Which rows are shown in the chart?
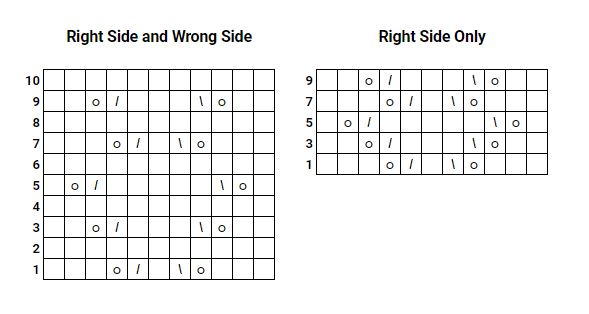
Not all knitting charts are built the same way. Depending on the type of project and the particular knit stitch being used, a chart may show both right side (RS) and wrong side (WS) rows or just the right side rows alone.
It should be clear by just looking at the chart which option the designer chose, but if it isn’t, there's a very easy way to find out. Simply look at the numbering on the chart! If the row numbers are all odd numbers (1, 3, 5, etc.) it’s a right-side-only chart. If all numbers are shown (1, 2, 3, 4, etc.), that chart will show you both the right side and wrong side rows. For a very basic chart, try the Knit a Heart Chart (pictured).
How to Read Right Side Charts
If you’re working on a RS chart, the WS rows aren’t shown and the pattern will explain what to do with them (typically knit or purl every stitch). To work a RS chart, knit each row by beginning to read at the right side of the chart, working from right to left and bottom to top. So, you’ll start in the bottom right corner and knit to the left to the end of the row. Complete the next row of your knitting (a WS row) according to the pattern instructions (not shown on the chart). Then follow the 2nd line of the chart again from right to left. Repeat for the length of the chart, moving up one row on the chart for every RS row you knit.
How to Read Right Side and Wrong Side Charts
If you’re working a chart that shows both the RS and WS rows, you will read in a zig zag fashion. RS rows will be read from right to left, while WS rows are read from left to right. So, as you finish row 1 working from right to left, move up to row 2 and start on the left working back to the right. Repeat this back and forth reading for the length of the pattern.
Step 4: What symbols has the designer used?
Not all knitting chart symbols are the same. There are different styles and formats for the various types of stitches, but as long as you have the key for the symbols being used in that particular chart, you should be able to read it pretty easily.
Below is an infographic of some of the most common stitch types and their corresponding symbols.

Step 5: Is there colorwork?
Charts for colorwork knitting patterns or fair isle knitting patterns usually show every row or round (both RS and WS rows/rounds). If you’re knitting in the round, read every round on the chart from right to left. If you’re knitting flat, read RS rows from right to left and WS rows from left to right.
Below is an example of a chart from the Bright Diamonds Cowl from Patons. The chart is an example of a right-side-only colorwork chart that is knit in the round.

Step 6: Is there cabling?
Charts for cable knitting charts can either show only RS rows or both RS and WS rows. Often, though, the actual cable rows are right side rows, which makes showing the wrong side rows not as necessary.
The same rules of chart reading apply to cable charts as to regular knitting charts. Keep in mind that cable knitting charts often indicate maneuvers and stitches that span more than a single stitch or square on the chart. Be sure to read the key and look over the pattern to ensure you understand how to create the cables before casting on.
The example chart below shows the cables in this Knitted Knotwork Scarf pattern. The slant line that spans across the multiple stitches will tell you if the cable is front-leaning or back-leaning, and the marks on either end of that line indicate how many of those stitches will be moved to the cable needle.

Step 7: Is there lacing?
Charts for lace knitting patterns are much like a typical RS chart, often showing just the RS of the work. So, you’ll read the RS rows starting from the bottom right and work to the left. Refer to the written pattern for the WS rows. These charts often include many yarn overs, k2togs, ssk, and other increases and decreases. For lacing charts, it's important to know what symbols the designer has chosen for each stitch.
The chart below is an example of a lace knitting chart used to form a diamond-shaped chevron for this sweater pattern. You can clearly see the pattern of yarn overs and decreases by simply looking at the chart.

Step 8: Is there brioche?
If you've ever knitted brioche style, you probably know how different it can be from other forms of knitting. When it comes to reading knitting charts, the story is basically the same for brioche. Brioche stitches, increases, decreases, and rows have their own terminology and their own knitting chart symbols as well!
Step 9: Are there repeats?
Sometimes a chart will represent a whole piece of knitting or just a stitch pattern, which is then repeated a given number of times to create the entire project. The pattern should explain whether the whole project is represented or designate how many times to repeat the stitch pattern.
Often, for more complicated patterns, the repeated motifs comprise a different number of stitches and start in different parts of the patterns. If this is the case, the repeated sections will often be shown in the chart with boxes around them to differentiate the different parts.
Step 10: Start knitting!
Once you've determined how you should be reading your knitting chart, it's time to get to work! Your knitting chart should help you knit through your pattern in no time, no matter how complicated it is. You'll have a finished piece of knitting before you know it.
Many knitters use a post-it note or a paperclip to keep their place in their charts. Others use a marker to mark through the rows they've already done. How ever you want to keep your place, your knitting chart will help you make sense of even the most advanced and complicated patterns.
Learn More: How to Read a Knitting Pattern

Do you have any advice for knitting with a knitting chart?
Let us know in the comments!
Your Recently Viewed Projects
Thanks for your comment. Don't forget to share!
Mark
Apr 05, 2018
Such an informative article! I've been nervous about knitting with charts because they look confusing, but they're actually pretty straight forward
Report Inappropriate Comment
Are you sure you would like to report this comment? It will be flagged for our moderators to take action.
Thank you for taking the time to improve the content on our site.