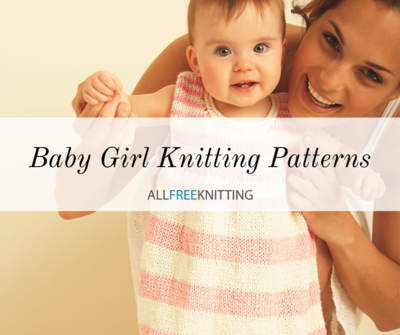
Little Birdie Dress
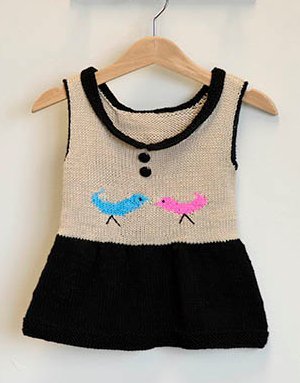
It doesn't get much cuter than the Little Birdie Dress. This simple stockinette stitch knit dress pattern is a charming addition to any little girl's wardrobe. Featuring a separately seamed and stitched bodice enhanced with an adorable intarsia bird motif, this tiny dress is a slightly more challenging (yet satisfying) knit. A rounded neckline and two sweet buttons add a touch of whimsy and timeless style to this adorable Little Birdie Dress.

Knitting Needle Size3 or 3.25 mm, Circular Knitting Needles
Yarn Weight(2) Fine (23-26 stitches to 4 inches)
MATERIALS
- Universal Yarn Little Bird (100% acrylic; 100g/344 yds)
- 111 Chinos (A) , 104 Pink Parfait (B), 109 Peacock (C ), 113 Shoe Polish (D) – 1 ball, all sizes
- Needles: US Size 3 (3.25 mm) straight, 16” circular or size needed to obtain gauge
- Notions: Stitch markers, tapestry needle, two 5/8” shank buttons, stitch holder
GAUGE
24 sts x 34 rows = 4” in St st
Save time, check your gauge.
SIZES
3 (6, 12, 24) months
Shown in 3 month size.
FINISHED MEASUREMENTS
Chest: 19 (21, 22, 23)”
PATTERN NOTES
This dress is intended to fit with about 2” of positive ease in the chest area.
The front and back of the bodice are knit separately and seamed. Stitches for the skirt are picked up along the lower edges of the bodice and then worked down in the round.
The Birdie chart is worked using the intarsia method.
BODICE
Front
With A, cast on 58 (64, 68, 72).
Row 1 (RS): Knit.
Row 2 (WS): Purl.
Cont in St st for 12 (14, 16, 18) more rows.
Next row (RS): K12 (15, 17, 19) sts, pm, work
Row 1 of Little Peep chart over 34 sts, pm, knit to end.
Work through Row 10 of chart, changing colors as indicated, and keeping sts on outside of marker in St st using A. After chart is complete, continuing in A only, work 12 more rows of St st.
Shape Armholes
Bind off 4 sts at beg of next 2 rows.
Dec row (RS): K1, k2tog, knit to last 3 sts, ssk, k1 – 2 sts dec’d. Purl a WS row. Rep these 2 rows, 1 more time – 46 (52, 56, 60) sts rem.
Cont in St st for 4 (6, 8, 10) more rows.
Separate Fronts, Shape Neck
Next row (RS): K14 (16, 18, 19), turn. Place rem sts on holder.
Left Front
Next row (WS): Purl.
Dec row (RS): Knit to last 3 sts, ssk, k1 – 1 st dec’d. Purl a WS row. Rep these last 2 rows, 3 more times – 10 (12, 14, 16) sts rem for Left Front. Work even in St st for 18 more rows, or until Armhole measures 4¼ (4½, 4¾, 5)”, ending with WS row. Bind off all sts.
Right Front
Return held sts to ndl.
Next row (RS): Bind off center 18 (20, 20, 22)
Neck sts, knit to end. Purl a WS row.
Dec row (RS): K1, k2tog, knit to end – 1 st dec’d. Purl a WS row. Rep these last 2 rows, 3 more times – 10 (12, 14, 16) sts rem for Left Front. Work even in St st for 18 more rows, or until Armhole measures 4¼ (4½, 4¾, 5)”, ending with WS row. Bind off all sts.
Back
Front
With A, cast on 58 (64, 68, 72).
Row 1 (RS): Knit.
Row 2 (WS): Purl.
Cont in St st for 32 (34, 36, 38) more rows.
Shape Armholes
Bind off 4 sts at beg of next 2 rows.
Dec row (RS): K1, k2tog, knit to last 3 sts, ssk, k1 – 2 sts dec’d. Purl a WS row. Rep these 2 rows, 1 more time – 46 (52, 56, 60) sts rem. Cont in St st for 18 (20, 22, 24) more rows.
Separate Fronts, Shape Neck
Next row (RS): K14 (16, 18, 19), turn. Place rem sts on holder.
Right Back
Next row (WS): Purl.
Dec row (RS): Knit to last 3 sts, ssk, k1 – 1 st dec’d. Purl a WS row. Rep these last 2 rows, 3 more times – 10 (12, 14, 16) sts rem for Left Front. Work even in St st for 4 more rows, or until the same number of rows have been worked as for Front. Bind off all sts.
Left Back
Return held sts to ndl.
Next row (RS): Bind off center 18 (20, 20, 22)
Neck sts, knit to end. Purl a WS row.
Dec row (RS): K1, k2tog, knit to end – 1 st dec’d. Purl a WS row. Rep these last 2 rows, 3 more times – 10 (12, 14, 16) sts rem for Left Front. Work even in St st for 4 more rows, or until the same number of rows have been worked as for Front. Bind off all sts.
Sew Back and Front Bodice together at shoulders.
Armhole Edging
With D and RS facing, pick up and knit sts around Armhole edge at a rate of 1 st for every st along bind-off, and 3 sts for every 4 rows around Armhole, turn. Bind off all sts over the next WS row, kwise.
Sew Side Seams.
SKIRT
With D and RS facing, beginning at right side seam of Bodice, pick up and knit 56 (62, 66, 70) sts along Front Bodice, pm, pick up and knit 56 (62, 66, 70) sts along Back Bodice – 112 (124, 132, 140) sts. PM and join to work in the rnd.
Gathers Inc rnd: {K8 (9, 10, 11), [kfb] 4 times} 4 times, knit to m, knit to end – 16 sts inc’d on Front of Skirt.
Work 6 rnds even in St st.
A-Line Inc rnd: * K1, m1, knit to 1 st before m, m1, k1; rep from * 1 more time – 4 sts inc’d. Work 7 rnds even in St st. Rep the last 8 rnds, 3 (4, 4, 5) more times. Work even in St st until Skirt meas 4½ (4¾, 5, 5¼)” from pick up edge.
Hem
Purl 1 rnd. Knit 1 rnd. Rep these 2 rows, 3 more times. Bind off all sts, pwise.
FINISHING
Collar
With D and straight ndls, cast on 124 (128, 128, 132) sts. Knit 2 rows.
Shape Collar
Working in garter st, bind off 1 st at beg of next 2 rows, bind off 2 sts at beg of next 6 rows, bind off 3 sts at beg of next 2 rows,
bind off 4 sts at beg of next 2 rows. Bind off rem sts.
Sew the bind-off edge of Collar to Neck edge, with wrong sides together, so that when Collar is folded over the seam will not show.
Weave in ends and lightly steam block armhole edgings and collar.
Sew buttons to front of Bodice as pictured. The buttons are purely decorative.
With D, work a French knot for an eye on each Birdie. Using a half strand of D, use an embroidery chain stitch to embroider little
legs on each Birdie.

Read Next75+ Free Baby Knitting Patterns