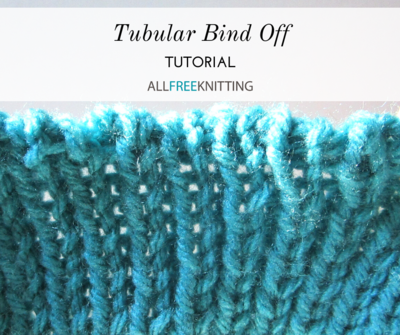
Tubular Bind Off Tutorial
If you need a stretchy K1P1 bind off, look no further than the tubular method, designed specifically for finishing off ribbing.

Sometimes it seems like, no matter how loosely you bind off, you'll still end up with an unbearably stiff edging to your knitting. That's what the tubular bind off method is for. This elastic bind off method uses a tapestry needle and stitch rearranging to create an exceptionally stretchy finish to anything you work up. Especially helpful for top-down sweaters and hats, this bind off method will help you to produce a garment that's easier to slip on and off. While the instructions seem involved, once the set-up rows are complete, the remaining instructions are the same for the kitchener stitch, so those familiar with this seaming method should understand easily.
Step 1
Knit one more row or round. In this row, you will knit the knit stitches as usual, but you will slip the purl stitches with your yarn in front.

Step 2
If you are working flat, repeat step 1. If you are working in the round, work across the round thusly: purl the purl stitches and slip the knit stitches with the yarn in back.

Step 3
If you are working flat, repeat step 1 one more time. If you are knitting in the round, repeat rounds 1 and 2 once more.

Step 4
Hold two empty DPNs (or circular needles to accommodate the number of stitches if you're working in the round) and transfer your stitches, one at a time, to the empty needles. Slip the knit stitches purlwise to the front needle and the purl stitches (also purlwise) to the back needle.

Step 5
Cut the yarn to about three times as long as the fabric you need to bind off, and thread it through a tapestry needle.

Step 6
Insert the needle on the first stitch of the front needle as if to purl and pull the yarn through.

Step 7
Insert the needle on the first stitch of the back needle as if to knit and pull the yarn through.

Step 8
Insert the needle on the first stitch of the front needle as if to knit and pull the yarn through. Slip this stitch off your needle.

Step 9
Insert the needle on the next stitch of the front needle as if to purl and pull the yarn through. Leave this stitch on the needle.

Step 10
Insert the needle on the first stitch of the back needle as if to purl and pull the yarn through. Slip this stitch off your needle.

Step 11
Insert the needle on the next stitch of the back needle as if to knit and pull the yarn through. Leave this stitch on the needle.

Step 12
Repeat steps 8 to 12 until two stitches remain, one on each needle.
Step 13
Insert the needle on the last stitch of the front needle as if to knit and pull the yarn through. Slip this stitch off your needle.

Step 14
Insert the needle on the last stitch of the back needle as if to purl and pull the yarn through. Slip this stitch off your needle.

Complete!
The tubular bind off is now complete. Weave in ends as usual.


Up Next:
How to Knit the Provisional Cast On
For which kinds of projects do you prefer to use a stretchy bind-off?
Read NextWhat Is Knitting Gauge?