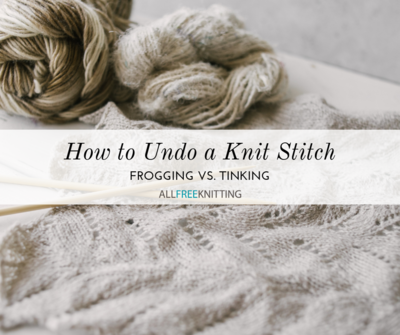
How to Undo a Knit Stitch: Frogging vs. Tinking
Spotted a mistake? Never fear. Learn how to frog and tink, and you'll be back to your knitting flow in no time!

If you're new to the world of knitting, some of the lingo and knitting slang can seem a little odd. Frogging and tinking are two words that often stump beginners, but they truly are lifesavers when you realize you've made a mistake in your knitting.
Tinking is just knitting backward. Literally -- the word "tink" is "knit" backward. This method involves undoing your stitches one at a time.
Frogging, on the other hand, is the more dramatic method of undoing your mistakes. This method involves ripping your stitches out by hand. This term probably comes from the fact that "rip it," sounds a little like "ribbit."
So what do you do if you notice a stitch that you didn't knit properly?
Don't Worry! It Happens to Everyone
Unless you're a knitting prodigy, you're probably going to make a few mistakes on your first few projects. Even experienced knitters make mistakes sometimes. But don't dispair! There are ways to fix everything.
In knitting, there are basically two ways to go about fixing stitches that you've messed up -- frogging and tinking. Both of these methods have different uses, depending on how far back in your project the mistake is.
If tinking and frogging aren't enough to fix your mistake, be sure to check out our complete guide to fixing knitting mistakes by clicking the image below.

Which One Do I Need to Do?
Because tinking takes a little bit more time to do than frogging does, it's best to save tinking for those mistakes that happen within your current row of stitches. Unknitting each stitch individually is monotonous, and if you're trying to tink multiple rows, you'll end up wasting a lot of time on something that can be accomplished in a few seconds with frogging.
Frogging is best for those moments where you look back at your progress and notice an error a few rows back. (It's happened to all of us.) This method involves ripping out entire rows of stitches all at once.
Frogging is a lot faster than tinking, but the downside is that it's easy to rip too far down, thus creating more work for yourself in the future, when you're reknitting the stitches you pulled out. The solution to this is to use lifelines while knitting. Lifelines are basically pieces of string or thread that are placed through a row of stitches as a sort of place marker. In the event that you do have to go back and frog your knitting, the lifeline will stop the stitches from coming undone beyond that point in the project. This video on lifelines is a great introduction to how to use and insert lifelines even after you've noticed your mistake.

How to Tink Knitting
Tinking is the best option for undoing your knitting if the mistake is a few stitches back or even in the previous row. It's a little tedious, and it can take some practice to get just right, but it's a great way to fix those tiny mistakes without ripping out rows and rows of your project.
Step-by-Step
- Insert the left knitting needle into the bump of the last completed stitch behind the right needle.
- Slide that stitch onto the left needle.
- Lightly pull on the working yarn to undo the stitch.
- Repeat steps 1-3 until you reach the mistake, and then continue reknitting.

How to Frog Knitting
Did you just now notice that one goof a few rows back? Or worse -- you've been reading the pattern wrong for the last few rows? If you've ever been in that scenario, frogging is your friend. You can even frog your entire project and start over if you have to.
We recommend checking your knitting every few rows and inserting a lifeline when you are sure you haven't made any mistakes. As mentioned earlier, this piece of yarn will prevent your frogging from going too far and undoing parts of your project that don't have issues.
With frogging, you do have to remove your knitting needles from your work. This feels really strange when you do it for the first time, but rest assured that your project will be just fine. You can insert your needles again through the stitches, and you will be able to continue knitting from where you left off.
Step-by-Step
- Place your work on a flat surface and remove the needles.
- Grab the working yarn and gently tug to begin undoing the stitches.
- Once the stitches start coming undone, you should be able to quickly rip out the stitches.
- Stop just after the stitch or stitches with the errors.