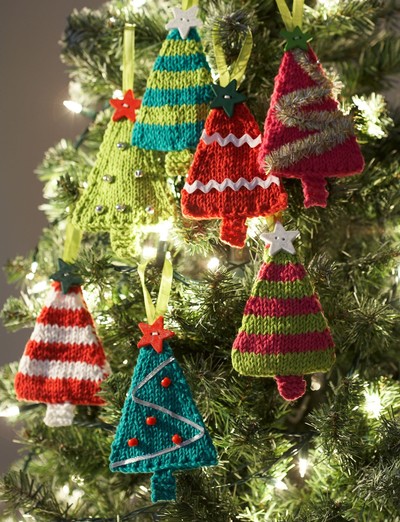
Christmas Tree Knit Scrubby
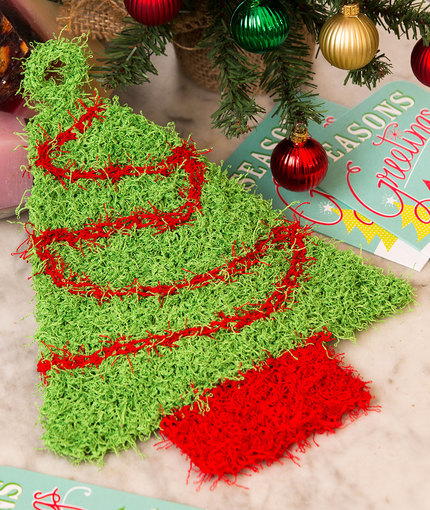
There's no better way to thank the gracious hostess of the Christmas party than with a knit dishcloth. Up your game by making her a Christmas Tree Knit Scrubby. This is just the thing she'll be whipping out like clockwork every winter. The festive coloring will go with any Christmas decor, and the red garland wrapping around the knit washcloth is the cutest little touch that shows you really put your heart into the gift. Of course, you could just knit a few for yourself. Who could blame you? It's adorable!

Knitting Needle Size6 or 4 mm
Yarn Weight(4) Medium Weight/Worsted Weight and Aran (16-20 stitches to 4 inches)
Gauge1 stitches, 2 rows, 3 inches. stockinette stitch
Materials:
- RED HEART® Scrubby™
- 620 Lime (A) - 1 ball
- 905 Cherry (B) - 1 ball
- Susan Bates® Knitting Needles: 4mm [US 6]
- Susan Bates® Crochet Hook: 6mm [US J-10] (for garland, optional)
- Yarn needle
Measurements: Scrubby measures about 8" [20.5 cm] wide at widest and 9 1/2" [24 cm] long, not including hanging loop.
Abbreviations:
A and B = Color A and Color B
k = knit
k2tog = knit next 2 stitches together
k3tog = knit next 3 stitches together
st(s) = stitch(es)
[ ] = work directions in brackets the number of times specified.
Gauge: Gauge is not critical for this project.
Notes
- Tree is worked from the lower edge upwards.
- Optional garland is worked onto finished tree, using crochet hook and surface slip stitch.
Special Technique
surface slip st = Hold yarn on back side of piece, insert hook from front to back through fabric and draw up a loop (1 loop on hook), *a short distance from previous insertion point, insert hook from front to back and draw ¬¬¬ loop through fabric and through loop on hook; repeat from * as desired.
Instructions
Stand
With B, cast on 16 sts.
Work in Garter stitch (knit every row) until piece measures about 2" [5 cm] from beginning.
Leave stitches on left needle and cut B, leaving a tail about 4" [10 cm] long to weave in later.
Tree
Attach A to first st on left needle.
Row 1: Cast on 10 sts to the left needle, knit across the 10 new sts, knit across the 16 stand sts - 26 sts.
Row 2: Cast on 10 sts to the left needle, knit across the 10 new sts, knit across the remaining 26 sts - 36 sts.
Rows 3 - 5: Work in Garter stitch for 3 rows.
Row 6 (decrease row): K2tog, knit to last 2 sts, k2tog - 34 sts.
Rows 7 - 10: Repeat Rows 3-6 once - 32 sts.
Rows 11 - 15: Work in Garter stitch for 5 rows.
Row 16: Repeat Row 6 - 30 sts.
Rows 7 - 22: Repeat Rows 11-16 - 28 sts.
Rows 23 - 25: Work in Garter stitch for 3 rows.
Row 26: Repeat Row 6 - 26 sts.
Rows 27 - 42: Repeat Rows 23 - 26 four times - 18 sts.
Row 43: Knit.
Row 44: Repeat Row 6 - 16 sts.
Rows 45 - 50: repeat Rows 43 and 44 three times - 10 sts.
Row 51: [K2tog] 5 times - 5 sts.
Row 52: K2tog, k1, k2tog - 3 sts.
Row 53: K3tog - 1 st.
Do not fasten off.
Hanging Loop
Row 1: Cast on 15 sts for hanging loop, knit the 15 new sts, knit the last st - 16 sts.
Bind off, leaving a long tail for sewing.
Sew end of hanging loop to top of tree.
GARLAND (optional)
With crochet hook, join B to side of tree near tip. Referring to photograph for placement, work surface slip st zigzag lines back and forth across tree. Keep stitches slightly loose so they stay on the surface.
FINISHING
Weave in ends.
Up Next:
Read NextSuper Sweet Santa Baby Sweater