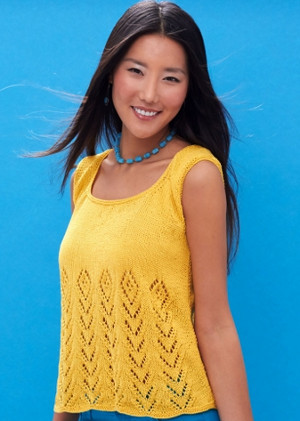
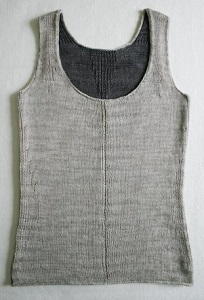
Amphoras Lace Tank
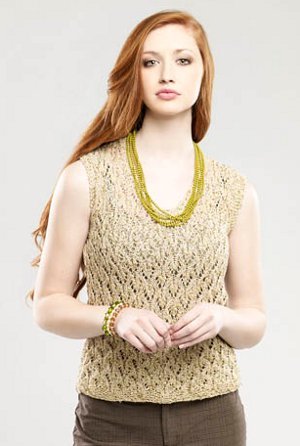
This gorgeous knitted tank top pattern is a lacy beauty you'll love pulling out again and again. The Amphoras Lace Tank is a show-stopping piece with a flattering fit and scoop neckline. Layer it over a fitted camisole for a modest or pair it with a beaded necklace for an elegant and artsy look. The Amphoras Lace Tank is a knit top pattern you'll love being able to say you made.

Knitting Needle Size4 or 3.5 mm
Yarn Weight(1) Super Fine (27-32 stitches to 4 inches)
Materials:
- Rozetti Yarns Cotton Gold (65% cotton, 27% payette, 8% metallic; 25 g/200 yds)
- Color 1091 – 8 (10, 10, 12, 12) balls
- Needles: US Size 4 (3.5 mm) straight or size needed to obtain gauge
- Notions: Stitch markers, removable marker or safety pin, tapestry needle, stitch holders
GAUGE
24 sts x 30 rows = 4” in Amphoras Lace patt using yarn held double
Save time, check your gauge.
SIZES
Small (Medium, Large, 1X, 2X)
Shown in Small size.
FINISHED MEASUREMENTS
Bust: 32 (36, 40, 44, 48)”
Length From Underarm: 14 (14, 14½, 14½, 15)”
Note: This tank is very stretchy and is intended to fit with up to 4” of negative ease.
PATTERN NOTES
Yarn is held double throughout tank.
This tank has an a-line shape. Decreases are worked at the sides of front and back. When decreasing in pattern, be sure only to work a decrease/increase in the lace pattern if there are enough stitches to work a corresponding increase/decrease. If there are not enough stitches for a full pattern repeat, you may wish to keep these in stockinette stitch.
STITCH GUIDE
Amphoras Lace
(multiple of 12 sts + 1)
Row 1 (RS): P1, * ssk, k3, yo, k1, yo, k3, k2tog, p1; rep from * to end.
WS Rows 2-12: K1, * purl to 1 st bef marker, k1; rep from * to end.
Row 3: P1, * ssk, k2, yo, k3, yo, k2, k2tog, p1; rep from * to end.
Row 5: P1, * ssk, k1, yo, k5, yo, k1, k2tog, p1; rep from * to end.
Row 7: P1, * yo, k3, k2tog, k1, ssk, k3, yo, p1; rep from * to end.
Row 9: P1, * k1, yo, k2, k2tog, k1, ssk, k2, yo, k1, p1; rep from * to end.
Row 11: P1, * k2, yo, k1, k2tog, k1, ssk, k1, yo, k2, p1; rep from * to end.
Rep Rows 1-12 for patt.
BACK
With yarn held double, cast on 111 (123, 135, 147, 159) sts. Knit 8 rows.
Establish Pattern
Row 1: K7, p1, pm * work Row 1 of Amphoras Lace patt over 12 sts, pm; rep from * to last 7 sts, end k7.
Row 2: P7, * k1, work Row 2 of Amphoras Lace patt over 12 sts; rep from * to last 7 sts, end p7.
Rows 3-12: Work in patt as established, keeping 7 sts each edge in St st.
Shape Sides
Row 1 (dec) (RS): K1, k2tog, knit to m, work in patt as established to last 3 sts, ssk, k1 – 2 sts dec’d.
Rows 2-12: Work in patt as established.
Rep Rows 1-12, 5 more times – 6 sts dec’d each edge, 97 (109, 121, 133, 145) sts rem.
Next row (RS): K1, work in patt to last st, k1.
Next row (WS): P1, work in patt to last st, p1.
Cont in patt as established, keeping 1 st each edge in St st until Back meas 14 (14, 14½, 14½, 15)” from cast-on edge, ending with WS row.
Shape Armholes
Bind off 6 (7, 8, 9, 10) sts at beg of next 2 rows – 85 (95, 105, 115, 125) sts rem.
Dec row (RS): K1, k2tog, work in patt to last 3 sts, ssk, k1 – 2 sts dec’d.
Note: See pattern notes for tips on decreasing in pattern.
Rep Dec row every RS row, 2 (4, 6, 8, 10) more times – 79 (85, 91, 97, 103) sts rem. Cont in patt until Armholes meas 7½ (8, 8½, 9, 9¼)”, ending with WS row. Place 19 (21, 23, 25, 27) sts each side on stitch holders for shoulders. Place center 41 (43, 45, 47, 49) on stitch holder for neck.
FRONT
Work as for Back to Shape Armholes section.
Shape Armholes
Work as for Back until Armholes meas 1” from bind-off row.
Separate Fronts, Shape Neck
Note: continue to work Armhole decreases as for Back.
Place removable marker or safety pin on center stitch.
Row 1 (RS): Work in patt to 3 sts before center st, ssk, k1, turn – 1 Neck st dec’d. Place rem sts for Left Front on stitch holder.
Row 2 (WS): Work in patt to end.
Dec row (RS): Work in patt to last 3 sts, ssk, k1 – 1 Neck st dec’d.
Rep Neck Dec row every RS row (while continuing to dec Armholes as for Back), 18 (19, 20, 21, 23) more times. After all Neck and Armhole decs are complete, 19 (21, 23, 25, 27) sts rem for shoulders. Work even in patt until Armholes meas 7½ (8, 8½, 9, 9¼)”, ending with WS row.
Place sts on holder.
Right Front
Return held sts to ndl. Keep center st on safety pin.
Row 1 (RS): K1, k2tog, work in patt to end – 1
Neck st dec’d.
Row 2 (WS): Work in patt to end. Rep Neck Dec row every RS row (while continuing to dec Armholes as for Back), 19 (20, 21, 22, 24) more times. Complete as for Left Front.
FINISHING
Join Right Shoulder with 3-ndl bind off.
Neck Edging
With RS facing, beginning at top of Left Front Neck, with yarn held double, pick up and knit 54 (58, 62, 64, 66) sts down Left Neck, knit the center st, pick up and knit 54 (58, 62, 64, 66) sts up Right Neck, knit across 41 (43, 45, 47, 49) held Back Neck sts – 150 (160, 170, 176, 182) sts. Knit a WS row.
Dec row (RS): Knit to 2 st before center st, ssk, k1, k2tog, knit to end – 2 sts dec’d.
Next row (WS): Knit.
Rep these 2 rows, 1 more time. Knit a RS row.
Bind off all sts over the next WS row, kwise.
Join Left Shoulder with 3-ndl bind off.
Armhole Edging
With RS facing and yarn held double, pick up and knit 98 (104, 110, 116, 120) sts evenly around Armhole. Knit 6 rows. Bind off all sts over the next WS row.
Sew side seams. Weave in ends and block lightly.

Your Recently Viewed Projects
Thanks for your comment. Don't forget to share!
rosariovanabbe 587 7939
Jun 10, 2020
plz help....yo, k1, yo, k3, on Row 1 does this mean I K1 with the yo and then k3 with the yo for all 3 stitches ? thank you so much
Lisa
Jun 16, 2020
No, this is a 6 stitch repeat, so you will yo, knit 1, yo, knit 3, so out of 4 stitches on the needle, you are increasing to 6 stitches, you only yo before and after the knit 1, otherwise your stitch count will be way off because you would be adding so many additional stitches.
gallanna38 8720394
Jul 12, 2018
What does ssk mean?
Kristina K
Jul 16, 2018
Hi gallanna38, ssk means "slip, slip, knit." This means you slip the next two stitches onto your righthand needle knitwise, and then you insert your lefthand needle through the stitches, in front of your righthand needle, as if to knit, and you knit those two stitches together. We hope this helps! Happy knitting! -Editors of AllFreeKnitting
Gracie
May 13, 2017
Wow this is a gorgeous top. If I could knit it and have it look like the photo, I would be thrilled. Has anyone tried it? It might be a bit of a challenge for me, but, wow, what a beautiful result (if I can do it).
quanahs 5032097
May 06, 2016
I had to look up the pretty cotton yarn used for this tank. Its cotton, wrapped with a metallic strand and sequins. It should be just lovely when knit and the simple design of this tank should show the yarn to perfection. The cotton will give it a lot of body and make sure its comfortable to wear. This top would look lovely and romantic with a pencil skirt or slacks for a special date night.
Report Inappropriate Comment
Are you sure you would like to report this comment? It will be flagged for our moderators to take action.
Thank you for taking the time to improve the content on our site.