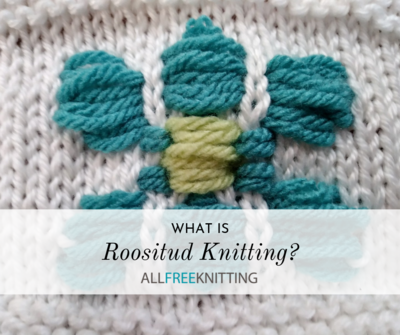
Roositud Knitting
Learn exactly what roositud is and check out our roositud inlay tutorial for a fun new way of knitting colorwork.

Sometimes you come across a knitting technique on the Internet where you have to stop and ask yourself: "Is this even real, or am I being punked?"
I wish I could say that I'm clever enough to fabricate something like this for my own amusement at the confusion of knitters everywhere, but I'm not. Since there can never be enough colorwork techniques in the world, roositud knitting exists as the knitterly answer to the exceedingly more popular craft of embroidery. While embroidering knitted fabric can feel like a bit of a chore, roositud is a much more organic way of incorporating a similar (if not identical) look into your knitted works. Learning how to roositud knit is easier than it looks!
What is Roositud Knitting?
Roositud knitting (pronounced royce-tood) is a colorwork technique that involves no real knitting with the contrast color. Instead, all you're doing is essentially wrapping your secondary color(s) around your work horizontally row-by-row to create some sort of design. More or less, roositud knitting is embroidering your work as you knit it up. According to Interweave, this technique is Estonian inlay technique that is typically done in small sections of projects, rather than carried throughout the work, like with stranded knitting.
When Do You Use Roositud Knitting?
Some patterns call directly for roositud knitting, but since it's not an exceedingly popular technique, you'll find that roositud fans typically enhance plainer patterns with this sort of pseudo-embroidery. If you find a chart of, say, a flower or a snowflake that you enjoy, you could place that chart in a roositud fashion wherever you please on a plain stockinette hat or sweater. This technique can also be used in place of intarsia in some cases.
Roositud Knitting on the Right Side
Note: I chose to hold the yarn double in this example because it creates a more robust, textural appearance. This is by no means necessary, but it creates a very aesthetically pleasing finished product.
Below is the simple colorwork chart I chose to follow for this tutorial.

Step 1
On the right side, knit using the main color, to the point in the chart where the contrasting color first appears. In this chart, it's the thirteenth stitch.

Step 2
Take the ball end of your contrasting color, leaving the tail hanging off of the wrong side, and bring it between your needles and to the front of your work.

Step 3
Knit using the main color (not the contrasting color) for the number of stitches in this section of the chart that the contrasting color shows up. In this case, we only have one stitch of the contrasting color, so we'll knit one stitch.

Note: Behind your project, bring the main color beneath the contrasting color before knitting it to help "tack down" the contrasting color on the wrong side of your work. Try to always secure the contrasting color in this way each time you finish wrapping it around.
Step 4
Pull the contrasting yarn back to the wrong side of the work, careful not to pull so tightly that you'll pucker the swatch, and continue knitting with the main color per the chart until (or if) you come upon the contrasting color again, where you'll repeat steps 2-4. You'll notice that the yarn has come across the stitches that the chart called for.

Note: I recommend after each row to tug at your contrasting yarn a bit to make sure that the colorwork is as taut as you would like. This becomes especially crucial after rows in which you find yourself switching colors more than once.
This is the finished roositud section on the right side

Roositud Knitting on the Wrong Side
If you're knitting in the round, you'll never have to worry about roositud knitting on the wrong side of your work, but when you're knitting flat and working from a chart, you may have some trouble when you flip your work to knit on the other side.
Step 1
Remember to read your chart from left to right in this case, and knit (or, more likely, purl) to the point in your chart where the contrasting color pops up. In this case, it's only six stitches from the edge.

Step 2
Rather than bringing your yarn to the front of your work, you will take the contrasting color and pull it to the back (or the right side) of your work this time.

Step 3
Knit using the main color for the number of stitches in this section of the chart that the contrasting color shows up. In this case, we'll knit three stitches.
Step 4
Bring the contrasting yarn back towards you, or to the wrong side of the work, once again making sure not to pull too tightly, and continue knitting with the main color per the chart until you reach the contrasting color again (where you'll repeat steps 2-4) or until the row is complete.

Here is the completed wrong side row, from the right side.

Below, you can see the completed swatch.

Roositud Knitting in the Round
If you're knitting in the round, this means you are only ever roositud knitting on the right side. Since your contrasting color yarn will be on the opposite end of your work when you approach the beginning of the round again, this creates a problem for people who prefer to have a very neat "wrong side" of their fabric. Instead, when you reach the first section of your roositud inlay on the second round, pull a length of your contrasting yarn in a large loop from where it ended in your previous row, and bring that loop to the front between your needles. Bring it to the back when you are done knitting the inlay section.
What you are doing here is essentially using the length of yarn you pulled to knit the inlay on this round. Courtney Kelley and Kate Gagnon Osborn demonstrate this technique wonderfully at the 5:27 mark in this video.
Up Next:
17 Fair Isle Patterns
Where would you utilize roositud knitting?
Read Next6 Stretchy Cast On Methods