Vintage Christmas Stocking Knitting Pattern
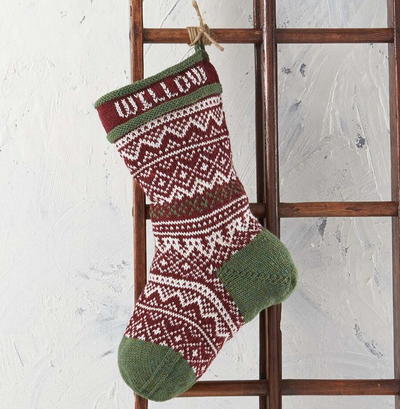
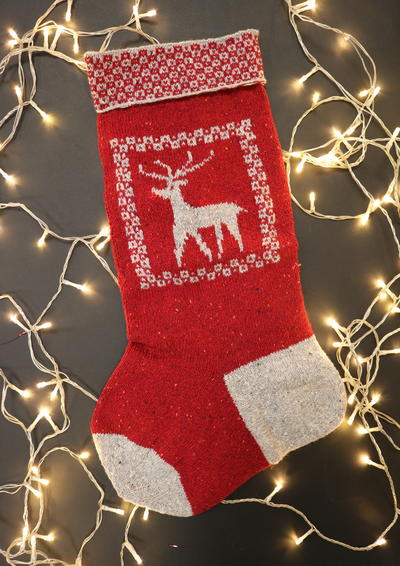
This vintage beauty is a '50s favorite knit stocking pattern that'll fill your house with Christmas cheer.

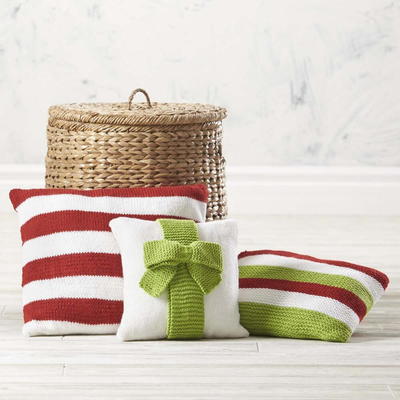
They just don't make knit stocking patterns like they used to! The Vintage Christmas Stocking Knitting Pattern hearkens back to our roots. From the classic red, white, and green design to the impressively intricate fair isle colorwork, it's no wonder this pattern became an instant classic. The fun doesn't end there; you can personalize these stockings with the individual names of the members of your family to make it into an extra-special keepsake that will stand the test of time. This stocking pattern would be better suited for intermediate knitters due to the inclusion of short rows and stranded colorwork.

Knitting Needle Size7 or 4.5 mm, 8 or 5 mm, Circular Knitting Needles, Double-Pointed Knitting Needles (DPNs)
Yarn Weight(4) Medium Weight/Worsted Weight and Aran (16-20 stitches to 4 inches)
Gauge20 sts x 24 rows = 4" (10.2cm) in stranded colorwork with size 8 needle.
20 sts x 28 rows = 4" (10.2cm) in St st with size 7 needle.
Save time, check your gauge.
Finished SizeCircumference: 18" (46cm)
Materials List
-
Willow Yarns™ Daily Worsted (100% superwash wool; 100g/218yd)
- 732247-0067 Sugar Maple Heather (1 ball): A
- 732247-0028 Ice (1 ball): B
- 732247-0070 Leafy Heather (1 ball): C
- US size 8 (5mm) 16" circular needle or size needed to obtain gauge
- US size 7 (4.5mm) 16" circular needle or size needed to obtain gauge
- US size 7 (4.5mm) dpn or size needed to obtain gauge
- Stitch markers
- Yarn needle
Instructions
Stitch Guide
-
w&t (wrap and turn):
Wyib, sl next st p-wise, bring yarn to front, sl st back to left-hand needle p-wise, bring yarn to back, turn work. -
kitchener st:
Work with half the sts on a front needle, and half the sts on a back needle.
Step 1: Insert yarn needle through first st on front needle as if to p, leave st on needle, pull yarn through.
Step 2: Insert yarn needle through first st on back needle as if to k, leave st on needle, pull yarn through.
Step 3: Insert yarn needle through first st on front needle as if to k and sl st off needle.
Step 4: Insert yarn needle through next st on front needle as if to p, leave st on needle, pull yarn through.
Step 5: Insert yarn needle through first st on back needle as if to p and sl st off needle.
Step 6: Insert yarn needle through next st on back needle as if to k, leave st on needle, pull yarn through.
Rep Steps 3-6 until 1 st rem on each needle.
Step 7: Insert yarn needle through first st on front needle as if to k and sl st off needle.
Step 8: Insert yarn needle through first st on back needle as if to p and sl st off needle.
Using the tip of the needle, work across the row of grafted sts, evening out tension and moving any extra yarn toward the tail. -
i-cord:
*Slide sts to opposite end of dpn. Bring the yarn across the WS to the beg of the row.
K across dpn, place needle in left hand; rep from * until i-cord is desired length.
Stocking
-
Cuff
With C and size 7 circular needle, CO 88 sts.
Pm and join to work in the rnd, being careful not to twist work.
P 6 rnds.
Cut C and join A.
K 11 rnds.
Drop A, join C.
K 1 rnd.
P 4 rnds.
Cut C. -
Leg
Change to size 8 circular needle.
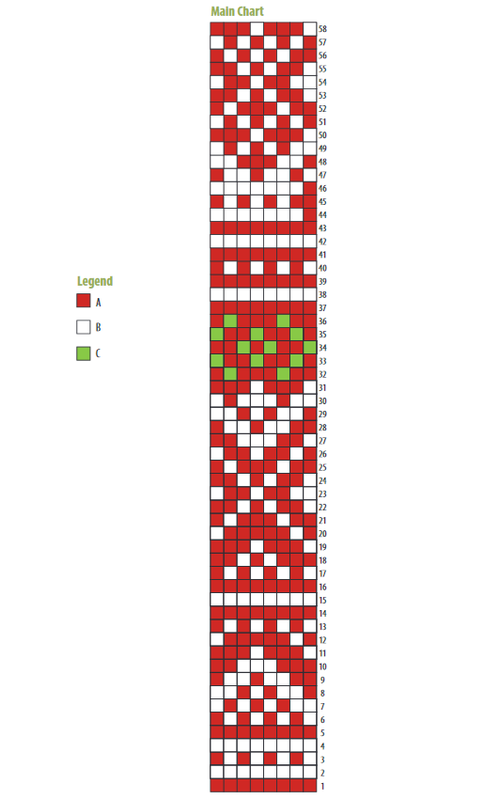
Beg working from Main Chart.
Rep Rnds 1-58 until leg measures 10" (25cm)
from end of cuff. -
Heel Part 1
Cut A and B and transfer sts to size 7 circular needle.
Join C. Heel is worked entirely in C.
Row 1 (RS): K22, w&t.
Row 2 (WS): P44, w&t.
Row 3: K43, w&t.
Row 4: P42, w&t.
Row 5: K41, w&t.
Row 6: P40, w&t.
Cont in this fashion, working 1 additional st each row, until you reach P16, w&t. -
Heel Part 2
Note: When you k or p a st that has been wrapped, lift the wraps up onto the needle and k or p them tog with the st to hide them.
Row 1: K17, w&t.
Row 2: P18, w&t.
Row 3: K19, w&t.
Row 4: P20, w&t.
Cont in this fashion, working 1 additional st each row, until you reach P44, w&t.
Next Row (RS): K22. -
Foot
Cut C; join A and B and transfer sts to size 8 circular needle. On Rnd 1, hide any rem wraps as you come to them.
Cont working from Main Chart, starting from your stopping point on the leg, until the foot measures 5" (12.7cm) from the end of the heel. -
Toe
Note: Change to dpn when sts no longer fit around circular needle.
Cut A and B.
Change to size 7 circular needle, remove m, sl 22 sts to right needle, pm; join C.
Rnd 1: K44, pm, k44.
Dec Rnd: *K1, ssk, k to 3 sts before next m,k2tog, k1; rep from * once more—4 sts dec’d.
Rep Dec Rnd every other rnd 9 more times.
Rep Dec Rnd every rnd 6 more times— 24 sts rem.
Cut C, leaving a long tail -
Finishing
Graft toe closed with kitchener st. -
Hanging Lp
With C and dpn, CO 4 sts. Work in i-cord for 6" (15.2cm). Fasten off. Sew ends of i-cord to inside of cuff at center back.
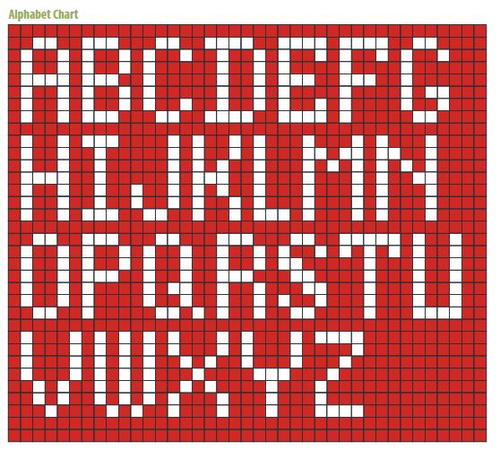
With B and following Alphabet Chart, add name of stocking recipient to 1 side of cuff with duplicate st.
Weave in ends.
Block.
Abbreviations
- k
- knit
- k2tog
- knit 2 stitches together
- lp
- loop
- pm
- place marker
- p-wise
- purlwise
- ssk
- slip, slip, knit these 2 stitches together - 1 stitch decreased
- St st
- Stockinette stitch
- wyib
- with yarn in back
- sl
- slip
- dpn
- double pointed needles
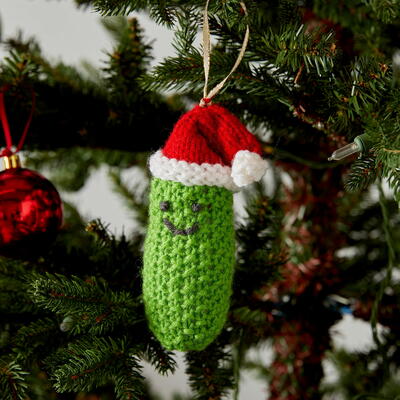
Read NextKnitted Pickle Ornament