How to Dye Yarn with Easter Egg Kits
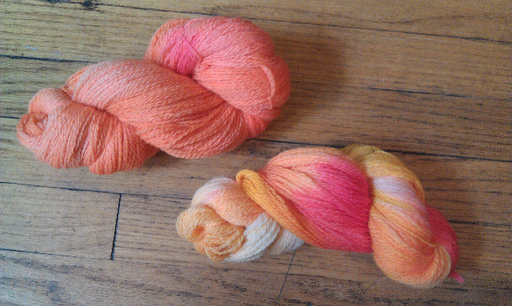
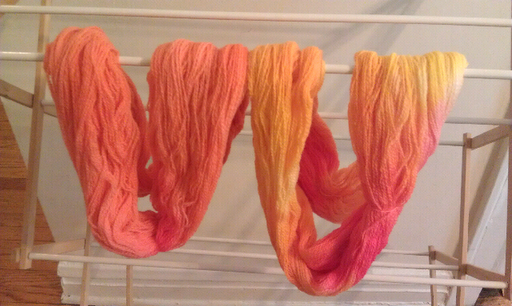
There are many ways you can dye yarn at home. Food coloring is a popular option because, as a food item, it is non-toxic to work with. There are many sources of food coloring that you can use to dye yarn, these include paste food coloring, liquid food colorings and even sugar-free drink packets. Today I am going to share with you another source of non-toxic dye, Easter Egg Dyeing Kits. Many of these kits come with concentrated food coloring packaged with citric acid, two of the components you need to dye yarn. In the accompanying video at the bottom of this I show the difference between adding vinegar in the middle of the dyeing process (which created a more monotone yarn) and adding vinegar at the beginning of the process (resulting in a space dyed yarn.)
Materials:
- Fiber - This method will work for animal fibers (such as wool and silk) and some blends. Acrylic and cotton cannot be dyed with this method. 100g of 100% wool is used in this tutorial.
- A container - A pot with a lid large enough to hold your fiber covered with water.
- Heat - In this video, I used the stove top as a source for heat, but you can also choose to use the microwave (make sure to use a microwave safe container!)
- Dye - Tablets from an Easter egg dyeing kit. The Easter Egg dye tablets used in this tutorial came from a R.J. Rabbit Presents Easter Unlimit It’s Time to Color Eggs Easter Egg Coloring Kit.
- Acid - My Easter Egg dyeing tablets come with citric acid in the dye. You may need to supplement this with additional citric acid or white vinegar.
- Water
- Rubber Gloves (Optional) - Rubber gloves will help you keep from dyeing your hands along with your yarn!
Instructions:
- Presoak your yarn in water for 30 minutes.
- Put your yarn in a pot on the stove, and add water so the yarn is just covered. (For more solid colors colors wait to add vinegar until step 5. If you want a more variegated yarn, add 1 Tablespoon of vinegar now.)
- Place the lid on the pot and heat the pot until the water begins to boil.
- Add the desired number of tablets to the pot, and reduce the heat to a low simmer. For a more uniform yarn color, dissolve the tablets in water and add to the pot in step 2.

- Let the yarn simmer until all color is in the yarn and the dyebath is clear - around 10 minutes. Different colors take different amounts of time, reds will exhaust faster than blues. If the dye does not appear to be sticking to the yarn, add some white vinegar, 1 Tablespoon at a time.
- Turn off the heat, and let the yarn cool. Do not agitate the yarn while the water is hot or you risk felting your fiber!
- Once the yarn is cool, remove from the dyebath and rinse with lukewarm water and mild soap until the water runs clear.
- Hang up your skein of yarn to dry.
I hope you enjoyed learning about another way you can dye yarn in your kitchen. Take advantage of the post-Easter clearance sales and pick up some egg coloring kits to give it a try!
Your Recently Viewed Projects

Thanks for your comment. Don't forget to share!
chris4homes 339333 3
Jun 22, 2012
Very nice. I love those colors. People have asked this before but I haven't seen an answer as to why cotton and acrylic cannot be used. I can't wear wool so an alternative other than silk would be nice.
chris4homes 339333 3
Jun 22, 2012
I think the difference was because in the first batch she moved the yarn and dye around a bit, whereas in the second batch she didn't move the yarn, but left it alone and that allowed the dye to stay more separated.
Report Inappropriate Comment
Are you sure you would like to report this comment? It will be flagged for our moderators to take action.
Thank you for taking the time to improve the content on our site.