close

Search Term

Enter a search term (optional)

Categories

Select One (optional)

Printable

(optional)

Show only printer-friendly patterns


Difficulty Level

Select One (optional)

Yarn Weight

Select One (optional)

Knitting Needle Size

Select as many as you like (optional)

  • 1 or 2.25 mm
  • 2 or 2.75 mm
  • 3 or 3.25 mm
  • 4 or 3.5 mm
  • 5 or 3.75 mm
  • 6 or 4 mm
  • 7 or 4.5 mm
  • 8 or 5 mm
  • 9 or 5.5 mm
  • 10 or 6 mm
  • 10.5 or 6.5 mm
  • 11 or 8 mm
  • 13 or 9 mm
  • 15 or 10 mm
  • 17 or 12.75 mm
  • 19 or 15 mm
  • 35 or 19 mm
  • 50 or 25 mm
  • Circular Knitting Needles
  • Double-Pointed Knitting Needles (DPNs)
AllFreeKnitting.com

Menu

How to Make 1 Left (M1L)

Also sometimes called the M1F or make 1 forward, the M1L stitch is one of the most common increases in knitting.

How to Make 1 Left M1L

The make 1 left increase (M1L or sometimes just M1) is one of the easiest increases to do in knitting. It is probably the first increase you'll learn to do, and it's very common in projects like knitted sweaters and occasionally sock patterns.

This increase is a favorite of many knitters because it's a nearly invisible increase. Because this increase stitch uses a piece of yarn that's already in the fabric you've knitted in the previous row, the "bump" you get with many increases and decreases is not as pronounced.

The M1L is often paired with the M1R or make 1 right (also sometimes called a M1B or make 1 back). This is simply the right-leaning version of the M1L, although you'll probably come across the M1L more frequently in your knitting. Because of this, if you see "M1" in a pattern and it doesn't specify if the increases is left- or right-leaning, it's probably safe to assume you should make 1 left.

Easy

Materials List

  • Yarn
  • Knitting needles

Instructions

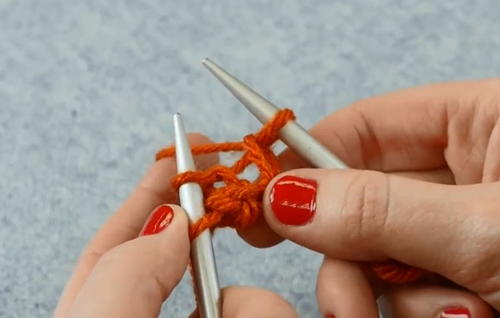
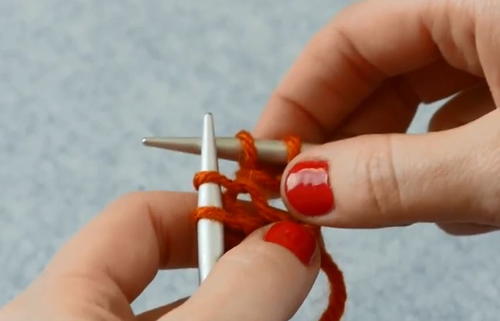
  1. Work your row until the point where your pattern calls for the M1L.

  2. Open your work slightly so you can see the piece of yarn that connects the two stitches. 

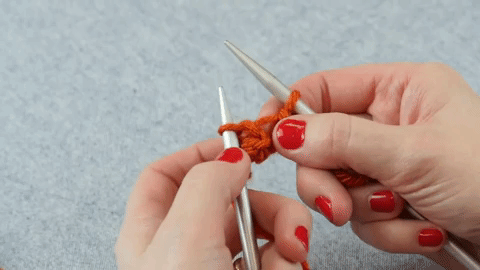
  3. Using your non-dominant needle, pick up this piece of yarn from front to back.

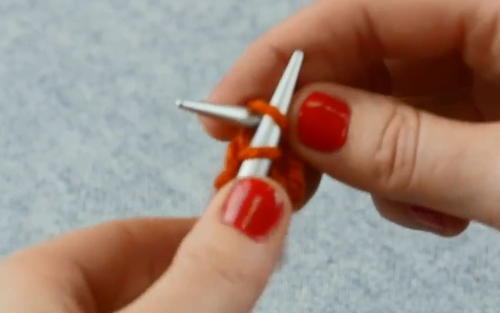
  4. Join this new loop to your row with a ktbl (knit through back loop).

    To work a ktbl:

    1. Insert your working needle into the stitch from the far side of the needle that's in your non-dominant hand.
       
    2. Bring the yarn over your working needle.
       
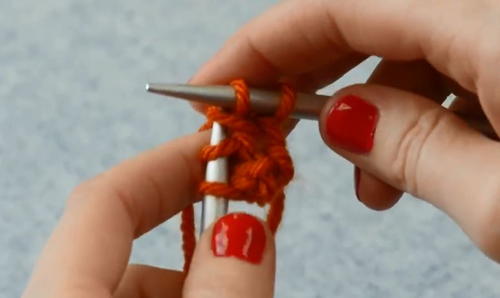
    3. Use your working needle to bring the loop of yarn up and over your non-dominant needle.
       
    4. Sweep the old stitch off your needle.

  5. Finish your row in pattern.

Free projects, giveaways, exclusive partner offers, and more straight to your inbox!

Your Recently Viewed Projects

I have not made this yet so I cannot rate it.

Include a Photo Include a Photo

Click the button above or drag and drop images onto the button. You can upload two images.

Cancel Reply to Comment

Thanks for your comment. Don't forget to share!

Close

Report Inappropriate Comment

Are you sure you would like to report this comment? It will be flagged for our moderators to take action.

Thank you for taking the time to improve the content on our site.

Project of the Day

Striping Sparkle Scrubby

The Striping Sparkle Scrubby is a wonderful free knit dishcloth pattern you will work up in no time. Two shades of blue combine to… Continue reading: "Striping Sparkle Scrubby"


Something worth saving?

Register now for FREE to:

  • SAVE all your favorite patterns
  • ADD personal notes
  • QUICKLY reference your patterns


Connect With Us

Facebook Twitter Pinterest Twitter
Email RSS

About Us Advertise Contact Us FAQ Keyword Index Do Not Sell My Personal Information Privacy Policy Share Your Project Subscribe Terms of Service Unsubscribe

---- 1 ----

close

Images from other crafters

There are currently no images from other crafters.

I Love It