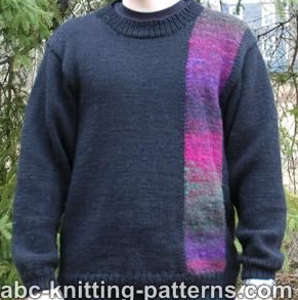
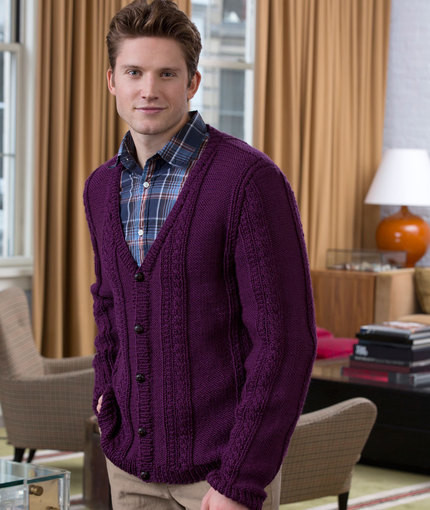
Cozy Colorblock Jacket
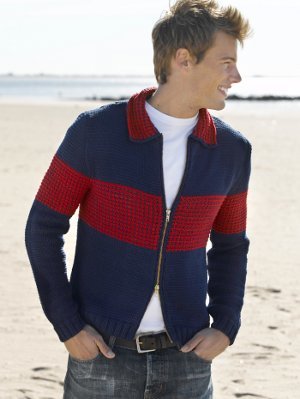
Stay warm, toasty and stylish with this classic knit jacket pattern for men. Created with a simple design, the Cozy Colorblock Jacket will suit a variety of different tastes. If you're already good on sweaters, consider knitting this project for a holiday gift for Dad, your uncle or your brother. Men of all ages will appreciate owning a timeless cardigan that help block out autumn's chilly winds. A special note: to complete this project, you'll need to master single crochet to make the edging.

Knitting Needle Size4 or 3.5 mm, 7 or 4.5 mm
Yarn Weight(3) Light/DK (21-24 stitches to 4 inches)
SIZES Small (Medium, Large)
MATERIALS
- 10 (11,12) skeins Tahki Yarns COTTON CLASSIC 100% mercerized cotton (1.75oz/50g;108yd/110m) in color #3856 deep indigo (A) 3 (3, 3) skeins in color #3488 dark red (B)
- One pair each size 4 and 6 (3.5 and 4mm) needles OR SIZE TO OBTAIN GAUGE
- One size F-5 (3.75mm) crochet hook for Edging
- Yarn needle
- Jacket separating zipper in navy, 22 (22, 24)” long
- Sewing needle and thread to match the zipper
- Pattern schematics
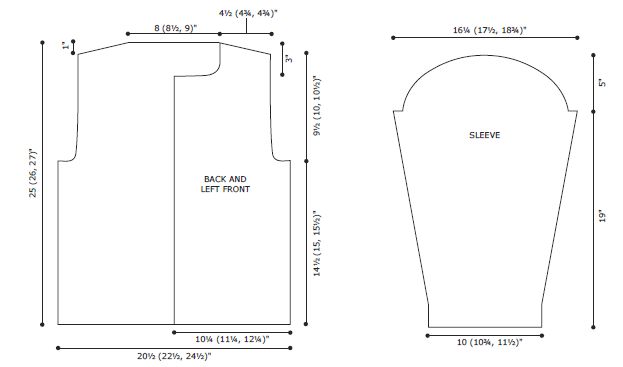
KNITTED MEASUREMENTS
Chest 41 (45, 49)”/104 (114, 124) cm
Length 25 (26, 27)”/64 (66, 69) cm
GAUGE
20 sts and 24 rows = 4”/10cm in St st using larger needles TAKE TIME TO CHECK GAUGE
ABBREVIATIONS
beg begin(ning)
cm centimeter
dec decrease(d)(s)(ing)
inc increase(d)(s)(ing)
k knit
mm millimeters
p purl
rem remain(s)(ing)
RS right side
sc single crochet
sl slip
st(s) stitch(es)
WS wrong side
SPECIAL TECHNIQUES
SINGLE CROCHET (sc): Working from right to left, insert hook into the next stitch, yarn over, draw yarn through this stitch (2 loops on hook), yarn over, draw yarn through 2 loops on hook. Repeat in each stitch around.
PATTERN STITCHES
K2, p2 rib (multiple of 4 sts + 2)
Stockinette stitch (St st) Knit on RS, purl on WS.
Crochet Chain (ch)
Slip Stitch Pattern (multiple of 2 sts)
Rows 1 (RS) and 2 Using B, knit.
Row 3 Using A, k1 (edge st), * slip 1, k1; repeat from * across to last st, k1 (edge st).
Row 4 Using A, k1 (edge st) * p1, slip 1; repeat from * across to last st, k1 (edge st).
Repeat Rows 1-4 for Slip st pattern.
BACK
Using smaller needles and A, cast on 102 (110, 122) sts.
(RS) Begin k2, p2 rib, end k2; work even until piece measures 2” from beg, increasing 0 (2, 0) sts evenly across last WS row – 102 (112, 122) sts.
(RS) Change to larger needles and St st; work even until piece measures 9 (9½, 10)” from beg, end with a WS row.
(RS) Change to Slip st pattern; work even until piece measures 14½ (15, 15½)” from beg, end with a WS row.
Shape Armholes
(RS) Bind off 0 (4, 4) sts at beg of next 2 rows, 3 sts at beg of next 2 (2, 4) rows, 2 sts at beg of next 2 (2, 4) – 92 (94, 94) sts rem.
(RS) Dec 1 st each side every other row 3 (2, 1) times – 86 (90, 92) sts rem, and AT THE SAME TIME, when Armholes measure 1½” from beg of shaping, discontinue Slip st pattern after working Row 2 of pattern.
Using A only for remainder of piece, change to St st; work even until Armholes measure 9½ (10, 10½)” from beg of shaping, end with a WS row.
Shape Shoulders and Neck
(RS) Bind off 8 sts at beg of next 4 rows, 7 (8, 8) sts at beg of next 2 rows – 40 (42, 44) sts rem for Neck. Bind off rem sts.
LEFT FRONT
Using smaller needles and A, cast on 50 (54, 62) sts.
(RS) Begin k2, p2 rib, end k2; work even until piece measures 2” from beg, increasing 2 (2, 0) sts evenly across last WS row – 52 (56, 62) sts.
(RS) Change to larger needles and St st; work as for BACK until Armhole measures 7½ (8, 8½)” from beg of shaping, end with a RS row – 44 (45, 47) sts rem.
Shape Neck
(WS) At Neck edge, bind off 5 (5, 7) sts once, 4 sts twice, 3 sts twice then 2 sts once – 23 (24, 24) sts remain for Shoulder.
Work even until Armhole measures same as BACK to Shoulder shaping, end with a WS row.
Shape Shoulder
Beg with RS row, shape as for BACK.
RIGHT FRONT
Work as for LEFT FRONT, reversing all shaping.
SLEEVES
Using smaller needles and A, cast on 50 (54, 58) sts.
(RS) Begin k2, p2 rib, end k2; work even until piece measures 2” from beg, increasing 2 sts evenly across last WS row – 52 (56, 60) sts.
(RS) Change to larger needles and St st; work even for 2 rows, end with a WS row.
Shape Sleeve
(RS) Continue in St st; inc 1 st each side this row, then every 6 rows 14 (15, 16) times – 82 (88, 94) sts; and AT THE SAME TIME, when piece measures 13½” from beg, end with a WS row.
Change to Slip st pattern; complete shaping, then work even until piece measures 19” from beg, end with a WS row.
Shape Cap
(RS) Continue in Slip st pattern; bind off 0 (4, 4) sts at beg of next 2 rows, 3 sts at beg of next 2 (2, 4) rows, 2 sts at beg of next 2 rows – 72 (70, 70) sts rem.
(RS) Dec 1 st each side every other row 12 (11, 11) times; AT THE SAME TIME, when Cap measures 1½” from beg of shaping, discontinue Slip st pattern after working Row 2 of pattern.
(RS) Using A only for remainder of piece, change to St st and complete shaping – 48 sts rem.
Bind off 5 sts at beg of next 4 rows – 28 sts rem. Bind off remaining sts.
FINISHING
Block pieces to measurements. Sew Shoulder seams. Set in SLEEVES; sew side and Sleeve seams.
Collar
With RS facing, using smaller needles and B, pick up and knit 96 (98, 100) sts around Neck shaping.
Begin k2, p2 rib, end k2; work even for 8 rows.
Change to Slip st pattern; work even until piece measures 4” from beg of Slip st pattern, end with Row 1 of pattern.
(WS) Bind off all sts in pattern.
Front Edging
With RS facing, using hook and A, join yarn with a sl st to center FRONT; ch 1, work 1 row single crochet evenly along center FRONT, from lower edge to Collar. Repeat for opposite center FRONT.
Fasten off.
Using yarn needle, weave in all ends. Using sewing needle and matching thread, sew one side of zipper to each side of center FRONT.
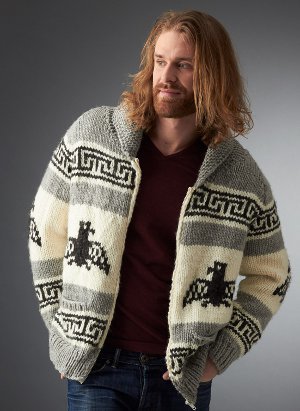
Read NextMen's Cowichan Cardigan Pattern
Your Recently Viewed Projects
Thanks for your comment. Don't forget to share!
JosieHealy
Apr 08, 2020
This is a nice pattern and the negative comments do not reflect appraisal of the knitted jacket.
coluk2 8181961
May 13, 2018
I think what kamtravels meant by knitting in the round was that you can use a circular needles to knit the back and sides as one.
kamtravels2
Aug 14, 2013
Great pattern and as with almost all patterns this can be knitted in the round.
Lisa
Aug 22, 2013
This pattern can't be knitted in the round-it must be left open at the front for the zipper. Not sure if this comment was intended for this pattern or not-but knitting in the round is not an option here. The only reason I mention it, is because a lot of new knitters depend on the comments for guidance with these patterns and your comment if intended for this pattern would be really confusing to them.
Report Inappropriate Comment
Are you sure you would like to report this comment? It will be flagged for our moderators to take action.
Thank you for taking the time to improve the content on our site.


