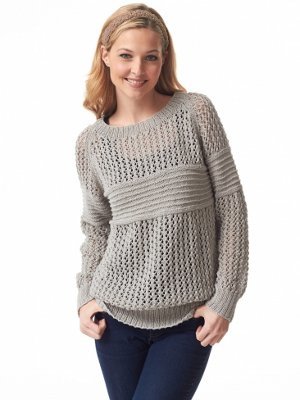
Classic Turtleneck Sweater

When youre building up your wardrobe, a key technique is to obtain a couple of classic pieces that you can wear in a number of different ways. The Classic Turtleneck Sweater is a project that you will be able to wear for years. This basic turtleneck will never go out of style, and you can easily wear this sweater in any way you please. This knitted sweater pattern is a great pattern for knitters who are newer to sweaters. The simple construction is easy to follow or embellish as the knitter sees fit.

Knitting Needle Size7 or 4.5 mm
Yarn Weight(4) Medium Weight/Worsted Weight and Aran (16-20 stitches to 4 inches)
SIZES:
XS/S (M-L-XL-2/3XL-4/5XL) 28/34 (36/38-40/42-44/46-48/54-56/62) ins [71/86.5 (91.5/96.5-101.5/106.5-112/117-122/137-142/157.5) cm].
Finished Bust: 35 (40-44-49-56-65) ins [89 (101.5-112-124.5-142-165) cm].
MATERIALS:
- Bernat Worsted (Solids: 400 g/14 oz) 2 (2-2-2-2-2) balls
- OR
- (Ombres: 300 g/10.5 oz) 2 (2-2-2-3-3) balls
- Sizes 4.5 (U.S. 7) and 5 mm (U.S. 8) knitting needles or size needed to obtain gauge. 2 st holders.
GAUGE:
18 sts and 24 rows = 4 ins [10 cm] with larger needles in stocking st.
INSTRUCTIONS
The instructions are written for smallest size. If changes are necessary for larger sizes the instructions will be written thus ( ).
BACK
**With smaller needles, cast on 78 (90-98-110-126-146) sts.
1st row: (RS). P2. *K2. P2. Rep from * to end of row.
2nd row: K2. *P2. K2. Rep from * to end of row.
Rep last 2 rows of (K2. P2) ribbing until work from beg measures 3 ins [7.5 cm], ending with a purl row.
Change to larger needles and proceed in stocking st until work from beg measures 12 ins [30.5 cm], ending with a purl row.
Shape armholes: Cast off 3 (4-6-7-9-11) sts beg of next 2 rows. 72 (82-86-96-108-124) sts.
Dec 1 st at each end of needle on next 3 (3-3-5-11-15) rows, then every following alt row to 54 (58-62-64-66-70) sts.**
Cont even until armhole measures 8 (8-8½-9-10-11) ins [20.5 (20.5-21.5-23-25.5-28) cm], ending with a purl row.
Shape shoulders: Cast off 12 (13-15-15-15-16) sts beg of next 2 rows.
Leave rem 30 (32-32-34-36-38) sts on a st holder.
FRONT
Work from ** to ** as given for Back.
Cont even until armhole measures 5 (5-5-5½-6-7) ins [12.5 (12.5-12.5-14-15-18) cm], ending with a purl row.
Neck shaping: Next row: (RS).
K18 (19-21-21-21-22) sts. Turn.
Leave rem sts on a spare needle.
Dec 1 st at neck edge on next 2 rows, then every following alt row to 12 (13-15-15-15-16) sts. Cont even until Front measures same length as Back to beg of shoulder, ending with a purl row. Cast off.
With RS facing, miss next 18 (20-20- 22-24-26) sts. Join yarn to rem sts and knit to end of row. Work as given for left side.
SLEEVES
With smaller needles, cast on 38 (38-42-42-42-46) sts.
Work 3 ins [7.5 cm] in (K2. P2) ribbing as given for Back, ending with WS row.
Change to larger needles and proceed in stocking st, inc 1 st at each end of needle, on 5th and every following 6th (6th-6th-4th-4th-2nd) row to 44 (46-64-48-74-52) sts, then every following 8th (8th-8th-6th-6th-4th) row to 58 (60-68-70-78-86) sts.
Cont even until sleeve from beg measures 18 ins [45.5 cm], ending with a purl row.
Shape top: Cast off 2 (2-4-4-6-6) sts beg next 2 rows. 54 (56-60-62-66-74) sts.
Dec 1 st each end of needle on next and every following alt row to 32 (36-44-40-36-44) sts, then every row to 8 sts. Cast off.
FINISHING:
Pin garment pieces to measurements and cover with a damp cloth, leaving cloth to dry.
Collar: Sew right shoulder seam. With RS of work facing and smaller needles, pick up and knit 21 (21-21-23-25-25) sts down left Front neck edge. K18 (20-20-22-24-26) from front st holder. Pick up and knit 21 (21-21-23-25-25) sts up right front neck edge. K30 (32-32-34-36-38) from Back st holder. 90 (94-94-102-110-114) sts.
Work in (K2. P2) ribbing, as given for Back for 7 ins [18 cm], ending with WS row. Cast off in rib.
Sew left shoulder and Collar seams, reversing last 4 ins [10 cm] for turn back.
Sew in Sleeves. Sew side and sleeve seams.
Read NextTextured Drop Shoulder Cardigan
Your Recently Viewed Projects
Thanks for your comment. Don't forget to share!
The Designing Peng uin
Jun 25, 2016
Truly a classic -and the colour is perfect although being a redhead I would prefer a blue or green in the same value as the sweater shown - this is fabulous
Report Inappropriate Comment
Are you sure you would like to report this comment? It will be flagged for our moderators to take action.
Thank you for taking the time to improve the content on our site.