Timeless Cabled Sweater
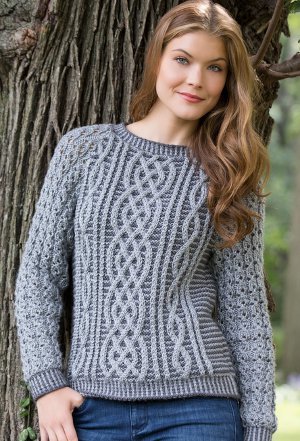
Fashionable yet classic, the Timeless Cabled Sweater is a knit sweater pattern you'll cherish for years to come. Interlocking cables stand out in two shades of gray for a stylish look you'll reach come autumn. With sizing options for small to extra-large, there's no reason why you can't create this classically beautiful knit sweater pattern for yourself or a friend.

Knitting Needle Size7 or 4.5 mm, 9 or 5.5 mm, Circular Knitting Needles
Yarn Weight(4) Medium Weight/Worsted Weight and Aran (16-20 stitches to 4 inches)
Gauge17 stitches, 34 rows, 4 inches. garter stitch
Materials:
- RED HEART® Soft® (Art. E728 available in solid color 5 oz (141 g), 256 yd (234 m), print 4 oz (113 g), 204 yd (187 m), and heather 4oz (113g), 212 yd (194m) balls): 4 (5, 5, 6, 6) balls 9440 Light Grey Heather A, 3 (4, 4, 5, 5) balls 9010 Charcoal B.
- Susan Bates® Knitting Needles: 4.5mm [US 7] and 5.5mm [US 9] straight needles, and 4.5mm [US 7] 16”/40cm circular needle.
- Stitch markers
- cable needle
- yarn needle
GAUGE: 17 sts = 4” (10 cm); 34 rows = 4” (10 cm) in Garter st with larger needles and changing color every 2 rows; 24 sts = 4” (10 cm) in Diamond Cable pattern with larger needles; 28 sts = 4½” (11.5 cm) in Center Cable pattern with larger needles; 20 sts = 4” (10 cm) in Lace Cable pattern with larger needles.
CHECK YOUR GAUGE. Use any size needles to obtain the gauge.
ABBREVIATIONS
A and B = Color A and Color B
k = knit; k2tog = knit next 2 sts together
p = purl; p2tog = purl next 2 sts together
st(s) = stitch(es); yo = yarn over
wyib = with yarn in back; wyif = with yarn in front
[ ] = work directions in brackets the number of times specified
* = repeat whatever follows the * as indicated
Directions are for size Small. Changes for sizes Medium, Large, XLarge and XXLarge are in parentheses
Finished Bust: 34 (38, 42, 46, 50)” (86.5 (96.5, 106.5, 117, 127) cm)
Finished Length: 23 (23½, 24, 24½, 25)” (58.5 (59.5, 61, 62, 63.5) cm)
Special Stitches
1/1 RC (1 over 1 Right Cross) = Slip next stitch to cable needle and hold in back, k1, then k1 from cable needle.
2/1 LC (2 over 1 Left Cross) = Slip next 2 stitches to cable needle and hold in front, k1, then k2 from cable needle.
2/1 RC (2 over 1 Right Cross) = Slip next stitch to cable needle and hold in back, k2, then k1 from cable needle.
2/2 LC (2 over 2 Left Cross) = Slip next 2 stitches to cable needle and hold in front, k2, then k2 from cable needle.
2/2 RC (2 over 2 Right Cross) = Slip next 2 stitches to cable needle and hold in back, k2, then k2 from cable needle.
sk2p = Slip next stitch as if to knit to right needle, k2tog, lift slipped st over the k2tog st and off needle.
ssk = Slip next 2 stitches, one at a time as if to knit, to right needle, insert point of left needle through front of sts, knit these sts together through back loop.
Pattern Stitches
Two-Color Rib Pattern
(over odd number of sts)
Row 1 (wrong side): With B, k1, *sl 1 wyif, k1; repeat from * across.
Row 2: With A, k2, *sl 1 wyib, k1; repeat from * to last st, k1.
Row 3: With A, k1, *p1, sl 1 wyif; repeat from * to last 2 sts, p1, k1.
Row 4: With B, k1, *sl 1 wyib, p1; repeat from * to last 2 sts, sl 1 wyib, k1.
Repeat Row 1–4 for Two-Color Rib.
Diamond Cable Pattern (over 24 sts)
Row 1 (right side): 1/1 RC, k2, 1/1 RC, k4, 2/2 RC, k4, 1/1 RC, k2, 1/1 RC.
Row 2: P2, k2, p2, k4, p4, k4, p2, k2, p2.
Row 3: Sl 2 wyib, k2, sl 2 wyib, k4, sl 4 wyib, k4, sl 2 wyib, k2, sl 2 wyib.
Row 4: Sl 2 wyif, k2, sl 2 wyif, k4, sl 4 wyif, k4, sl 2 wyif, k2, sl 2 wyif.
Row 5: 1/1 RC, k2, 1/1 RC, k3, 2/1 RC, 2/1 LC, k3, 1/1 RC, k2, 1/1 RC.
Row 6: P2, k2, p2, k3, p2, k2, p2, k3, p2, k2, p2.
Row 7: Sl 2 wyib, k2, sl 2 wyib, k3, sl 2 wyib, k2, sl 2 wyib, k3, sl 2 wyib, k2, sl 2 wyib.
Row 8: Sl 2 wyif, k2, sl 2 wyif, k3, sl 2 wyif, k2, sl 2 wyif, k3, sl 2 wyif, k2, sl 2 wyif.
Row 9: [1/1 RC, k2] twice, 2/1 RC, k2, 2/1 LC, [k2, 1/1 RC] twice.
Row 10: [P2, k2] twice, p2, k4, p2, [k2, p2] twice.
Row 11: [Sl 2 wyib, k2] twice, sl 2 wyib, k4, sl 2 wyib, [k2, sl 2 wyib] twice.
Row 12: [Sl 2 wyif, k2] twice, sl 2 wyif, k4, sl 2 wyif, [k2, sl 2 wyif] twice.
Row 13: 1/1 RC, k2, 1/1 RC, k12, 1/1 RC, k2, 1/1 RC.
Rows 14–17: Repeat Rows 10–13.
Rows 18–20: Repeat Rows 10–12.
Row 21: [1/1 RC, k2] twice, 2/1 LC, k2, 2/1 RC, [k2, 1/1 RC] twice.
Rows 22–24: Repeat Rows 6–8.
Row 25: 1/1 RC, k2, 1/1 RC, k3, 2/1 LC, 2/1 RC, k3, 1/1 RC, k2, 1/1 RC.
Rows 26–28: Repeat Rows 2–4.
Repeat Rows 1–28 for Diamond Cable pattern
Center Cable Pattern (over 28 sts)
Row 1 (right side): [K4, 2/2 RC] 3 times, k4.
Row 2: [K4, p4] 3 times, k4.
Row 3: [K4, sl 4 wyib] 3 times, k4.
Row 4: [K4, sl 4 wyif] 3 times, k4.
Row 5: K3, 2/1 RC, [2/2 LC, 2/2 RC] twice, 2/1 LC, k3.
Row 6: K3, p2, k3, p4, k4, p4, k3, p2, k3.
Row 7: K3, sl 2 wyib, k3, sl 4 wyib, k4, sl 4 wyib, k3, sl 2 wyib, k3.
Row 8: K3, sl 2 wyif, k3, sl 4 wyif, k4, sl 4 wyif, k3, sl 2 wyif, k3.
Row 9: K2, 2/1 RC, k3, 2/2 LC, k4, 2/2 LC, k3, 2/1 LC, k2.
Row 10: K2, p2, [k4, p4] twice, k4, p2, k2.
Row 11: K2, sl 2 wyib, [k4, sl 4 wyib] twice, k4, sl 2 wyib, k2.
Row 12: K2, sl 2 wyif, [k4, sl 4 wyif] twice, k4, sl 2 wyif, k2.
Row 13: K6, [2/2 RC, 2/2 LC] twice, k6.
Row 14: [K2, p2] twice, k4, p4, k4, [p2, k2] twice.
Row 15: [K2, sl 2 wyib] twice, k4, sl 4 wyib, k4, [sl 2 wyib, k2] twice.
Row 16: [K2, sl 2 wyif] twice, k4, sl 4 wyif, k4, [sl 2 wyif, k2] twice.
Row 17: K12, 2/2 RC, k12.
Rows 18–20: Repeat Row 14–16.
Row 21: K6, [2/2 LC, 2/2 RC] twice, k6.
Rows 22–24: Repeat Rows 10–12.
Row 25: K2, 2/1 LC, k3, 2/2 LC, k4, 2/2 LC, k3, 2/1 RC, k2.
Rows 26–28: Repeat Rows 6–8.
Row 29: K3, 2/1 LC, [2/2 RC, 2/2 LC] twice, 2/1 RC, k3.
Rows 30–32: Repeat Rows 2–4.
Repeat Rows 1–32 for Center Cable pattern.
Lace Cable Pattern (multiple of 5 sts + 2)
Row 1 (right side): P2, *yo, sk2p, yo, p2; repeat from * across.
Row 2: K2, *p3, k2; repeat from * across.
Row 3: P2, *k1, yo, ssk, p2; repeat from * across.
Row 4: K2, *p3, k2; repeat from * across.
Row 5: P2, *k3, p2; repeat from * across.
Row 6: K2, *p3, k2; repeat from * across.
Repeat Rows 1–6 for Lace Cable pattern.
Notes
1. Slip all stitches as if to purl, unless otherwise noted. Note whether stitches are slipped with the yarn held in front (wyif) or with the yarn held in back (wyib).
2. The color is changed every other row. Only one color of yarn is used in any row. Do not cut yarns between color changes, unless noted otherwise.
3. Markers are used to separate cable patterns across row. This allows you to count stitches between markers frequently to ensure that you maintain the correct number of stitches. Use of stitch markers in this manner is optional.
4. When instructed to work in patterns “as established” work the next row of each pattern ensuring that stitches continue to line up as in previous rows.
5. Cable patterns can be worked by following the written instructions or by reading the charts. Read right side rows of charts from right to left and wrong side rows from left to right.
Timeless Cabled Sweater Construction Charts
Timeless Cabled Sweater Stitch Charts
BACK
With smaller needles and B, cast on 99 (107, 115, 123, 133) sts.
Ribbing
Beginning with Row 1 (wrong side) of pattern, work in Two-Color Rib until piece measures 2” (5 cm) from beginning; end with a Row 1 of the pattern.
Change to larger needles.
Decrease Row (right side): With A, knit and decrease 3 sts evenly across row—96 (104, 112, 120, 130) sts.
Body
Set-Up Row (wrong side): With A, k10 (14, 18, 22, 27), place marker, p2, k2, p2, k4, p4, k4, p2, k2, p2, place marker, [k4, p4] 3 times, k4, place marker, p2, k2, p2, k4, p4, k4, p2, k2, p2, place marker, k10 (14, 18, 22, 27).
Next Row: With B, knit to first marker, slip marker, sl 2 wyib, k2, sl 2 wyib, k4, sl 4 wyib, k4, sl 2 wyib, k2, sl 2 wyib, slip marker, [k4, sl 4 wyib] 3 times, k4, slip marker, sl 2 wyib, k2, sl 2 wyib, k4, sl 4 wyib, k4, sl 2 wyib, k2, sl 2 wyib, slip marker, knit to end of row.
Continue to slip markers as you come to them.
Next Row: With B, knit to first marker, sl 2 wyif, k2, sl 2 wyif, k4, sl 4 wyif, k4, sl 2 wyif, k2, sl 2 wyif, [k4, sl 4 wyif] 3 times, k4, sl 2 wyif, k2, sl 2 wyif, k4, sl 4 wyif, k4, sl 2 wyif, k2, sl 2 wyif, knit to end of row.
Begin Cable Patterns
Row 1 (right side): With A, knit to first marker, work Row 1 of Diamond Cable pattern over next 24 sts, work Row 1 of Center Cable pattern over next 28 sts, work Row 1 of Diamond Cable pattern over next 24 sts, knit to end of row.
Row 2: With A, knit to first marker, work Row 2 of Diamond Cable pattern over next 24 sts, work Row 2 of Center Cable pattern over next 28 sts, work Row 2 of Diamond Cable pattern over next 24 sts, knit to end of row.
Continue in patterns as established, changing color every other row, until piece measures 14” (35.5 cm) from beginning; end with a wrong side row.
Shape Raglan Armholes
Continue to change color every other row throughout.
Row 1 (right side): Bind off 4 (6, 8, 10, 13) sts, continue in patterns as established to end of row—92 (98, 104, 110, 117) sts.
Row 2: Bind off 4 (6, 8, 10, 13) sts, continue in patterns as established to end of row—88 (92, 96, 100, 104) sts.
Continue to maintain patterns as established and decrease 1 st each end of every 4th row 19 (20, 21, 22, 23) times; end with a wrong side row—50 (52, 54, 56, 58) sts.
Note: To work decreases every 4th row, designer recommends working a k2tog at beginning and end of each right side row worked with B.
Bind off.
FRONT
Work front same as back until 62 (64, 66, 68, 70) sts remain while working raglan shaping; end with a wrong side row. Bind off.
RIGHT SLEEVE
With smaller needles and B, cast on 43 (43, 48, 48, 53) sts.
Ribbing
Beginning with Row 1 (wrong side) of pattern, work in Two-Color Rib until piece measures 2” (5 cm) from beginning; end with a Row 1 of the pattern. Cut B.
Change to larger needles.
Decrease Row (right side): With A, knit and decrease 1 st near center of row—42 (42, 47, 47, 52) sts.
Work remainder of sleeve with A only.
Body
Set-Up Row (wrong side): K2, *p3, k2; repeat from * to end of row.
Begin Lace Cable Pattern
Row 1 (right side): Work Row 1 of Lace Cable pattern to end of row.
Continue in Lace Cable pattern and at the same time increase 1 st each end every 6th (4th, 4th, 3rd, 3rd) row 14 (17, 18, 20, 21) times, work added sts into the Lace Cable pattern—70 (76, 83, 87, 94) sts.
Work even in Lace Cable pattern as established until piece measures 18” (45.5 cm) from beginning; end with a wrong side row.
Shape Raglan Edges
Row 1 (right side): Bind off 4 (6, 8, 10, 13) sts, continue in patterns as established to end of row—66 (70, 75, 77, 81) sts.
Row 2: Bind off 4 (6, 8, 10, 13) sts, continue in patterns as established to end of row—62 (64, 67, 67, 68) sts.
Continue to maintain pattern as established and decrease 1 st at beginning of next 42 (44, 47, 47, 48) rows—20 sts.
Work even in pattern as established until raglan edges measure same as front raglan edge; end with a wrong side row.
Shape Neck
Row 1 (right side): Bind off 4 sts, work in pattern as established to end of row—16 sts.
Row 2: Work in pattern as established to end of row.
Row 3: Work in pattern as established to last 2 sts, k2tog—15 sts.
Row 4: Work in pattern as established to end of row.
Repeat last 4 rows 3 more times. Fasten off last st.
LEFT SLEEVE
Work left sleeve same as right sleeve to neck shaping. If last row worked was a wrong side row, work 1 right side row even.
Shape Neck
Row 1 (wrong side): Bind off 4 sts, work in pattern as established to end of row—16 sts.
Row 2: K2tog, work in pattern as established to end of row—15 sts.
Repeat last 2 rows 3 more times. Fasten off last st.
FINISHING
Sew raglan seams, easing to fit and making sure that the shorter raglan sleeve edge is sewn to the front raglan edges. Sew side and sleeve seams.
Neckband
With right side facing, circular needle and B, beginning at right back raglan seam, pick up and k36 (38, 40, 42, 44) sts across back neck, 12 sts down neck edge of left sleeve, 42 (44, 46, 48, 50) sts across front neck, 12 sts up neck edge of right sleeve—102 (106, 110, 114, 118) sts. Place marker for beginning of round. Prepare to work in rounds.
Round 1: With B, *p1, sl 1 wyib; repeat from * around.
Rounds 2 and 3: With A, *sl 1 wyib, k1; repeat from * around.
Round 4: With B, repeat Round 1.
Repeat last 4 rounds 2 more times.
With B, bind off in ribbing pattern.
Weave in all ends.
Read NextTextured Drop Shoulder Cardigan
Your Recently Viewed Projects
katenigel 9104033
Nov 09, 2014
I have just made this and am very pleased with the result it fits beautifully. I did think when making it that it looked and odd shape! My only moans are that the rib at the bottom curls up and I needed 6 balls of the light wool and only 3 of the dark wool for the middle size.
Ddipsy
Aug 21, 2014
I have seen cabled sweaters whereby the cables really catch the eye, and seem to bounce off the sweater. This is a pattern I shall definitely use and reuse The two tones of yarn, in the picture, look so good together. I think ithe pattern can be easily adapted for a man's sweater too.
Report Inappropriate Comment
Are you sure you would like to report this comment? It will be flagged for our moderators to take action.
Thank you for taking the time to improve the content on our site.

