Autumn Equinox Sweater
This simple, breezy sweater will take you seamlessly from summer to fall.
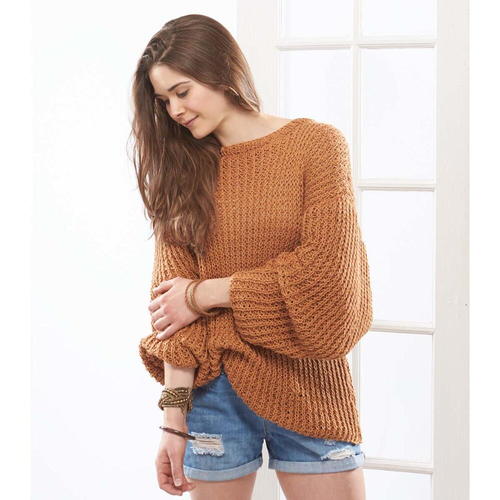
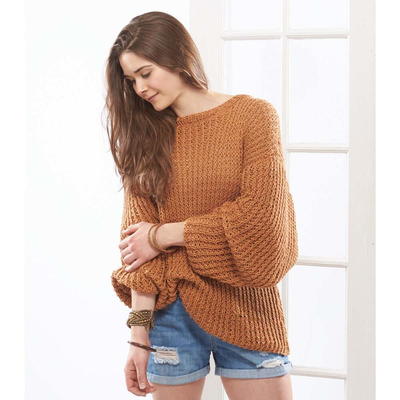
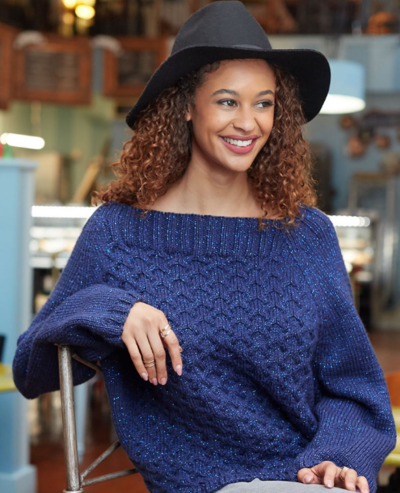
The Autumn Equinox Sweater is a beautiful drop shoulder sweater pattern that practically screams "Autumn!" This pullover boasts a trendy burnt orange color that is sure to get you in the fall spirit. The ridged design of this top helps add some texture to an otherwise simple design, but the real pull of this sweater is the slouchy, comfortable fit that suits a range of body types. This knit sweater pattern would be stunning paired with leggings or tucked under a circle skirt for a more feminine look.
NotesWith this st pat, the yo sts will "float" over the sl st on the needle instead of next to that st. When doing shaping, treat the sl st and yo as 1 st and k them tog if necessary when working a dec or BO (as you would do on Row 3 of pat).

Knitting Needle Size7 or 4.5 mm
Yarn Weight(4) Medium Weight/Worsted Weight and Aran (16-20 stitches to 4 inches)
Gauge16 sts x 32 rows = 4" (10.2cm) in tuck st pat, blocked. Save time, check your gauge.
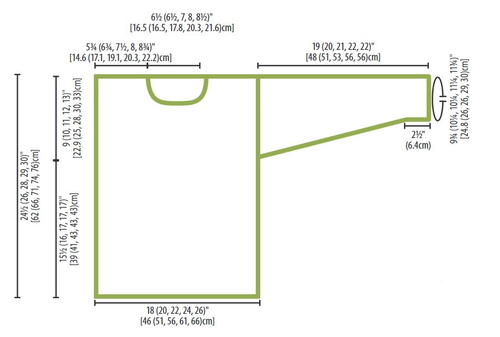
Finished SizeExtra Small (Small, Medium, Large, 1X) - Oversized fit, choose a size with 4-6" (10.2-15.2cm) of ease. Bust: 36 (40, 44, 48, 52)" [91 (102, 112, 122, 132) cm]; Length: 24½ (26, 28, 29, 30)" [62 (66, 71, 74, 76) cm]
Materials List
- Willow Yarns™ Meadow (100% cotton; 50g/115yd) - 731937-0004 Nest [10 (11, 13, 15, 17) balls]
- US size 7 (4.5mm) straight needles or size needed to obtain gauge.
- Removable stitch markers
- Stitch holder
- Yarn needle
Sweater
Stitch Guide
Tuck st pat:
(multiple of 2 sts + 3)
Row 1 (RS): K1, p1, *yo, sl 1 p-wise wyib, p1; rep from * to last st, k1.
Row 2 (WS): P1, k1, *sl st and yo p-wise wyif, yo, k1; rep from * to last st, p1.
Row 3: K1, p1, *k next st and 2 yo tog, p1; rep from * to last st, k1.
Row 4: P1, *k1, p1; rep from * across.
Rep Rows 1-4 for pat.
Back
CO 73 (81, 89, 97, 105) sts.
Setup Row (WS): P1, *k1, p1; rep from * across.
Work in tuck st pat until back measures 15½ (16, 17, 17, 17)" [39 (41, 43, 43, 43) cm]. Pm at both ends of the row to mark beg of the armholes.
Cont in tuck st pat until armholes measure 9 (10, 11, 12, 13)" [22.9 (25, 28, 30, 33) cm], ending with Row 3 of pat.
BO all sts in pat.
Place 2 m in BO edge, each 23 (27, 30, 32, 35) sts from the edge to mark the shoulders.
Front
Work as for back until armholes measure 6½ (7½, 8½, 9, 10)" [16.5 (19.1, 21.6, 22.9, 25) cm], ending with a WS row.
Shape Neck
Work across 29 (33, 36, 40, 43) sts for left neck, BO center 15 (15, 17, 17, 19) sts, work across rem 29 (33, 36, 40, 43) sts for right neck. Place sts for left neck on st holder.
Right Neck
Note: Cont to work in pat, when necessary during shaping, k coordinating yo and sl st tog to complete BO or dec.
At beg of next RS row, BO 2 (2, 2, 3, 3) sts—27 (31, 34, 37, 40) sts.
At beg of next RS row, BO 2 sts—25 (29, 32, 35, 38) sts.
Work 1 WS row.
Dec Row (RS): K1, k2tog, work in pat to end—1 st dec’d.
Next Row (WS): Work in pat to last 3 sts, p3.
Rep last 2 rows 1 (1, 1, 2, 2) more times—23 (27, 30, 32, 35).
Work in pat until armhole measures 9 (10, 11, 12, 13)" [22.9 (25, 28, 30, 33) cm], ending with Row 3 of pat.
BO all sts in pat.
Left Neck
Join yarn at neck edge, work 2 rows in pat.
At beg of next WS row, BO 2 (2, 2, 3, 3) sts—27 (31, 34, 37, 40) sts.
At beg of next WS row, BO 2 sts—25 (29, 32, 35, 38) sts.
Dec Row (RS): Work in pat to last 3 sts, ssk, k1—1 st dec’d.
Next Row (WS): P3, work in pat to end.
Rep last 2 rows 1 (1, 1, 2, 2) more times—23 (27, 30, 32, 35 sts).
Work in pat until armhole measures 9 (10, 11, 12, 13)" [22.9 (25, 28, 30, 33)cm], ending with Row 3 of pat.
BO all sts in pat.
Sleeves
Note: Work new sts into pat when possible.
CO 39 (41, 41, 45, 47) sts.
Setup Row (WS): P1, *k1, p1; rep from * across.
Work in tuck st pat until sleeve measures 2½" (6.4cm), ending with a WS row.
Inc Row (RS): K1, m1, work in pat to last st, m1, k1—2 sts inc’d.
Rep Inc Row every other RS row 2 (7, 15, 18, 22) more times—24 (57, 73, 83, 93) sts.
Rep Inc Row every third RS row 14 (12, 8, 7, 6) times—73 (81, 89, 97, 105) sts.
Work in pat without inc’ing until sleeve measures 19 (20, 21, 22, 22)" [48 (51, 53, 56, 56)cm, ending with Row 3 of pat.
BO all sts in pat
Finishing
Sew one left shoulder seam.
Neck Edging
Pick up and k1 in every BO st bet m on back 27 (29, 29, 33, 35) sts, evenly pick up and k44 (44, 46, 52, 56) around front neck.
Row 1 (WS): P1, *k1, p1; rep from * across.
Row 2 (RS): K1, *p1, k1; rep from * across.
Rep last 2 rows until edging measures 1½" (3.8cm), ending with a WS row.
BO all sts in pat.
Sew neck seam and right shoulder seam.
Sew sleeves onto body bet armhole m.
Sew sleeve and side seams.
Weave in ends.
See diagram.
Abbreviations
beg: begin/beginning
bet: between
BO: bind off
cm: centimeter
CO: cast on
cont: continue
dec, dec’d: decrease, decreased
inc, inc’ing, inc’d: increase, increasing, increased
k: knit
k2tog: knit 2 stitches together
m: marker
m1: make one stitch
p: purl
pat: pattern
pm: place marker
p-wise: purlwise
rem: remain/remaining
rep: repeat/repeats
RS: right side
sl: slip
sl st: slip stitch
ssk: slip, slip, knit these 2 stitches together—1 stitch decreased
WS: wrong side
wyib: with yarn in back
wyif: with yarn in front
yo: yarn over
Up Next:
Read NextLemon Curry Ease Pullover
Your Recently Viewed Projects
ThatLittleLady
Sep 26, 2020
Hey there! I am a fairly new knitter and cannot for the life of me visualize how the yo to immediate sl works out, could someone post a short video of the two stitch pattern repeated?
wixnstix 7267849
Oct 27, 2018
I cannot download this pattern as it keeps giving the message it is not a valid pdf format...
Kristina K
Oct 29, 2018
Hi wixnstix, we recommend highlighting the pattern, copying by right-clicking and selecting 'copy,' and then pasting it into a word document by right-clicking and selecting 'paste.' We also have an option to print the pattern under the 'more' button at the very end of the pattern if you would prefer this. We hope this helps! Happy knitting! -Editors of AllFreeKnitting
Lisa
Oct 29, 2018
The message is correct this is not a downloadable pattern because it si not a PDF. since the pattern is printed on this page, to make a copy you have to print from this page. to do this, with the page open, right click with your mouse, a new window will open, scroll down to print and click on it, this take you to print preview, in print preview change the print "all" to the pages that just the pattern is on, then print it.
Susan S
Aug 15, 2018
This sweater looks so roomy and I love the sleeves. They have a very and interesting unusual shape. I'm going to put it on my list.
Report Inappropriate Comment
Are you sure you would like to report this comment? It will be flagged for our moderators to take action.
Thank you for taking the time to improve the content on our site.

