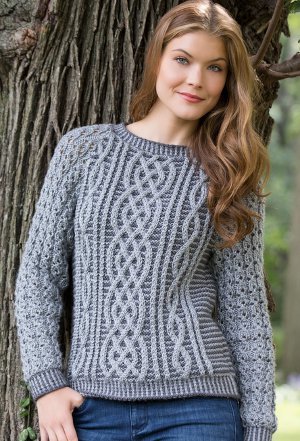
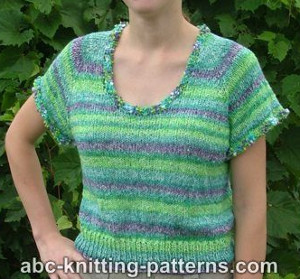
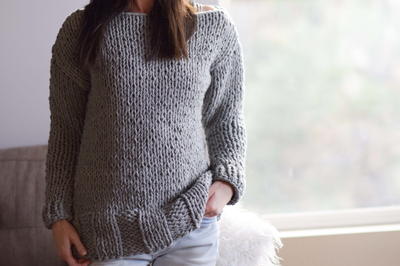
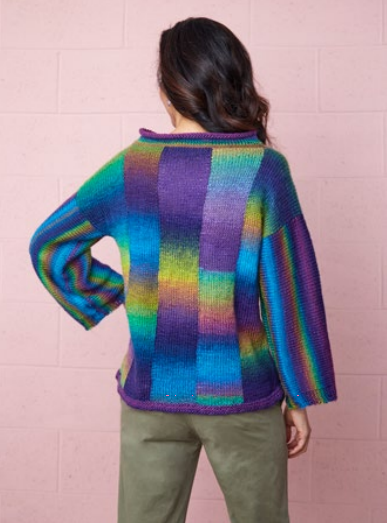
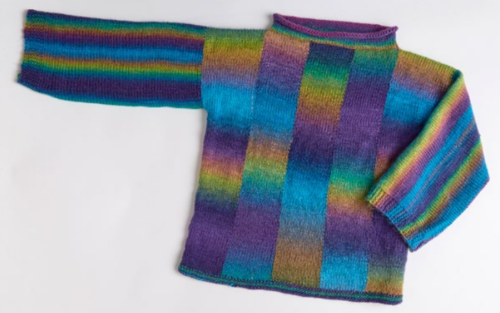
Bargello Sweater Knitting Pattern

If you’ve always wanted to know how to knit a sweater, the Bargello Sweater Knitting Pattern is for you. This easy knitting pattern can be made in many sizes and many colors to suit your cozy needs. This sweater has both a vertical and staggered-horizontal striping pattern that makes this piece very interesting to look at, and the stockinette stitch fabric has a simple pattern to remember and create. Make this sweater your first knit sweater, and you will be proud of the beautiful results!
NotesSizing Notes:
Directions are for size Small. Changes for sizes Medium, Large, 2X-Large, and 3X-Large are in parentheses. Note that directions do not include an X-Large size. If X-Large size is needed, choose between Large and 2X-Large.
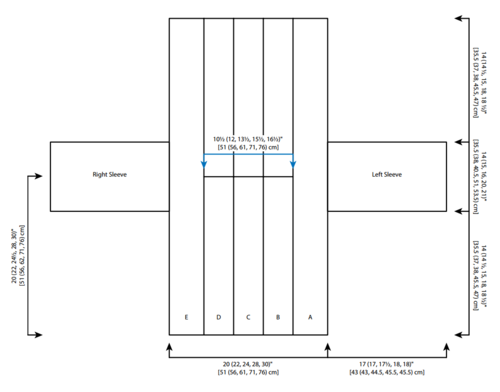
To Fit Bust: 34 (38, 42, 50, 54)" [86.5 (96.5, 107, 127, 137) cm]
Finished Bust: 40 (44, 48, 56, 60)" [101.5 (112, 122, 142, 152.5) cm]
Finished Length: 21 (22, 23, 28, 29)" [53.5 (56, 58.5, 71, 73.5) cm]

Knitting Needle Size5 or 3.75 mm, Circular Knitting Needles
Yarn Weight(4) Medium Weight/Worsted Weight and Aran (16-20 stitches to 4 inches)
Gauge18 sts = 4" [10 cm]; 25 rows = 4" [10 cm] in Stockinette stitch (knit on right side, purl on wrong side).
Materials List
- RED HEART® Unforgettable®: 7 (7, 7, 9, 9) balls 1975 Gossamer
- Susan Bates® Knitting Needles: 5mm [US 8] 36" [90 cm] and 16" [40 cm] circular needles
- 6 stitch markers
- 7 zip-closure plastic baggies
- 1 zip-closure plastic bag large enough to hold all the balls of yarn in smaller plastic baggies
- permanent marker
- yarn needle
Want to make a sweater for baby, too? Check out this link!20 Super Cute Knit Baby Sweater Patterns
Instructions:
Notes
1. Sweater is worked in one piece beginning at lower front edge. Front is knit to underarms where stitches are cast on for sleeves. Front/sleeve piece is worked until half of sleeves are complete then center stitches are bound off and cast on again to form neck opening. Work then proceeds down back side of sleeves to underarms where stitches are bound off to complete sleeves and back knit down to lower back edge. 2. Stitches are picked up around the neck opening to begin working the neck edging.
3. The body of the sweater is worked in five intarsia columns. Each sleeve adds one more intarsia section to the piece.
4. When changing yarn, always pick up the new yarn from under the yarn being dropped to link the yarns and prevent holes.
5. Before beginning, examine the starting colors of each ball of yarn. Make sure that each ball starts on a different color. Winding off a few yards may be needed to ensure that the starting colors are all different.
6. To minimize tangling place each of seven balls into its own zip-closure plastic baggie with the end of yarn hanging out and the baggie zipped almost all the way closed. With permanent marker, label each baggie with one of A, B, C, D, E, Right Sleeve, and Left Sleeve.
7. For sizes Small, Medium, and Large swatch with yarn designated for one of the sleeves.
8. For sizes 2X-Large and 3X-Large swatch with one of the balls not yet placed in a baggie.
Front
With longer circular needle and A, cast on 90 (100, 110, 125, 135) sts. Knit 6 rows.
-
Set-Up Row 1 (right side): K21 (23, 25, 28, 30), drop A, place marker; join B and k16 (18, 20, 23, 25), drop B, place marker; join C and k16 (18, 20, 23, 25), drop C, place marker; join D and k16 (18, 20, 23, 25), drop D, place marker; join E and knit 21 (23, 25, 28, 30).
-
Set-Up Row 2 (wrong side): Working each intarsia section with its own yarn and linking yarns to prevent holes (see note 4), purl to end of row.
-
Place bagged yarns A, B, C, D, and E all into the larger zip-closure baggie. Placing the yarns in the larger baggie ensures that for the duration of the project it will not be necessary to reposition the yarn balls as you work. The yarns will link with each other while working a right side row then unlink themselves after completing the following wrong side row. If you notice that this is not happening and the yarns are tangled, check your work to see if a single yarn was used across more than one intarsia column. If this is the case, undo your work to the point where this occurred.
-
Work in Stockinette stitch (knit on right side, purl on wrong side), working each intarsia section with its own yarn and linking yarns to prevent holes, until piece measures about 14 (14½, 15, 18, 18½)" [35.5 (37, 38, 45.5, 47) cm] from beginning, end with a wrong side row.
Sleeves
Note: When joining new yarn for sleeves for sizes 2X-Large and 3X-Large, it may be necessary to wind off some yarn to match colors and avoid abrupt color changes.
-
Set-Up Row 1 (right side): With yarn designated for Left Sleeve, cast on 77 (77, 79, 81, 81) sts onto the working needle and then knit these 77 (77, 79, 81, 81) new sts, drop Left Sleeve yarn, place marker; working each intarsia section with its own yarn and linking yarns to prevent holes, knit to end of row—167 (177, 189, 206, 216) sts.
-
Set-Up Row 2 (wrong side): With yarn designated for Right Sleeve, cast on 77 (77, 79, 81, 81) sts onto the working needle and then purl these 77 (77, 79, 81, 81) new sts, drop Right Sleeve yarn, place marker; working each intarsia section with its own yarn and linking yarns to prevent holes, purl to last 7 sts, k7—244 (254, 268, 287, 297) sts. Throughout remainder of piece, continue to work each intarsia section with its own yarn and link yarns to prevent holes.
-
Next Row (right side): Slip 1, knit to end of row.
-
Next Row (wrong side): Slip 1, k6, purl to last 7 sts, k7.
-
Repeat last 2 rows until sleeves measure about 7 (7½, 8, 10, 10½)" [18 (19, 20.5, 25.5, 26.5) cm] from sleeve set-up rows, end with a wrong side row.
Neck Opening
-
Row 1 (right side): Slip 1, k97 (99, 103, 108, 110), remove marker, bind off 48 (54, 60, 69, 75) removing next 3 markers as you bind off, knit to end of row.
Cut B, C, and D, leaving 4" [10 cm] tails. -
Row 2 (wrong side): Slip 1, k6, purl to bound off sts, turn work, place marker, drop E; with D, cast on 16 (18, 20, 23, 25) sts, drop D, place marker; with C, cast on 16 (18, 20, 23, 25) sts, drop C, place marker; with B, cast on 16 (18, 20, 23, 25) sts, drop B, turn work, place marker, purl to last 7 sts, k7—244 (254, 268, 287, 297) sts.
Back
-
Row 1 (right side): Slip 1, knit to end of row.
-
Row 2 (wrong side): Slip 1, k6, purl to last 7 sts, k7.
-
Repeat Rows 1 and 2 until sleeves measure about 14 (15, 16, 20, 21)" [35.5 (38, 40.5, 51, 53.5) cm] from sleeve setup rows, end with a wrong side row.
-
Sleeve Bind-off Row 1 (right side): Bind off all 77 (77, 79, 81, 81) Left Sleeve sts and remove first marker, knit to end of row—167 (177, 189, 206, 216) sts.
Cut Left Sleeve yarn. -
Sleeve Bind-off Row 2 (wrong side): Bind off all 77 (77, 79, 81, 81) Right Sleeve sts and remove first marker, purl to end of row—90 (100, 110, 125, 135) sts.
Cut Right Sleeve yarn -
Work even in Stockinette st until piece measures about 14 (14½, 15, 18, 18½)" [35.5 (37, 38, 45.5, 47) cm] from sleeve bind-off rows, end with a wrong side row.
-
Cut all yarns, leaving a 4" [10 cm] tail. With the most plentiful remaining ball of yarn, knit 6 rows.
-
Bind off.
Finishing
Block piece to measurements shown on schematic. Sew side and sleeve seams.
-
Neck Edging
With shorter circular needle and most plentiful remaining ball of yarn, pick up and k96 (108, 120, 138, 150) sts evenly spaced around neck opening edge (pick up an k48 (54, 60, 69, 74) along front neck edge and the same number of sts along back neck edge). Place marker for beginning of round and prepare to work in the round.
Knit rounds until neck edging measures about 2" [5 cm] from pick up round or to desired length.
Bind off.
Block neck edging lightly if desired.
Weave in ends.
Abbreviations
- A, B, C, etc.
- Yarn A, Yarn B, Yarn C, etc
- k
- knit
- st(s)
- stitch(es)
What is your favorite sweater-weather activity?
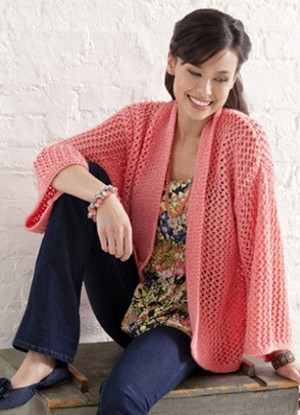
Read NextEmbarker Cocoon Cardigan
Your Recently Viewed Projects

Thanks for your comment. Don't forget to share!
Report Inappropriate Comment
Are you sure you would like to report this comment? It will be flagged for our moderators to take action.
Thank you for taking the time to improve the content on our site.