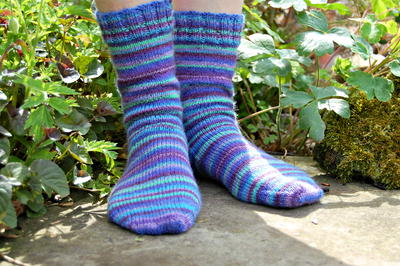
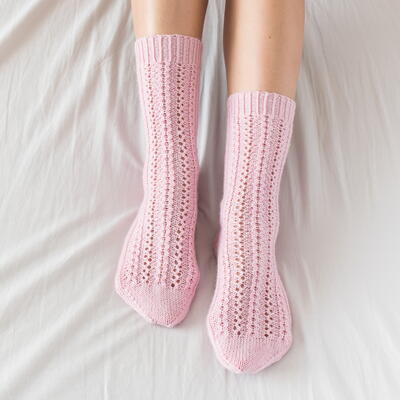
Pansy Path Knit Sock Pattern

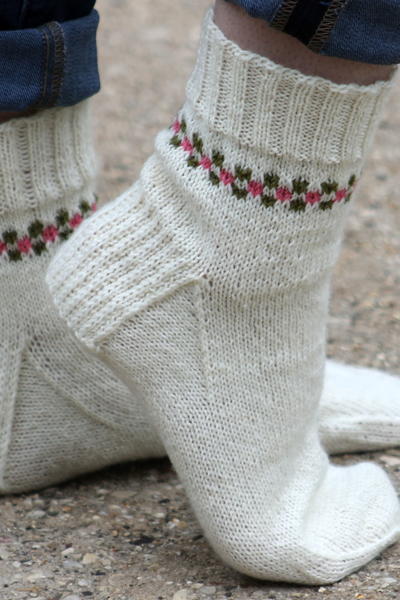
These sweet Pansy Path Knit Socks are perfect for keeping your toes warm and toasty during the cool fall and winter months. With a sweet striped pattern around the top of the sock, this knitting pattern is easy to customize if you want to switch up the color motif. Knit up with Lion Brand Sock-Ease Yarn, specifically designed to create socks, this pattern is perfect for those who are looking for a quick and easy project to make as a gift or a holiday stocking stuffer.

Knitting Needle SizeDouble-Pointed Knitting Needles (DPNs)
Gauge30 stitches, rows, 4 inches. stockinette stitch
Materials:
- 1 skein Lion Brand Sock Ease Yarn (75% wool, 25% nylon; 438 yards [400 meters]/100 grams) in Marshmallow - #100 (A), Green Apple - #174 (B), and Lollipop - #139 (C)
- 1 set double pointed needles in size US 1
- 1 set double pointed needles in size US 2
- Tapestry needle
- Stitch holder
Sizes:
Adult small (adult medium; adult large) (small corresponds to the following US shoe sizes: women's 5 - 7 and men's 4 - 6, medium corresponds to women's 8 - 10 and men's 7 - 9, and large corresponds to women's 11 - 14 and men's 10 - 13)
Instructions:
First, then, using a Long-Tail or an Old Norwegian cast-on (for stretch), your color A yarn, and your size US 1 dpns, cast on 60 (68; 72) stitches loosely, divide between 3 dpns evenly, and join in round. Then we’ll knit our ribbing, as follows:
Ribbing Row: * p2, k2; rep from *
Knit this ribbing row until sock measures roughly 1.75” (2”; 2.25”). Then switch to your size US 2 needles and knit five rows around. Then we’ll work our color stripe as follows. Make sure to leave your yarn very loose behind the slipped stitches, or your sock will be too tight.
Color Rows 1 & 2: using color B, * k2, slip 2 with yarn in back (wyib); rep from *
Color Row 3: using color A, knit
Color Rows 4 & 5: using color C, * slip 2 wyib, k2; rep from *
Color Row 6: using color A, knit
Color Rows 7 & 8: using color B, * k2, slip 2 with yarn in back (wyib); rep from *
Knit color rows 1 – 8. Clip the tails of your color B & color C yarns, since you’re done with them. Using color A, knit 10 (15; 20) rows in stockinette.
Once these rows are done, it's time to begin working the heel portion of the sock. With that in mind, k15 (k17; k18). Then, turn work around and, using the same needle, p30 (p34; p36). The 30 (34; 36) stitches you just worked are your heel stitches, so you can go ahead and transfer the other 30 (34; 36) stitches to a stitch holder or yarn scrap to work later. Continuing with your heel stitches, then, we'll knit like so:
Heel Row 1 (right side): * slip 1 stitch purlwise (slip 1) with yarn in back (wyib), k1; rep from *
Heel Row 2: slip 1 with yarn in front (wyif), purl to end of row
Knit heel rows 1 & 2 15 (17; 18) times. Then we'll begin our heel turn, which uses short rows for shaping. So we'll knit the following two transition rows:
Transition Row 1 (right side): k17 (k19; k20), ssk, k1, turn
Transition Row 2: slip 1 wyif, p5, p2tog, p1, turn
And once those two bad boys are done, we'll continue the heel turn as follows. Note that you'll be bridging the gaps made by the turns with your ssk and p2tog stitches, and that wrapping & turning isn't necessary in this instance.
Turn Row 1: slip 1 wyib, knit to one stitch before gap from turn on previous row, ssk, k1, turn
Turn Row 2: slip 1 wyif, purl to one stitch before gap from turn on previous row, p2tog, p1, turn
Knit turn rows 1 & 2 until you've worked all of your heel stitches. If you're knitting the large size, on your final repeat of turn row 1, you will omit the final k1, and on your final repeat of turn row 2, you will omit the final p1. When you're done with this section, you will have (18, 20, 20) stitches remaining on your heel, and it will be time to begin the gusset. With that in mind, we'll knit the gusset set-up row as follows:
Gusset Set-up Row: with first needle, knit across all heel stitches. Then, pick up and 16 (18; 19) stitches along edge of heel flap, placing each stitch in one of your slipped edge stitches, and placing the final picked-up stitch in the corner where the heel meets the top of the sock. With your second dpn, knit across instep (your 30 (34; 36) held stitches). Then, with 3rd dpn, pick up 16 (18; 19) stitches along other edge of heel flap, placing first picked-up stitch in the corner where the heel meets to the top of the sock, and then knit across first 9 (10; 10) stitches from first dpn, so that the round once again begins at the center back of the heel. You should now have 25 (28, 29) stitches on your first needle (or before your first row marker), 30 (34; 36) stitches on your second needle, and 25 (28, 29) on your third.
Complete the gusset set-up row. Now we're ready to work on the gusset, as follows. Make sure to read the directions below the rows carefully, as they will be specific for your size.
Gusset Row 1: knit until you have 3 stitches left on your first needle, k2tog, k1; knit across second needle; k1, ssk, knit until end of third needle
Gusset Row 2: knit
Knit gusset rows until you have 15 (17; 18) stitches left on each of your first and third needles. Now we'll continue in stockinette, without decreases, until the piece measures roughly 7.5" (8"; 8.75") from the back of the heel, or until you're at about 2" (2.25"; 2.25") from your desired finished length. Now it's time to work on the toe decreases. With that in mind, we'll continue like so:
Toe Row 1: knit until 3 stitches remain on first needle, k2tog, k2; on second needle, k1, ssk, knit until 3 stitches remain on second needle, k2tog, k1; on third needle, k1, ssk, knit until end of needle
Toe Row 2: knit
Knit rows 1 & 2 until 32 (36; 36) stitches remain in sock. Then we'll work Toe Row 1 only (no toe row 2!) until only 12 (16; 16) stitches remain. Knit stitches from needle 1 onto needle 3, so that there are only 6 (8; 8) stitches on each of two needles. Use the Kitchener Stitch to graft final stitches. Then, tuck in ends, and block. Make another.
Read NextElse's Estonian Lace Socks
Your Recently Viewed Projects
Thanks for your comment. Don't forget to share!
brbrptt 9859433
Sep 12, 2017
I have made 4 pair of these! Every time I take a pair off my magic loop, someone oohs and aahs until I hand them over. Finally got to keep the last ones and I love the feel of the heel. Thanks.
Tricia108
May 23, 2017
This is an adorable pattern. I have just started making socks again and these would be great. I like the pattern on the back heel as well. It adds a little more cushion. I will do them on magic loop though. It is easy enough to figure out. There are nothing like home made socks. They just fit your feet better. I have small feet so it is hard to get store bought ones to fit as nicely. Thank you for the pattern,
icurn4ever 8822730
Oct 16, 2016
I have saved the pattern and this looks like a great one for my husband who hates socks that are too tall. I would like to figure a way to do this in the round as "magic loop". Does anyone else think this looks viable for that method? How would I go about converting it? I love making two socks at one time for the consistent sizing.
quanahs 5032097
Mar 19, 2016
This is a pretty sock pattern with a good bit of ribbing at the top to keep the socks from slouching. I love the addition of the pretty color work band and think the socks could be made to suit any occasion. Also, the range of sizes included is very useful especially when deciding to make these socks for more than one person. Thanks for the pattern.
bthomas255 6356649
Sep 27, 2015
The gauge for this project, Pansy Path Knit Socks, says "30 stitches and rows = 4 inches in stockinette stitch". Did the number of rows get left out? Have never known the number of stitches rows to be the same and equal to the same number of inches for both. I'm assuming that the gauge was done on the US 2 needles? These sock are so cute, and I want to make them for Christmas using red green accents. Thanks
Report Inappropriate Comment
Are you sure you would like to report this comment? It will be flagged for our moderators to take action.
Thank you for taking the time to improve the content on our site.