Team USA Knit Mittens
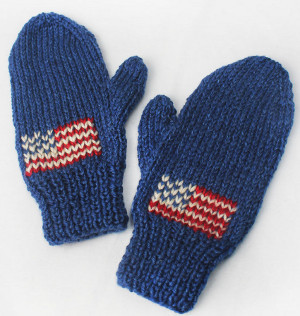
Show your spirit during the winter Olympics with the Team USA Knit Mittens. These surprisingly simple mittens will keep your fingers nice and warm while you cheer on your favorite team. No matter what your favorite sport is, the Olympics have a way of bringing people together. You can easily make these mittens for the entire family; featuring a simple color work pattern, this knit mittens pattern will knit up quickly.

Knitting Needle Size7 or 4.5 mm, 9 or 5.5 mm
Yarn Weight(4) Medium Weight/Worsted Weight and Aran (16-20 stitches to 4 inches)
SIZE: Toddler, (Child, Adult Medium, Adult Large)
Finished Circumference: 6 (7, 8 1/2, 10) in. (15 (18, 21.5, 25.5) cm)
Finished Length: 6 (8, 10 1/2, 11 1/2) in. (15 (20.5, 26.5, 29) cm)
Note: Pattern is written for smallest size with changes for larger sizes in parentheses. When only one number is given, it applies to all sizes. To follow pattern more easily, circle all numbers pertaining to your size before beginning.
MATERIALS
- 136-109 Lion Brand Heartland Yarn: Olympic 1 1, 1, 1 Ball (A)
- 136-098 Lion Brand Heartland Yarn: Acadia 1 1, 1, 1 Ball (B)
- 136-113 Lion Brand Heartland Yarn: Redwood 1 1, 1, 1 Ball (C)
- Lion Brand Knitting Needles - Size 7 [4.5 mm]
- Lion Brand Knitting Needles- Size 9 [5.5 mm]
- Lion Brand Split Ring Stitch Markers
- Lion Brand Stitch Holders
- Lion Brand Large-Eye Blunt Needles (Set of 6)
GAUGE: 16 sts + 24 rows = 4 in. (10 cm) in St st (k on RS, p on WS) with larger needles.
BE SURE TO CHECK YOUR GAUGE. When you match the gauge in a pattern, your project will be the size specified in the pattern and the materials specified in the pattern will be sufficient. If it takes you fewer stitches and rows to make a 4 in. [10 cm] square, try using a smaller size hook or needles; if more stitches and rows, try a larger size hook or needles.
ABBREVIATIONS:
M1 (make 1) = An increase worked by lifting the horizontal thread lying between the needles and placing it onto the left needle. Work this new stitch through the back loop.
ssk (slip, slip knit) = Slip the next 2 sts as if to knit, one at a time to right needle; insert the left needle into the fronts of these 2 sts and k them together.
beg = begin(s)(ning)
k = knit
k2tog = knit 2 together
p = purl
p2tog = purl 2 together
rep = repeat(s)(ing)
RS = right side
St st = Stockinette stitch
st(s) = stitch(es)
WS = wrong side
MITTENS (make 2)
Cuff
With smaller needles and leaving long yarn tail, cast on 25 (29, 35, 41) sts.
Row 1 (WS): P1, (k1, p1) across.
Row 2: K1, (p1, k1) across.
Rep Rows 1 and 2 until piece measures about 2 (2 1/2, 3, 3 1/2) in. (5 (6.5, 7.5, 9) cm), ending with RS
row.
Note: End with a RS row means that the last row you work should be a RS row. Change to larger needles. Beg with a purl row, work 3 (5, 7, 9) rows in St st (k on RS, p on WS).
Thumb Gusset
Row 1 (RS): K12 (14, 17, 20); place marker; M1, k1, M1; place marker; k12 (14, 17, 20) - 27 (31, 37, 43) sts.
Row 2 and all WS Rows: Purl.
Row 3: K to marker, slip marker, M1, k to next marker, M1, slip marker, k to end.
Rep Rows 2 and 3 until there are 9 (11, 13, 15) sts between markers - 33 (39, 47, 55) sts when all increases have been completed.
Next Row (WS): Purl.
Body
Next Row: K12 (14, 17, 20) sts; remove markers and slip the 9 (11, 13, 15) sts for thumb gusset to stitch holder; k12 (14, 17, 20) - 24 (28, 34, 40) sts.
Continue working in St st until piece measures about 5 (6, 9, 10) in. (12.5 (15, 23, 25.5) cm from beg.
End with a WS row as your last row worked, and placing a marker between the two center sts.
Top Shaping
Row 1 (RS): Ssk, k to 2 sts before marker, k2tog; slip marker; ssk, k to last 2 sts, k2tog.
Row 2: Purl.
Rep Rows 1 and 2 until 16 (16, 18, 20) sts remain.
Next Row (all sizes): (K2tog) across - 8 (8, 9, 10) sts.
Next Row: Purl.
Cut yarn, leaving a long yarn tail. Thread yarn tail through rem sts twice and pull to gather. Knot to secure.
Thumb Top
Return thumb gusset sts from holder to larger needle ready to work a RS row.
Join yarn and knit one row.
Next Row: P3 (4, 5, 6), p2tog, p4 (5, 6, 7) - 8 (10, 12, 14) sts.
Work even in St st to desired length, ending with a WS row.
Next Row: (K2tog) across - 4 (5, 6, 7) sts.
Cut yarn, leaving a long yarn tail. Thread yarn tail through rem sts twice and pull to gather. Knot to secure.
FINISHING
Duplicate Stitch
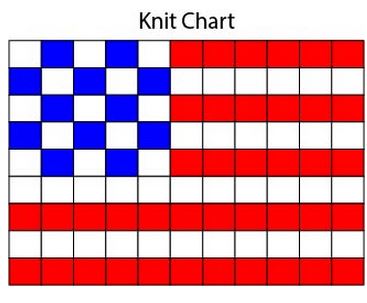
With B and C and following chart, work a duplicate st flag, centered, on back of each Mitten just below cuff.
Using yarn tails, sew sides and thumb to complete Mitten. Sew closed any gaps that may have occurred when increasing sts for thumb gusset.
Weave in ends.
Read NextChristmas Garter Stitch Mittens
Your Recently Viewed Projects
Report Inappropriate Comment
Are you sure you would like to report this comment? It will be flagged for our moderators to take action.
Thank you for taking the time to improve the content on our site.

