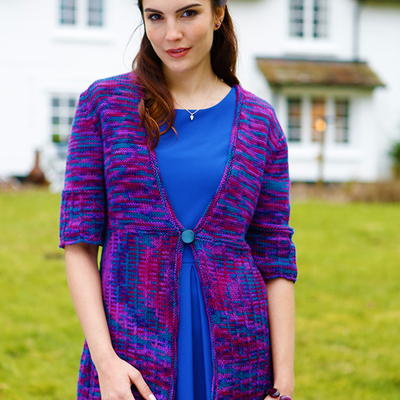
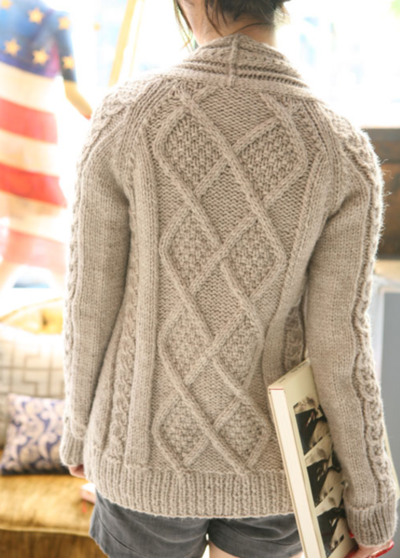
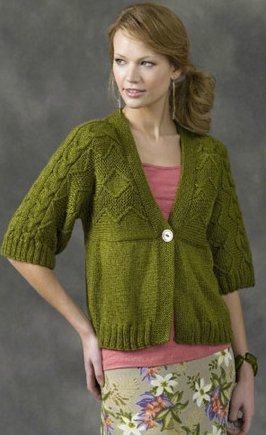
Cabled Yoke Cardigan

A tasteful cable can tie a piece together. The Cabled Yoke Cardigan will be a delightful addition to your wardrobe, no matter what the season. The short sleeves make it easily adaptable to almost any weather. Its an easy way to layer on a chilly spring or autumn night, and can easily be worn in over air-conditioned interiors during the summer. This cardigan is engaging without being overwhelming or unbalanced; this pattern is sure to please everyone.

Knitting Needle Size6 or 4 mm, 7 or 4.5 mm, Circular Knitting Needles
Yarn Weight(4) Medium Weight/Worsted Weight and Aran (16-20 stitches to 4 inches)
SIZES
To fit bust measurement:
Extra-Small / Small: 28-34" [ 71-86.5 cm ]
Medium: 36-38" [ 91.5-96.5 cm ]
Large: 40-42" [ 101.5-106.5 cm ]
Extra-Large: 44-46" [ 112-117 cm ]
2/3 Extra-Large: 48-54" [ 122-137 cm ]
4/5 Extra-Large: 56-62" [ 142-157.5 cm ]
Finished bust:
Extra-Small / Small: 36" [ 91.5 cm ]
Medium: 40" [ 101.5 cm ]
Large: 44½" [ 113 cm ]
Extra-Large: 50" [ 127 cm ]
2/3 Extra-Large: 56" [ 142 cm ]
4/5 Extra-Large: 65" [ 165 cm ]
GAUGE
20 sts and 26 rows = 4" [10 cm] with larger needles in stocking st.
MATERIALS
- Patons® Canadiana or Patons® Decor or Patons® Classic Wool (Patons® Decor (87672 Grey Heather) shown in photograph)
- Color of your choice 5 (6, 6, 7, 8, 8) balls
- Sizes 4 mm (U.S. 6) and 4.5 mm (U.S. 7) knitting needles.
- Sizes 4 mm (U.S. 6) and 4.5 mm (U.S. 7) circular knitting needles 36" [90 cm] long.
- Set of four sizes 4 mm (U.S. 6) and 4.5 mm (U.S. 7) double-pointed knitting needles or size needed to obtain tension.
- Cable needle.
- 3 buttons.
- 2 stitch holders.
INSTRUCTIONS
The instructions are written for smallest size. If changes are necessary for larger sizes the instructions will be written thus ( ). Numbers for each size are shown in the same color throughout the pattern. When only one number is given in black, it applies to all sizes.
Panel Pat A (worked over 3 sts)
1st row: (RS). K3.
2nd and alt rows: P3.
3rd row: C3F.
5th row: K3.
6th row: As 2nd row.
These 6 rows form Panel Pat A.
Panel Pat B (worked over 3 sts)
1st row: (RS). K3.
2nd and alt rows: P3.
3rd row: C3B.
5th row: K3.
6th row: As 2nd row.
These 6 rows form Panel Pat B.
Panel Pat C (worked over 20 sts)
1st row: (RS). (P2. K4) 3 times. P2.
2nd and alt rows: Knit all knit stitches and purl all purl stitches as they appear.
3rd row: P2. K4. T4B. T4F. K4. P2.
5th row: P2. K2. C4B. P4. C4F. K2. P2.
7th row: P2. C4B. T4F. T4B. C4F. P2.
9th row: P2. K4. P2. C4F. P2. K4. P2.
11th and 13th rows: As 1st row.
15th row: As 9th row.
17th row: As 1st row.
18th row: As 2nd row.
These 18 rows form Panel Pat C.
Cable Yoke
With pair of larger needles, cast on 28 sts.
1st row: (RS). P1. Work 1st row of Panel Pat A. Work 1st row of Panel Pat C. Work 1st row of Panel Pat B. P1.
2nd row: K1. Work 2nd row of Panel Pat B. Work 2nd row of Panel Pat C. Work 2nd row of Panel Pat A. K1.
3rd row: P1. Work 3rd row of Panel Pat A. Work 3rd row of Panel Pat C. Work 3rd row of Panel Pat B. P1.
4th row: K1. Work 4th row of Panel Pat B. Work 4th row of Panel Pat C. Work 4th row of Panel Pat A. K1.
Panel Pats A, B and C are now in position. Cont in pat until work from beg measures approx 43 (43-45-45-47-47)" [109 (109-114.5-114.5-119.5-119.5) cm], ending with 16th row of Panel Pat C. Cast off .
Bottom Yoke
Beg at one end of Cable Yoke, with larger circular needle pick up and knit 216 (220-228-236-252-260) sts evenly across bottom edge of Cable Yoke.
2nd row: (WS). K1. (P6. K7) twice. P6. K2 (3-4-5-7-8). Place marker on last st. K40 (40-42-44-48-50). Place marker on last st. K4 (5-6-7-9-10). (P6. K7) 4 times. P6. K5 (6-7-8-10-11). Place marker on last st. K40 (40-42-44-48-50). Place marker on last st. K1 (2-3- 4-6-7). (P6. K7) twice. P6. K1.
3rd row: P1. (Work 1st row of Panel Pat A. Work 1st row of Panel Pat B. P7) twice. Work 1st row of Panel Pat A. Work 1st row of Panel Pat B. P1 (2-3-4-6-7). M1P. P1. M1P. P39 (39-41-43-47- 49). M1P. P1. M1P. P4 (5-6-7-9-10). (Work 1st row of Panel Pat A. Work 1st row of Panel Pat B. P7) 4 times. Work 1st row of Panel Pat A. Work 1st row of Panel Pat B. P4 (5-6-7-9-10). M1P. P1. M1P. P39 (39-41-43-47-49). M1P. P1. M1P. P1 (2-3-4-6-7). (Work 1st row of Panel Pat A. Work 1st row of Panel Pat B. P7) twice. Work 1st row of Panel Pat A. Work 1st row of Panel Pat B. P1. 224 (228-236-244-260-268) sts.
4th row: K1. (Work 2nd row of Panel Pat A. Work 2nd row of Panel Pat B. K7) twice. Work 2nd row of Panel Pat A. Work 2nd row of Panel Pat B. K50 (52-56-60-68-72) (Work 2nd row of Panel Pat A. Work 2nd row of Panel Pat B. K7) 4 times. Work 2nd row of Panel Pat A. Work 2nd row of Panel Pat B. K50 (52-56-60-68-72). (Work 2nd row of Panel Pat A. Work 2nd row of Panel Pat B. K7) twice. Work 2nd row of Panel Pat A. Work 2nd row of Panel Pat B. K1. Panel Pats A and B are now in position.
Size XS/S only:
5th row: [(Pat to next marked st. M1P. P1 (marked st). M1P) 4 times. Pat to end of row.
6th row: Work even in pat.
Rep last 2 rows twice more. 248 sts.
All sizes:
Next row: (RS). *(Pat to next marked st. M1P. P1 (marked st). Pat to next marked st. P1 (marked st). M1P. Rep from * once more. Pat to end of row.
Next row: (Pat to next marked st. M1. K1. M1) 4 times. Pat to end of row.
Rep last 2 rows 0 (1-3-0-2-0) time(s) more. 260 (252-284-256-296-280) sts.
Next row: (Pat to next marked st. M1P. P1. M1P) 4 times. Pat to end of row.
Next row: (Pat to next marked st. M1. K1. M1) 4 times. Pat to end of row.
Rep last 2 rows 0 (3-2-5-5-9) times more, then 1st row 1 (0-1-1-0-0) time more. 284 (316-340-360-392-440) sts.
Work 1 (0-1-1-0-0) row even.
Next row: (Dividing row). Pat across fi rst 43 (47-51-52-57-68) sts (Right Front). Slip next 56 (62-66-74-80-84) sts (Right Sleeve) onto length of spare yarn. Cast on 6 (6-8-16-20-26) sts. Join yarn to next st and pat across next 86 (98-106-108-118-136) sts (Back). Cast on 6 (6-8-16-20-26) sts. Slip next 56 (62-66-74-80-84) sts (Left Sleeve) onto length of spare yarn. Pat across rem 43 (47-51-52-57-68) sts (Left Front). 184 (204-224-244-272-324) sts.
Body: Cont even in pat, as established, until work from dividing row measures 16 ins [40.5 cm], dec 1 st at center and ending with a WS row. 183 (203-223-243-119.5-119.5) sts.
Change to smaller circular needle and proceed as follows:
1st row: K1. *P1. K1. Rep from * to end of row.
2nd row: P1. *K1. P1. Rep from * to end of row.
Rep last 2 rows of (K1. P1) ribbing once more.
Cast off in ribbing.
Sleeves: With RS of work facing, slip 56 (62-66-74-80-84) sts from spare yarn onto three larger double-pointed needles. Cast on 6 (6-8-16-20-26) sts. Join in rnd. Place marker after 3rd (3rd-4th-8th-10th-13th) cast on st for beg of rnd. 62 (68-74- 90-100-110) sts.
Purl 12 rnds.
Change to smaller double-pointed needles and proceed as follows:
Next rnd: *K1. P1. Rep from * around.
Rep last rnd 3 times more.
Cast off loosely in ribbing.
Top Yoke
With RS of work facing and larger circular needle, pick up and knit 175 (179-187-191-195-199) sts evenly across top edge of Cable Yoke.
1st row: (WS). K29 (30-32-32-33-33) (Left Front). Place marker. K29 (29-29-31-31-33) (Left Sleeve). Place marker. K59 (61- 65-65-67-67) (Back). Place marker. K29 (29-29-31-31-33) (Right Sleeve). Place marker. K29 (30-32-32-33-33) (Right Front).
2nd row: *Purl to 2 sts before marker. (P2tog) twice. Rep from * 3 times more. Purl to end of row.
3rd row: Knit.
Rep last 2 rows 4 times more. 135 (139-147-151-155-159) sts rem.
Shape front neck:
1st row: (RS). *Purl to 2 sts before marker. (P2tog) twice. Rep from * 3 times more. Purl to last 9 (10-12-12-14-14) sts. Turn. Leave rem sts on a st holder.
2nd row: Knit to last 9 (10-12-12-14-14) sts. Turn. Leave rem sts on a st holder. 109 (111-115-119-119-123) sts rem on needle.
3rd row: P2tog. *Purl to 2 sts before marker. (P2tog) twice. Rep from * 3 times more. Purl to last 2 sts. P2tog.
4th row: ssk. Knit to last 2 sts. K2tog.
5th and 6th rows: As 3rd and 4th rows.
7th row: As 3rd row.
8th row: ssk. *Knit to 2 sts before marker. (K2tog) twice. Rep from * 3 times more. Knit to last 2 sts. K2tog.
9th row: *Purl to 2 sts before marker. (P2tog) twice. Rep from * 3 times more. Purl to end of row.
10th row: As 8th row. 47 (49-53-57-57-61) sts rem. Break yarn, leaving all sts on a spare needle.
Neck edging: With pair of smaller needles, K9 (10-12-12-14-14) from right front st holder.
Pick up and knit 17 sts up right front neck edge. P47 (49-53-57-57-61), dec 4 sts evenly across.
Pick up and knit 17 sts down left front neck edge. P9 (10-12-12-14-14) from left front st holder. 95 (99- 107-111-115-119) sts.
Work 4 rows in (K1. P1) ribbing as given for Body. Cast off in ribbing.
FINISHING
Pin garment pieces to measurements. Cover with a damp cloth, leaving cloth to dry. Sew underarm seams.
Buttonhole band: With RS of work facing and pair of smaller needles, pick up and knit 121 (125-125-127-129-133) sts evenly up right front edge.
2nd row: (WS). P1. *K1. P1. Rep from * to end of row.
3rd row: (Buttonhole row). Rib across 86 (90-90-92-94-98) sts. *Cast off 2 sts Rib 13 sts (including st on needle after cast off ). Rep from * once more. Cast off 2 sts. Rib to end of row. (3 buttonholes).
4th row: Rib across, casting on 2 sts over cast off sts.
Work 2 more rows of (K1. P1) ribbing.
Cast off in ribbing.
Button band: With RS of work facing and pair of smaller needles, pick up and knit 121 (125-125-127-129-133) sts evenly down left front edge.
Work as given for Buttonhole band, omitting references to buttonholes.
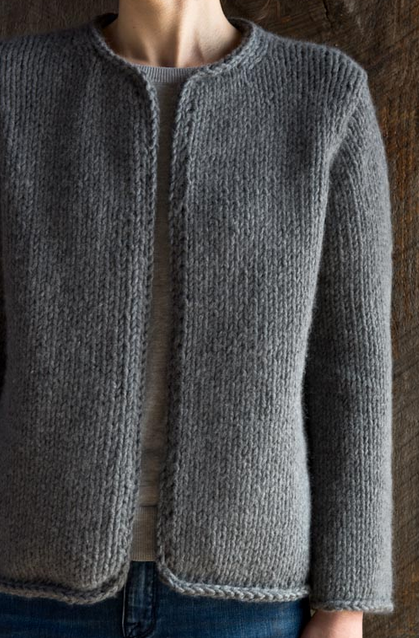
Read NextClassic Knit Jacket
Your Recently Viewed Projects
Thanks for your comment. Don't forget to share!
dregular
Apr 13, 2017
I am trying to print a pattern without printing all the pages and ads. Is this possible
KathrynAllison
Apr 14, 2017
Hello dregular, there is a white "Print" button directly under the name of the pattern. Pressing that button will create a print-friendly version of the pattern. Hope this helps! -Editors of AllFreeKnitting
Cinnybugg
Apr 05, 2017
I can't wait to start this Sweater! When I looked at the photo I thought Oh So Gorgeous But they won't have it in my size... Boy,did I do a happy dance when I saw that it was included!! My current project (a long sleeve sweater) is on hold... on my way to choose my yarn! Thank-you so much for all your beautiful variety of free patterns!
Jo Ann Knit Lady
Aug 06, 2014
I love this pattern and am trying to get it started. I have the Cable Yoke started (the first 4 rows) but for some reason I can't understand how to cont in pattern. My panel Pats A,B and C are in position but where do I start to continue in pattern? Is there an easier way for me to understand this part of pattern? Thank you so much for the pattern it is beautiful and I thought I could handle it but I am at a loss at the moment.
Editor JD
Aug 08, 2014
Hi Jo Ann, As this pattern is not ours, I suggest contacting the Patons Design Team on their website, Yarnspirations.com. It'd also be helpful to post your question on our Facebook page. We have a ton of talented followers who would love to help! Thanks, -Editors of AllFreeKnitting
Lisa
Oct 09, 2017
You will continue on in the pattern as indicated, which means you will continue doing each row of each panel consecutively until the panels reach the lengths indicated for each size in the pattern.
Ddipsy
Jun 29, 2014
Such a flattering design! i look forward to knitting this sweater. It will be no gift. It's all mine!
louisedowie 840203 5
Jun 21, 2014
The yarn weight states DK, but the materials list shows a worsted weight, which is correct? Thanks
ahuggett6232014 07 39009
Jun 23, 2014
Always follow the materials list! We've amended our pattern listing to reflect the correct yarn weight. Thanks for your question. Editors of AllFreeKnitting
evamulkern 3941936
Jun 19, 2014
What do I do with the 2 extra sts that are in the cable yoke pattern? instructions only add up to 26.
Lisa
Aug 03, 2014
There are no extra stitches if the pattern is followed exactly as written-the panel is 26sts and there is a P1 at the beginning and the end bringing the stitch count to 28. hope thi helps.
skyeways 8437662
Jun 19, 2014
A beautiful design, and I am eager to make this! Where on this site will I find a list of abbreviations and instructions explaining the same? English and American patterns appear to differ. Thank you
Editor JD
Aug 04, 2014
Hi skyeways 8437662, Please find the green underlined link above "Stitch Glossary." Hope this helps! -Editors of AllFreeKnitting
elizabethcoxlesmar tels 3124403
Jun 18, 2014
I would love to make this cardigan but I do not know what T4B and T4F means. I guess it 4 back and 4 frontwise but don't know what the T stands for. Is this an American term? Elizabeth in France
hotsprings528 2870 905
Jun 18, 2014
it is a cable. Instead of two the front and knitting though (which is usually C4B or C4F) you purl stitches. It doesn't look like a traditional twisty cable then, but rather a diagonal line. T4B - Slip two stitches onto a cable needle and hold it to the back. Knit two stitches off of the main needle. Bring the yarn to the front and purl the two stitches off the cable needle. T4F - Slip two stitches onto a cable needle and hold it to the front. Purl two stitches off of the main needle. Bring the yarn to the back and knit the two stitches off the cable needle. T4B
Ila Treat
Jun 18, 2014
I like the pattern, but good heavens, people! That's "Yoke" not "Yolk", we're not talking eggs here!
Report Inappropriate Comment
Are you sure you would like to report this comment? It will be flagged for our moderators to take action.
Thank you for taking the time to improve the content on our site.