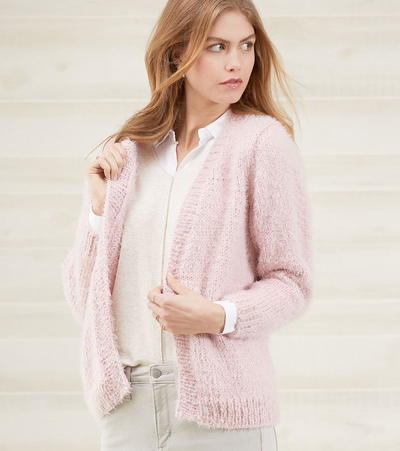
Knit Envelope Cardigan

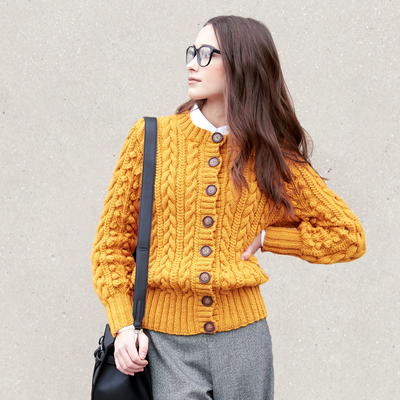
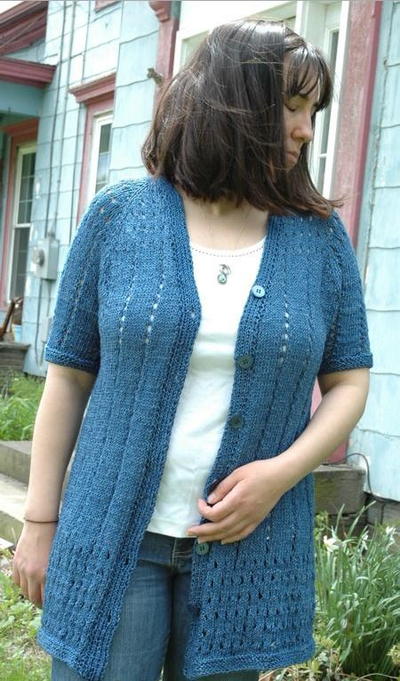
The Knit Envelope Cardigan is an easy pattern featuring a shawl collar and textured stitch. The worsted weight yarn gives this knitted cardigan warmth without excess bulk. Fold yourself up in this dreamy design and you will not be disappointed. The easy knit cardigan pattern has instructions for multiple sizes as well as a chart in order to help you visualize each step. Casual cardigans such as this envelope style are ideal for multiple occasions. You can dress this neutral knit sweater up or down and the natural yarn goes with a variety of pieces already in your wardrobe.

Knitting Needle Size7 or 4.5 mm, Circular Knitting Needles
Yarn Weight(4) Medium Weight/Worsted Weight and Aran (16-20 stitches to 4 inches)
Gauge20 sts and 26 rows = 4" [10 cm] in stocking st.
Finished SizeTo fit bust measurement: Extra-Small/Small/Medium 28-38" [71-96.5 cm] Large/XL/2XL 40-48" [101.5-122 cm] 3/4/5 X-Large 54-62" [137-157.5 cm]
Materials List
- Patons® Classic Wool Worsted™ (3.5 oz/100 g; 210 yds/192 m) - Natural Mix (00229), XS/S/M - 5 balls, L/XL/2XL - 6 balls, 3/4/5 XL - 7 balls
- Size U.S. 7 (4.5 mm) knitting circular knitting needle 36" [91.5 cm] long or size needed to obtain gauge
- Stitch marker
Find even more knit cardigan patterns by checking out this collection of21 Knit Cardigans Perfect for Summer
Instructions
The instructions are written for smallest size. If changes are necessary for larger size(s) the instructions will be written thus ( ). Numbers for each size are shown in the same color throughout the pattern. When only one number is given in black, it applies to all sizes.
Front
Cast on 79 (87-97) sts. **Do not join. Working back and forth across needle in rows, proceed as follows:
1st row: (RS). K1. *P1. K1. Rep from * to end of row.
2nd row: P1. *K1. P1. Rep from * to end of row.
Rep last 2 rows (K1. P1) ribbing for 3" [7.5 cm], ending on a WS row. **
Proceed as follows:
1st row: (RS). K1. (P1. K1) 7 times. PM. *K1. P1. Rep from * to end of row.
2nd row: (K1. P1) to marker. Slm. (P1. K1) 7 times. P1.
3rd row: K1. (P1. K1) 7 times. Slm. *P1. K1. Rep from * to end of row.
4th row: (P1. K1) to marker. Slm. (P1. K1) 7 times. P1.
5th row: K1. (P1. K1) 7 times. Slm. *K1. P1. Rep from * to end of row.
6th row: (K1. P1) to marker. Slm. (P1. K1) 7 times. P1.
Rep last 4 rows Irish Moss St and Rib pat until 5 (6½-7)" [12.5 (16.5- 18) cm] total length, ending on a WS row.
Shape Collar: Next row: (RS). Rib to marker. M1. Slm. Pat to end of row. Work 3 rows even in pat, taking inc sts into ribbing.
Rep last 4 rows 19 times more. 99 (107-117) sts.
Cont even until 37 (42½-45)" [94 (108-114.5) cm] total length, ending on a WS row.
Next row: (RS). Pat to 2 sts before marker. K2tog. Slm. Pat to end of row. Work 3 rows even in pat.
Rep last 4 rows 19 times more. 79 (87-97) sts. PM at end of last row. Cont even in pat until work from marker measures 2 (3½-4)" [5 (9- 10) cm], ending on a WS row.
Work 3" [7.5 cm] in (K1. P1) ribbing, ending on a RS row. Cast off in ribbing.
Back
Cast on 159 (179-195) sts. Work from ** to ** as given for Front. Proceed as follows:
1st row: (RS). K1. *P1. K1. Rep from * to end of row.
2nd and 3rd rows: P1. *K1. P1. Rep from * to end of row.
4th row: K1. *P1. K1. Rep from * to end of row.
Rep last 4 rows Irish Moss St pat until 13 (14-14)" [33 (35.5-35.5) cm], total length, ending on a WS row. Cast off in pat.
Finishing
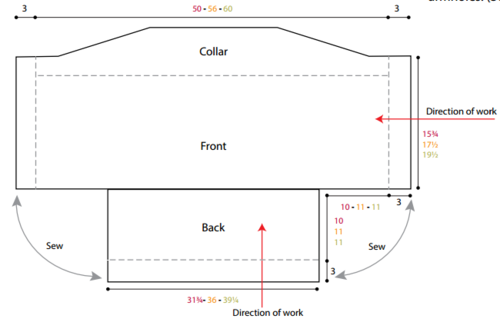
Center top edge of Back along straight side edge of Front and sew tog. Sew side 3" [7.5 cm] ribbing edges of Front and Back tog at each side, leaving seam open above ribbing to form armholes. (See Diagram)
-
Click image to enlarge
Abbreviations
- Dec
- Decrease(ing)
- Inc
- Increase(ing)
- K
- Knit
- K2tog
- Knit next 2 stitches together
- P
- Purl
- M1
- Make 1 stitch by picking up horizontal loop lying before next stitch and knitting into back of loop
- PM
- Place marker
- RS
- Right side
- Slm
- Slip marker
- WS
- Wrong side
Read NextMidtown Cardigan
Your Recently Viewed Projects
Thanks for your comment. Don't forget to share!
gardenlady4012 263 4130
Jun 04, 2017
Pattern does not work up at all as shown in picture. It has a cocoon/shrug shape, not a cardigan. It's knitted side to side and is very wide across the back, they must have pinned and tucked the heck out of it before taking this picture. I am thinking of customizing the pattern so that it will have more of a cardigan shape.
flgardener
Jun 24, 2017
I was wondering about that. I don't want a big old cocoon either but I like the front as shown in the photo. Would you be willing to share your modified pattern?
mhristova123 34844 98
May 17, 2017
I want to ask why the link called Such Comfy Sweater turned to Knit Envelope Cardigan? This is not the fist time when you change the name. For shame...
sharonlancaster1 5 350149
Mar 26, 2017
Why isn't the 14 sts of ribbing on both sides while working? I'm only coming out with it on one side. Help.
gardenlady4012 263 4130
Jun 04, 2017
It is knitted from side to side. You will also work ribbing on the other end.
Lisa
Feb 24, 2018
The garment is knit side to side, so the ribbing is only required on side of the garment. If you look at the construction diagram it will make more sense-maybe.
schiebet
Mar 06, 2017
This is a unique pattern. I've never seen one in this shape before and I really like it. I really, really like that it doesn't require much seaming. I can't wait to cast this on.
hatton 9385833
Feb 25, 2017
I have the same problem as Lorraine. What is meant by work 3 rows even in pattern taking increases into ribbing? Please could you reword this instruction so that it is clear for those of us who have chosen a pattern marked Easy
lerdmann7 9476466
Feb 25, 2017
I would hope that it simply means the increases are all in ribbing to account for the shaping for the shawl collar. I have not knit this yet but that shawl collar is so flattering in other knits that I wear often I have to give it a whirl.
Lisa
Feb 24, 2018
The garment is being knit side to side. So, when you increase you must keep the added stitches in the same stitch pattern to maintain the uniformity and continuity of the pattern.
3cats2love
Feb 25, 2017
Hi, I will try to explain my understanding of this part of the pattern. You are working this pattern from the top down in the diagram. When you start to shape the collar, you make a row that includes an increase. When you knit the next 3 rows in the Irish moss stitch and ribbing pattern, the increased stitch becomes part of the ribbing (not the moss stitch). You repeat these 4 rows (increase row followed by 3 regular pattern rows) another 19 times. When you reach that point you will have gradually added 20 stitches total.
barb 2800867
Feb 25, 2017
Actually you are knitting the top part sideways the back is then knit from bottom up and attached to the straight edge of the top piece. The top piece is the folded down to form the front edges of the sweater. I am in the process of making this right now
Lisa
Mar 05, 2017
I think this is the row everyone is having trouble with, Rib to marker. M1. Slm. Pat to end of row. Work 3 rows even in pat, taking inc sts into ribbing. It's actually easier than it sounds, you are simply working the next three rows while incorporating the new stitches into the row so that you keep the continuity of the patterns. Just be sure to add the increases to the ribbing appropriately so that they don't show. Hope this helps, happy knitting.
Lorraine
Feb 14, 2017
Please help with the shape collar part. I know how to M1 stitch. I dont understand work 3 rows even in pattern taking increases into ribbing. Am I adding a stitch to each of these rows?
flgardener
Feb 24, 2017
Lorraine, I love the AllFreeKnitting site but my experience with it is that you almost never get an answer to your questions here. I'm interested in this pattern myself so I did a little digging and I think I found where it originated. You could try asking your question via this site. Good luck!http//www.yarnspirations.com/patterns/patons- == knit-envelope-cardigan.html?id=201566
RachelAnne
Feb 03, 2017
Wow, I love how simple this cardigan is, and that it comes in so many sizes. Wonderful variety! Can't wait to cast on.
Report Inappropriate Comment
Are you sure you would like to report this comment? It will be flagged for our moderators to take action.
Thank you for taking the time to improve the content on our site.