Pretty Pink Fashion Fur Shrug for Girls

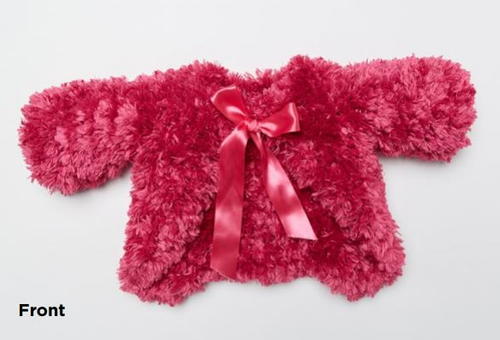
Adorable as can be, this Pretty Pink Fashion Fur Shrug for Girls by Red Heart is almost too cute for words! This easy knit shrug pattern is made using jumbo yarn and will be a warm and fashionable addition to any little girl's wardrobe. Bright and fashion-forward as can be, this shrug likely won't stay stored in a closet for long! If you'd like, consider creating this shrug with other bold colors so that the accessory can coordinate with just about any ensemble. This easy knit pattern is available in several different sizes. In addition, a diagram for the pattern, as well as images of the front and back of this design, are available below.

Knitting Needle Size17 or 12.75 mm
Yarn Weight(7) Jumbo
Gauge 4 sts = 4" [10 cm]; 8 rows = 4" [10 cm] in Garter stitch (knit every row).
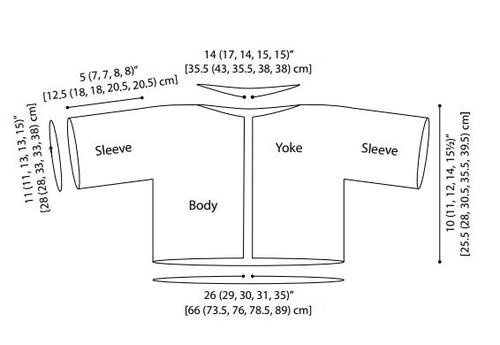
Finished SizeTo Fit Chest: 21 (23, 25, 26½, 28)" [53.5 (58.5, 63.5, 67.5, 71) cm] Finished Chest: 26 (29, 30, 31, 35)" [66 (73.5, 76, 78.5, 89) cm], closed Finished Length: 10 (11, 12, 14, 15½)" [25.5 (28, 30.5, 35.5, 39.5) cm]
Materials List
- RED HEART® Fur™: 5 (6, 7, 8, 10) balls 9701 Azalea
- Susan Bates® Knitting Needles: 12.75mm [US 17] circular knitting needle, 32" [80 cm]
- Detachable stitch markers
- 2 large stitch holders
- One yard 1½" [38mm] ribbon (optional)
- Yarn needle
Make even more accessories for the entire family when you check out these
Instructions
Notes:
Directions are for Child size 2; changes for sizes 4, 6, 8, and 10 are in parentheses.
Special Stitch: kfb (Knit into front and back) = Knit next stitch but do not remove from needle, knit into back loop of same stitch and remove from needle – 1 st increased.
*Shrug is worked from the neck down to the lower edge.
*The yoke is worked first then the piece is divided and body and sleeves are worked separately to end.
*Circular needle is used to accommodate large number of stitches. Work back and forth in rows on circular needle as if working with straight needles.
Shrug Yoke
-
Cast on 14 (17, 14, 15, 15) sts.
-
Row 1 (set-up row – wrong side): K2 (3, 2, 2, 2) for right front, place marker, k3 for sleeve, place marker, k4 (5, 4, 5, 5) for back, place marker, k3 for sleeve, place marker, k2 (3, 2, 2, 2) for left front.
-
Row 2 (increase row – right side): Kfb, *knit to 1 st before next marker, kfb, slip marker, kfb; repeat from * 3 more times, knit to last st, kfb—24 (27, 24, 25, 25) sts.
-
Row 3: Knit, slipping markers as you come to them.
-
Row 4 (increase row): *Knit to 1 st before next marker, kfb, slip marker, kfb; repeat from * 3 more times, knit to end of row—32 (35, 32, 33, 33) sts.
-
Rows 5–8 (8, 10, 10, 12): Repeat Rows 3 and 4 for 2 (2, 3, 3, 4) more times—48 (51, 56, 57, 65) sts.
-
Before turning work to begin next row, place a marker or safety pin on this side to mark right side of work.
-
Next Row (wrong side): Knit, slipping markers as you come to them.
Divide for Body and Sleeves
-
Row 1 (right side): K7 (8, 8, 8, 9) left front sts, remove marker, k11 (11, 13, 13, 15) left sleeve sts and place these sts on a holder, remove marker, k12 (13, 14, 15, 17) back sts, remove marker, k11 (11, 13, 13, 15) right sleeve sts and place these sts on a holder, remove marker, k7 (8, 8, 8, 9) right front sts—26 (29, 30, 31, 35) sts remain on needle for body
Shrug Body
-
Working over body sts only, work in Garter stitch (knit every row) until piece measures about 7 (8, 9, 11, 12½)" [18 (20.5, 23, 28, 32) cm] from beginning.
-
Next 6 Rows (decrease row): K2tog, knit to end of row—20 (23, 24, 25, 29) sts.
-
Bind off.
Shrug Left Sleeve
-
Return the 7 (8, 8, 8, 9) left sleeve sts to needle so that you are ready to work a wrong side row. Join yarn and work in Garter stitch until sleeve measures about 5 (7, 7, 8, 8)" [12.5 (18, 18, 20.5, 20.5) cm] from divide.
-
Bind off. Cut yarn, leaving a 24" [61 cm] tail for sewing sleeve seam.
Shrug Right Sleeve
-
With 7 (8, 8, 8, 9) right sleeve sts work same as left sleeve.
Finishing
-
With yarn needle and long yarn tail attached to sleeve, whipstitch each sleeve seam.
-
Weave in ends.
-
If desired, thread one end of ribbon through top of each neck edge and tie for bow.
Diagram and Photos
-
Click here for the enlarged version of the pattern's diagram.
-
You can click here for the larger photo of the front of the shrug.
-
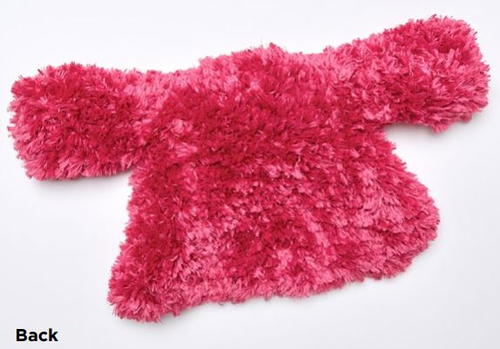
Click here for the enlarged version of the back of the shrug.
Abbreviations
- k
- knit
- k2tog
- knit next 2 stitches together
- st(s)
- stitch(es)
What color of yarn will you use to make this knit shrug?
Read NextCabled Shoulder Shrug
Your Recently Viewed Projects
Thanks for your comment. Don't forget to share!
achumley0003 31706 34
Oct 31, 2017
This is such a cute little fur shrug for a little girl. I can imagine how fancy my daughter would have felt wearing this when she was young. She loved getting dressed up. This shrug seems like it would be pretty warm also. I also think it could be worked as a full size coat with just some math.
Report Inappropriate Comment
Are you sure you would like to report this comment? It will be flagged for our moderators to take action.
Thank you for taking the time to improve the content on our site.