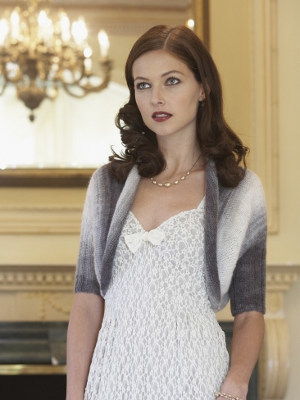
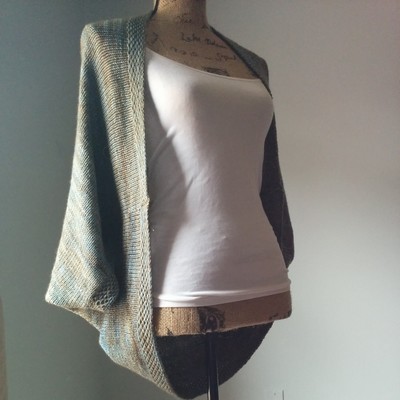
Elegant Cabled Shrug

Dive into this darling knit shrug pattern. The Elegant Cabled Shrug features cables that curve from the neckline all around the back and up the other side for a stylish, streamlined look. Versatile enough for casual week day activities as well as evening affairs, the Elegant Cabled Shrug is sure to become your next go-to layering piece. Perfect for year-round wear, this knit shrug pattern is an effortless way to add visual interest and appear to whatever you're wearing.

Knitting Needle Size6 or 4 mm, 9 or 5.5 mm, Circular Knitting Needles, Double-Pointed Knitting Needles (DPNs)
Yarn Weight(4) Medium Weight/Worsted Weight and Aran (16-20 stitches to 4 inches)
Gauge18 stitches, 24 rows, 4 inches. stockinette stitch
Materials:
- Stitch Nation by Debbie Stoller™ Bamboo Ewe™ (. T101 available in 3.5 oz (100g), 177 yd (162m) balls.): 4 (4, 5, 5, 5) balls 5529 Mermaid
- Knitting Needles: 5.5mm [US 9] straight needles or circular needle (work back and forth in rows), 4mm [US 6] double pointed needles (set of 2 for I-cord)
- Stitch markers
- stitch holders
- cable needle
- yarn needle
GAUGE: 18 sts = 4”; 24 rows = 4” in Stockinette st.
CHECK YOUR GAUGE. Use any size needles to obtain the gauge.
Directions are for size Small. Changes for sizes Medium, Large, 1X and 2X are in parentheses.
To Fit Bust: 34 (38, 42, 46, 50)”
Finished Bust: 36 (40, 44, 49, 53)”
ABBREVIATIONS
k = knit; k2tog = knit next 2 sts together; p = purl; p2tog = purl next 2 sts together; st(s) = stitch(es); yo = yarn over; [ ] = work direections in brackets the number of times specifed; * = repeat whatever follows the * as indicated
Special Stitches:
2/2 LC = 2 over 2 Left Cross – Slip next 2 sts to cable needle and hold in front, k2, then k2 from cable needle.
2/2 RC = 2 over 2 Right Cross – Slip next 2 sts to cable needle and hold in back, k2, then k2 from cable needle.
M1 = Make 1 (Increase) - Lift strand between needles to left-hand needle and work strand through the back loop, twisting it to prevent a hole, [knit or purl as indicated by pattern st].
ssk = slip next two stitches knitwise to right needle, insert point of left needle through front of stitches, knit these stitches together through back loop.
w&t (wrap and turn) = Slip next stitch to right needle, bring yarn to front, between needles, slip the stitch back to left needle. Bring yarn around front of slipped stitch and to back, between needles. Turn work to begin working back in the other direction. Note: When working the wrapped stitch in a later row, pick up the wrap and work it together with the wrapped stitch.
PATTERN STITCHES
Pattern Charts
Right Front Cable Pattern (over 10 sts)
Row 1 (Wrong Side): P4, k2, p4.
Row 2: K4, yo, p2tog, k4.
Row 3: Repeat Row 1.
Row 4: 2/2 RC, yo, p2tog, 2/2 RC.
Repeat Rows 1–4 for Right Front Cable pattern.
Wishbone Cable Pattern (over 8 sts)
Row 1 (Wrong Side): Purl.
Row 2: Knit.
Row 3: Repeat Row 1.
Row 4: 2/2 RC, 2/2 LC.
Repeat Rows 1–4 for Wishbone Cable pattern.
Left Front Cable Pattern (over 10 sts)
Row 1 (Wrong Side): P4, k2, p4.
Row 2: K4, p2tog, yo, k4.
Row 3: Repeat Row 1.
Row 4: 2/2 LC, p2tog, yo, 2/2 LC.
Repeat Rows 1–4 for Left Front Cable pattern.
SPECIAL TECHNIQUES
Grafting
Thread yarn needle with long length of yarn. Hold the two needles in the left hand with wrong sides together. Keeping the yarn needle and yarn under the points of the knitting needles, graft the stitches together as follows:
*1. Insert yarn needle through first st of front needle as if to knit and slip the st off.
2. Insert needle through 2nd st of front needle as if to purl, but leave the st on the needle.
3. Insert yarn through first st on back needle as if to purl and slip the st off.
4. Insert yarn through 2nd stitch on back needle as if to knit, but leave st on needle. Repeat from * until all the sts are joined. Take care to draw yarn up so that gauge of grafting equals gauge of knitting. Fasten off. Weave in ends on wrong side.

3-Needle Bind Off
Hold needles of stitches to be seamed parallel and with Right Sides together, with 3rd needle knit together first stitch from each needle, *knit together next stitch from each needle, pass first stitch over 2nd stitch and off right needle; repeat from * until all stitches have been knit from the 2 parallel needles and only one stitch remains on the right needle. Fasten off.
NOTES
1. Shrug is worked in 4 pieces: back bodice, 2 sleeves, and border piece.
2. The back bodice extends slightly into the front sides.
3. The border piece forms the fronts and lower back. It is knit in two sections, beginning from a provisional cast-on at the center of the lower back. The first sections forms the right front, and the second section forms the left front. The two sections are mirror images, as shown in the cable charts.
4. Short rows are used to curve the pieces.
5. Charts provide view of cable patterns from Right Side. Read Right Side rows of chart from right to left, and Wrong Side rows from left to right.
SHRUG
Construction Chart
Back Bodice
Cast on 56 (68, 82, 96, 110) sts.
Row 1 (Wrong Side): Purl.
Row 2: K1, M1, k to last st, M1, k1—58 (70, 84, 98, 112) sts.
Row 3: P1, M1, purl to last st, M1, p1—60 (72, 86, 100, 114) sts.
Rows 4–17: Repeat last 2 rows 7 more times—88 (100, 114, 128, 142) sts.
Row 18: Repeat Row 2—90 (102, 116, 130, 144) sts.
Row 19: Purl.
Rows 20–23: Repeat last 2 rows 2 more times—94 (106, 120, 134, 148) sts.
Curve Lower Right Edge with Short Rows
Row 1 (Right Side): K3, w&t.
Row 2: P3, turn.
Row 3: K2, w&t.
Row 4: P2, turn.
Row 5: K1, w&t.
Row 6: P1, turn.
Right Armhole (Right Side): Bind off 9 (11, 15, 19, 22) sts, knit to end of row picking up wraps—85 (95, 105, 115, 126) sts.
Curve Lower Left Edge with Short Rows
Row 1 (Wrong Side): P3, w&t.
Row 2: K3, turn.
Row 3: P2, w&t.
Row 4: K2, turn.
Row 5: P1, w&t.
Row 6: K1, turn.
Left Armhole (Wrong Side): Bind off 9 (11, 15, 19, 22) sts, purl to end of row picking up wraps—76 (84, 90, 96, 104) sts.
Next Row (Right Side): K1, k2tog, knit to last 3 sts, ssk, k1—74 (82, 88, 94, 102) sts.
Next Row: Purl.
Repeat last 2 rows 2 more times—70 (78, 84, 90, 98) sts.
Work even in Stockinette st (knit on Right Side, purl on Wrong Side) for 30 (32, 34, 36, 38) rows.
Shape Neck
Next Row (Right Side): K15 (18, 21, 24, 27), place these sts on a holder for right shoulder, bind off 40 (42, 42, 42, 44), knit to end of row—15 (18, 21, 24, 27) sts remain for left shoulder.
Left Shoulder
Row 1: Purl.
Row 2 (Right Side): Knit to last 3 sts, ssk, k1—14 (17, 20, 23, 26) sts.
Repeat last 2 rows 4 more times—10 (13, 16, 19, 22) sts. Bind off.
Right Shoulder
With Wrong Side facing, return right shoulder sts to needle.
Row 1: Purl.
Row 2 (Right Side): K1, k2tog, k to end of row—14 (17, 20, 23, 26) sts.
Repeat last 2 rows 4 more times—10 (13, 16, 19, 22) sts. Bind off.
Right Front
Cast on 50 sts provisionally.
Note: Use any provisional cast on you prefer.
Set-Up Row 1 (Wrong Side): [K4, work Row 1 of Wishbone Cable pattern] 3 times, k4, work Row 1 of Right Front Cable pattern.
Row 2: Work next row of Right Front Cable pattern, p4, [work next row of Wishbone Cable pattern, p4] 3 times.
Row 3: [K4, work next row of Wishbone Cable pattern] 3 times, k4, work next row of Right Cable pattern.
Rows 4–45 (51, 57, 63, 69): Repeat last 2 rows 21 (24, 27, 30, 33) times, continuing in patterns as established.
Curve Edge with Short Rows
Row 1 (Right Side): Work in pattern as established over first 10 sts, w&t.
Row 2: Work in pattern as established to end of row.
Row 3: Work in pattern as established to 1 purl st before first Wishbone Cable, [M1] 0 (1, 1, 1, 1) time(s), w&t.
Row 4: Work in pattern as established to end of row.
Row 5: Work in pattern as established to first purl st following first Wishbone Cable, w&t the purl st.
Row 6: Work in pattern as established to end of row.
Row 7: Work in pattern as established to 1 purl st before 2nd Wishbone Cable, [M1] 0 (1, 1, 1, 1) time(s), w&t.
Row 8: Work in pattern as established to end of row.
Row 9: Work in pattern as established to first purl st following 2nd Wishbone Cable, w&t the purl st.
Row 10: Work in pattern as established to end of row.
Row 11: Work in pattern as established to 1 purl st before 3rd Wishbone Cable, [M1] 0 (1, 1, 1, 1) time(s), w&t.
Row 12: Work in pattern as established to end of row.
Row 13: Work in pattern as established to first purl st following 3rd Wishbone Cable, w&t the purl st.
Row 14: Work in pattern as established to end of row.
Row 15: Work in pattern as established over first 46 sts, w&t.
Row 16: Work in pattern as established to end of row.
Row 17: Work to last st picking up wraps, [M1] 0 (1, 1, 1, 1) time(s).
Row 18: Work in pattern as established to end of row—50 (54, 54, 54, 54) sts.
Rows 19–22: Work even in pattern as established.
Repeat Rows 1–22, if you are making size S or M, do not work the increases (M1)—50 (54, 58, 58, 58) sts.
Repeat Rows 1–22, if you are making size S, M or L, do not work the increases—50 (54, 58, 62, 62) sts.
Repeat Rows 1–22, if you are making size S, M, L or 1X, do not work the increases—50 (54, 58, 62, 66) sts.
Repeat Rows 1–18, do not work the increases for any of the sizes.
Last 1 (3, 5, 7, 9) Rows: Work even in pattern as established.
Shape Neck:
Note: In the following rows, you will be instructed to decrease 1 st. Decrease by working a k2tog or p2tog, whichever decrease looks best within the established pattern.
Row 1 (Wrong Side): Work in Wishbone Cable pattern as established to last 12 sts, decrease 1 st, place marker, work in Right Front Cable pattern as established to end of row —49 (53, 57, 61, 65) sts
Row 2: work in Right Front Cable pattern as established to marker, slip marker, decrease 1 st, work in Wishbone Cable pattern as established to end of row - 48(52, 56, 60, 64) sts.
Row 3: Work in Wishbone Cable pattern as established to 2 sts before marker, decrease 1 sts, slip marker, work in Right Front Cable pattern as established to end of row—47 (51, 55, 59, 63) sts.
Row 4: Repeat Row 2—46 (50, 54, 58, 62) sts.
Rows 5–30 (32, 34, 36, 38): Repeat last 2 rows 13 (14, 15, 16, 17) more times—20 (22, 24, 26, 28) sts.
Rows 31 (33, 35, 37, 39) - 40 (42, 44, 46, 48): Work even in patterns as established.
Shape Shoulder (Wrong Side)
Bind off all sts to marker, remove marker work in Right Front Cable pattern as established to end of row—10 sts.
Back Neck Band
Rows 1-11: Work even in Right Front Cble pattern over remaining 10 sts.
Curve Back Neck Band with Short Rows
Row 1 (Wrong Side): Work in pattern as established over first 4 sts, w&t
Row 2: Work in pattern as established to end of row.
Row 3: Work in pattern as established over first 5 sts, w&t.
Row 4: Work in pattern as established to end of row.
Row 5: Work in pattern as established to end of row, picking up wraps.
Rows 6–10: Work even in pattern as established.
Rows 11–15: Repeat short Rows 1–5.
Rows 16–32 (34, 34, 34, 36): Work even in pattern as established.
Place remaining 10 sts on a holder.
Left Front
With Wrong side of right front facing, pick up 50 sts across other side of provisional cast on.
Set-Up Row 1 (Right Side): [K4, work Row 2 of Wishbone Cable pattern] 3 times, k4, work Row 2 of Left Front Cable pattern.
Row 2: Work next row of Left Front Cable pattern, p4, [work next row of Wishbone Cable pattern, p4] 3 times,
Row 3: [K4, work next row of Wishbone Cable pattern] 3 times, k4, work next row of Left Cable pattern.
Rows 4–45 (51, 57, 63, 69): Repeat last 2 rows 21 (24, 27, 30, 33) times, continuing in patterns as established.
Complete left front following same instructions as for right front, except follow Left Front Cable pattern when instructed to follow Right Front Cable pattern, and rows labeled Right Side on right front are Wrong Side on left front and vice-versa.
Sleeves (Make 2)
Cast on 48 (56, 64, 72, 80) sts.
Set-Up Row 1 (Wrong Side): K0 (1, 2, 0, 1), *k2, p4; repeat from * to last 0 (1, 2, 0, 1) sts, knit to end of row.
Row 2: P0 (1, 2, 0, 1), *k4, yo, p2tog; repeat from * to last 0 (1, 2, 0, 1) sts, purl to end of row.
Row 3: Repeat Row 1.
Row 4: P0 (1, 2, 0, 1), *2/2 RC, yo, p2tog; repeat from * to last 0 (1, 2, 0, 1) sts, purl to end of row.
Rows 5 and 6: Repeat Rows 1 and 2.
Rows 7–11: Beginning with a Wrong Side row, work in St st for 5 rows.
Shape Cap
Row 1 (Right Side): Bind off 3 (4, 6, 7, 9) sts, knit to end of row—45 (52, 58, 65, 71) sts.
Row 2: Bind off 3 (4, 6, 7, 9) sts, purl to end of row—42 (48, 52, 58, 62) sts.
Decrease Row: K1, k2tog, knit to last 3 sts, ssk, k1—40 (46, 50, 56, 60) sts.
Next Row: Purl.
Repeat Decrease Row—38 (44, 48, 54, 58) sts.
Repeat last 2 rows 1 (14, 14, 14, 14) more times—36 (16, 20, 26, 30) sts.
Size S Only
Work even in St st for 3 rows.
Repeat Decrease Row—34 sts.
Repeat last 4 rows once more—32 sts.
Next Row: Purl.
Repeat Decrease Row—30 sts.
Repeat last 2 rows 8 more times—14 sts.
All Sizes
Next Row: P1, p2tog through back loop, purl to last 3 sts, p2tog, p1—12 (14, 18, 24, 28) sts.
Next Row: K1, k2tog, knit to last 3 sts, ssk, k1—10 (12, 16, 22, 26) sts.
Repeat last 2 rows until 8 (8, 8, 10, 10) sts remain.
Bind off.
FINISHING
I-Cord Ties (Make 2)
Cast on 4 sts onto one double-pointed needle, working over the 4 sts, *knit all the sts, do not turn work. Slide all the stitches to opposite end of needle. Carry yarn tightly across back of work, and knit all the stitches. Repeat from * until I-cord measures 8” or desired length for tie.
Weave in ends. Block pieces lightly, to schematic measurements. Use Kitchener stitch (grafting) or 3-needle bind-off to sew ends of back neck bands together. Sew right front/left front piece to back bodice. Sew sleeve seams. Sew sleeves into armholes. Sew one I-cord tie to each side of center front.
Read NextLacy Shruggy
Your Recently Viewed Projects
Thanks for your comment. Don't forget to share!
horseyfolks
May 25, 2022
Thank you for quick replyhowever, the right front pattern has only a repeat for second and third rows of cable . How can established lpattern include fourth row Row? I really want to finish this. Thank you for your patience
Lisa
Jun 03, 2022
The key to working this pattern is in the part of the line that says "continue in patterns as established" is where you will continue through the separate patterns in order, moving through line to line of the pattern. The row numbers of each separate pattern will only be the same for the first 4 rows, at row 5 you will start over again at row 1 and continue the sequence of 4 consecutive rows again. 1 to 4 will be 1 to 4, rows 5 to 8 will be rows 1 to 4 etc. until you make your way through the pattern sequence.
horseyfolks
May 22, 2022
I have knitted to the 7th row of front right and there has been no 4th row of cable patternso, there is NO CABLE! Im so confused. Please tell me where I went wrong.
Lisa
May 24, 2022
This pattern is really confusing the way it is written, for the repeat, you are repeating the 2 rows as specified but you are also following the directions for the as "established "part, for the established part you are working through the cable patterns consecutively, the cables are in the as established section of the instructions. This pattern really should have been rated advanced rather than intermediate, since intermediate knitters are having difficulty with it.
horseyfolks
Apr 25, 2022
Started the back and cant see when I will knit 4th row of the 3 cable patterns. IT then says 23 row 24 timesNo 4th row. Please help!!
Lisa
Apr 30, 2022
In knitting you always follow stitch patterns consecutively, unless the pattern states otherwise. So, row 4 will be row 4, no matter where you are in the sequence. For example if it is a 23 row sequence, row 4 will be worked on rows 4, 8,12, 16, 20, for the repeat of the sequence you will do this as many times as the pattern instructs you to. This is how patterns are followed, not specific to this pattern since you mentioned starting the back and the instructions you are confused about and provided information that is not found in the back bodice instructions as published here. Hope this helps, happy knitting!
quanahs 5032097
May 06, 2016
This beautiful shrug is simply gorgeous with all of the intricate cable work and the sweet short sleeves. The bamboo (rayon) yarn ensures it will be comfortable and not too warm. The curved front is accomplished via short rows, so it might be a bit of a challenge for less experienced knitters.
Report Inappropriate Comment
Are you sure you would like to report this comment? It will be flagged for our moderators to take action.
Thank you for taking the time to improve the content on our site.