This project was submitted by one of our readers, just like you.
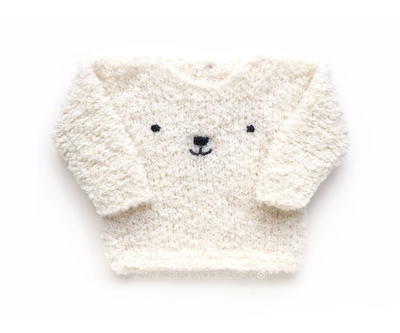
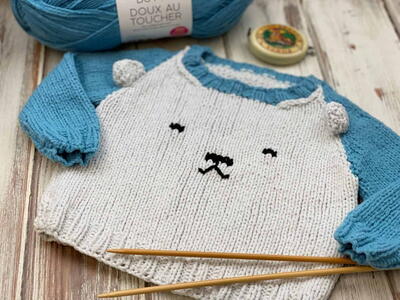
Baby Sleep Sack

Baby Sleep Sack
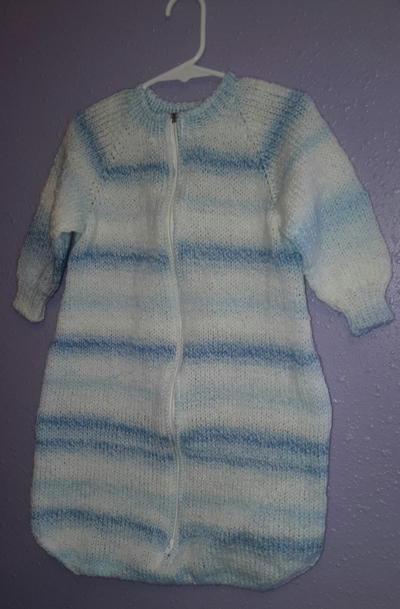
I wanted a pattern for a sleep sack for my newest grandson. After looking at several options and finding nothing that satisfied the criteria outlined by his mother, I decided to write my own. This sleep sack uses DK weight yarn instead of worsted weight producing a nice spring, fall, or air conditioning option. It is worked from the top down in once piece so it is easily customizable and has a separating zipper inserted “upside down” allowing only the bottom portion to be opened for diaper changes. This was by request. My grandson received a commercially produced sleep sack with this feature and his parents loved being able to change nighttime diapers with minimal disturbance. The sample was made using instructions for size 12 months and used 2 entire skeins of Baby Marble. Calculations indicate that the size 6 months would use a little over 1 skein (or 420 yds dk yarn) and size 18 months would require about 2 and a half skeins (or 750 yds dk yarn).

Knitting Needle Size4 or 3.5 mm, 6 or 4 mm, Circular Knitting Needles, Double-Pointed Knitting Needles (DPNs)
Yarn Weight(3) Light/DK (21-24 stitches to 4 inches)
Materials List
- US size 6 (4.0mm) circ and DPN
- US size 4 (3.5) circ and DPN
- Tapestry Needle
- 4 Stitch Markers
- Separating zipper
- Matching sewing thread
- Waste yarn
Instructions
CO 4, PM1, CO 6, PM2, CO 28, PM3, CO6, PM4, CO 4 (48)
Row1 (WS): Purl slipping markers as you come to them.
Row 2 (RS): Kfb, k to one stitch before M1, kfb, sm, kfb, k to one stitch before M2, kfb, sm, kfb, k to one stitch before M3, kfb, sm, kfb k to one stitch before M4, kfb, sm, kfb, k to one stitch before end, kfb. (10 sts inc).
Row 3: Purl slipping markers as you come to them.
Repeat Rows 2 and 3 two more times (78)
Row 9: CO 8, k to k to one stitch before M1, kfb, sm, kfb, k to one stitch before M2, kfb, sm, kfb, k to one stitch before M3, kfb, sm, kfb k to one stitch before M4, kfb, sm, kfb, k to end.
Row 10: CO 8, p to end.
Row 11: K to one stitch before M1, kfb, sm, kfb, k to one stitch before M2, kfb, sm, kfb, k to one stitch before M3, kfb, sm, kfb k to one stitch before M4, kfb, slm kfb, k to end.
Row 12: Purl
Repeat rows 11 and 12 until you have 148(172, 196) total stitches.
Divide for sleeves:
Row 1: K to Ml, remove m, using tapestry needle and waste yarn, slip all sts between M1 and M2 onto waste yarn to hold for Left sleeve. CO 6, pm, CO6, and join to back, knit across back to M3, remove M and transfer all sts between M3 and M4 onto waste yarn for right sleeve as for left sleeve, CO 6, pm, CO 6 and join to front sts, k to end.
Markers are now located at underarm seam location.
Continue to work in stockinette st for 17 more rows ending with wsr.
Inc row: *K to m, LLI, sm, RLI; rep from * once more, k to end.
Work in Stockinette st working Inc row every 6th row 5 more times. (24 sts inc)
Continue in Stockinette st until work measures 18 (24, 30)” from CO (or 2” less than desired total length.) ending with wsr.
Next row: Kto end, pm, join to work in the round.
K one rnd.
Dec rnd: *K to 2 sts before underarm marker, k2tog, sm, ssk; rep from * once more, k to end of rnd.
Rep dec rnd every other round 9 more times (40 sts dec).
Option 1: BO all stitches and sew front to back at bottom edge.
Option 2: Join front to back by using Kitchener Stitch.
Option 3 (used in the sample): Turn garment inside out and join front to back using 3 needle bind off.
Neckband:
Using smaller circular needle, with rs facing, beginning at right neck edge, pu 14 sts from front, 6 sts along sleeve, 28 sts, across back, 6 sts along sleeve, and 14 sts from left front.
Work in ribbing for 1”.
BO in ribbing.
Zipper slit reinforcement:
Using smaller circular needle, with rs facing, beginning at right neck edge, pu 1 st for each row along right front, 1 st at join, and 1 st along each row of left front.
Turn work and BO all stitches Knitwise.
Sleeves:
Slip[ the sleeve sts onto 2 of the larger dpn. With rs facing you join yarn to right edge of underarm and use a third needle,to pu 6 sts, pm (this is the underarm seam marker), pu 6 sts.
K1rnd slipping some the sts so that each needle has approximately the same number of stitches.
K7 rnds even.
Dec rnd: K1, ssk, k to 2 sts before marker, k2tog.
Rep dec rnd every 8 rnds 4(6,7) more times (28, 30,34 sts remain).
Work even until sleeve meas 5 ½ (6 ½ ,7)” or 1 ½ less than desired length.
Change to small dpn and work rib for 1 1/2”.
BO in rib.
Finishing
Pin zipper in place keeping fronts away from teeth. Sew in place by hand or by machine.
Weave in ends.
Because I used acrylic yarn, instead of blocking, I simply ran it through the washing machine before gifting. This evens out the stitches and softens the garment.
I hope you enjoy this pattern.
Abbreviations
- BO
- bind off
- CO
- cast on
- Kfb
- knit front and back - knit into the front of the next stitch, leave it on the needle and knit into the back of the same stitch (one stitch increased)
- LHN
- left hand needle
- LLI
- left leaning lifted increase - this increase is done after working the stitch. After working the stitch, insert RHN into the stitch 2 row below the stitch on the LHN, place this stitch on RHN, knit this stitch, one stitch increased
- M
- marker (M1, M2, etc just indicates order they are placed)
- PM
- place marker
- PU
- pick up stitches
- RHN
- right hand needle
- RLI
- right leaning lifted increase. This increase is done before wrking the stitch on the needle: Using LHN, lift stitch from the row below the next stitch on LHN, lift this stitch and place it on LHN beside existing stitch, knit this stitch then knit the existing stitch. One stitch increased.

Read Next75+ Free Baby Knitting Patterns
Your Recently Viewed Projects
Thanks for your comment. Don't forget to share!
Tricia108
Feb 14, 2018
This is a basic pattern for a sleep sack. I find these ae very popular here in the NY metro area because it does tend to get colder during the winter. I made one for a friend and she still raves about it even though her daughter is too big for it now. It was a winter baby and put to good use. I will work up quickly and the hardest part I find is putting the zipper it. Hand baste first before finishing with a machine. They wash up well. Thank you for another pattern which will be put to good use. Good for charity knitting as well.
adelebor 4315408
Jan 17, 2018
Thank you for that information. It is one I will be starting soon for a baby due in April, so should be about right for the coming Fall.
adelebor 4315408
Jan 16, 2018
Are these directions for a 12 mo. size? What is the length of the sack? What is the gauge?
KathrynAllison
Jan 17, 2018
Hi adelebor, yes, the directions provided are for a 12 month baby. Unfortunately, the designer did not provide the length or gauge information. Perhaps other knitters who have completed the pattern will see your question and offer their assistance. Hope this helps! -Editors of AllFreeKnitting
Tricia108
Dec 12, 2017
I love this pattern. The fact that it uses the zipper upside down is genius. The little one can't play with the zipper either. This way you can change the diaper and not expose their chest. I love that it is knitted in one piece. You can to be careful with the directions but otherwise it should knit up quickly. You won't find this pattern other places. It will certainly be in demand. I knit for charities and individuals with babies will love this. Thank you!
dgweisblatt
Jul 21, 2016
Hi Susan - Love this pattern! One question - about the zipper... Is there a zipper in the front and also along the bottom? 2 zippers? Thanks! Deb
KathrynAllison
Jul 27, 2016
Hello dgweisblatt! This pattern only uses one zipper (down the middle of the sleep sack). Hope this helps! -Editors of AllFreeKnitting
Report Inappropriate Comment
Are you sure you would like to report this comment? It will be flagged for our moderators to take action.
Thank you for taking the time to improve the content on our site.