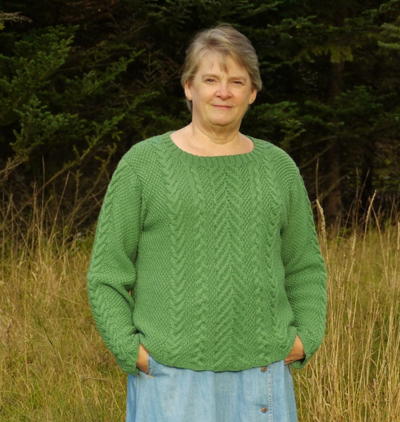
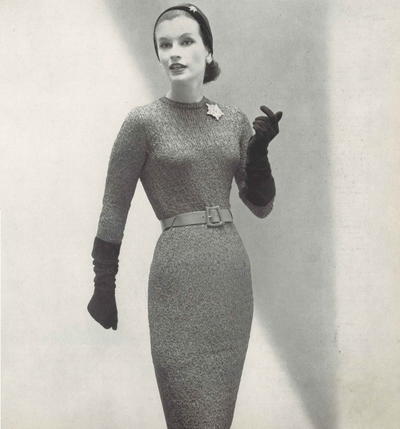
Grandma's Favorite Sweater

Dress to impress with this classic knit sweater pattern that boasts a neat, scooped neckline and ribbed sleeves. Accented with rows of the cable stitch, Grandma's Favorite Sweater is an attractive design that flatters a variety of body types. We love this beautiful knit sweater pattern in the bright crimson color showed in the picture, but it would look great in any other bold color or versatile neutral as well. Knit one today in your favorite color to enjoy all winter long.

Knitting Needle Size4 or 3.5 mm, 6 or 4 mm, Circular Knitting Needles
Yarn Weight(4) Medium Weight/Worsted Weight and Aran (16-20 stitches to 4 inches)
If you like Grandma's Favorite Sweater, be sure to check out the rest of 2013's most popular patterns here!
Directions are for size Small; changes for sizes Medium, Large, XLarge and XXLarge are in parentheses.
Finished Bust: 35, (39, 43, 47, 51)”.
Finished Length: 20¾ (21¾, 22½, 23½, 24¼)
Materials:
- RED HEART® “Shimmer™”: 4 (4, 5, 6, 6) balls 1929 Red.
- Knitting Needles: 4 mm [US 6].
- Circular Knitting Needles: 3.5 mm [US 4], 24” long.
- Cable needle, stitch holders (2), stitch markers (2), yarn needle.
GAUGE: 20 sts = 4”; 27 rows = 4” in Stockinette stitch st. 23 sts = 4”; 29 rows = 4” in Cable Pattern (slightly stretched). CHECK YOUR GAUGE. Use any size needles to obtain the gauge.
Special Abbreviat ions
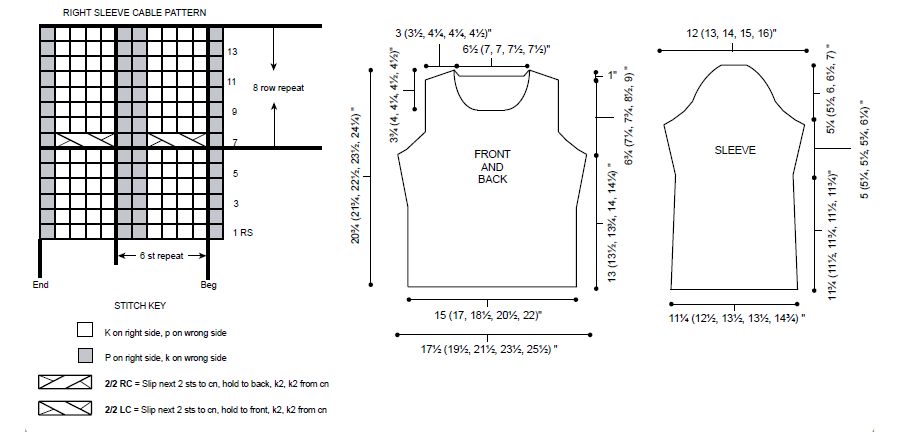
2/2 LC = slip next 2 sts to cable needle, hold to front; k2; k2 from cable needle.
2/2 RC = slip next 2 sts to cable needle, hold to back; k2; k2 from cable needle.
Instructions
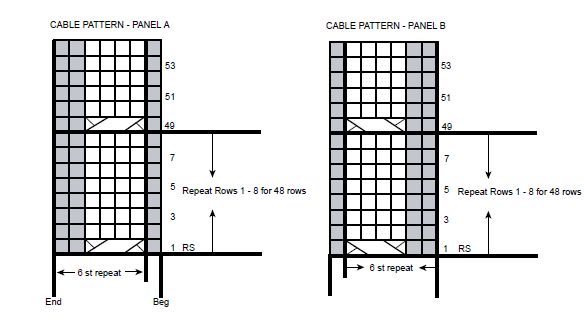
Cable Pattern for Panel A (multiple of 6 sts + 1)
Row 1 (right side): P1, * 2/2 RC, p2; repeat from *.
Row 2: * K2, p4; repeat from * to last st, k1.
Row 3: P1, * k4, p2; repeat from *.
Rows 4 - 7: Repeat Rows 2 and 3 two times.
Row 8: Repeat Row 2.
Repeat Rows 1 – 8 five times more, then repeat Rows 1 - 6 once more for Cable Panel A.
Cable Pattern for Panel B (multiple of 6 sts + 1)
Row 1 (right side): * P2, 2/2 LC; repeat from * to last st, p1.
Row 2: K1, * p4, k2; repeat from *.
Row 3: * P2, k4; repeat from * to last st, p1.
Rows 4 - 7: Repeat Rows 2 and 3, two times.
Row 8: Repeat Row 2.
Repeat Rows 1 – 8, five times more, then Rows 1 - 6 once more for Cable Panel B.
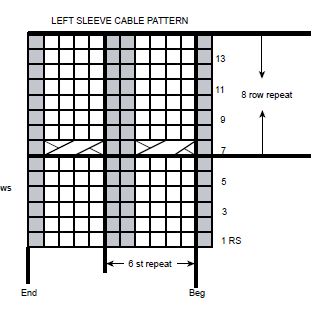
Left Sleeve Cable Pattern (multiple of 6 sts + 6)
Row 1 (right side): P1, * k4, p2; repeat from * to last 5 sts, k4, p1.
Row 2: K1, * p4, k2; repeat from * to last 5 sts, p4, k1.
Rows 3 - 6: Repeat Rows 1 and 2, two times.
Row 7: P1, * 2/2 RC, p2; repeat from * to last 5 sts, 2/2 RC, p1.
Row 8: Repeat Row 2.
Rows 9 - 14: Repeat Rows 1 and 2 three times.
Repeat Rows 7 – 14 for Left Sleeve Cable Pattern.
Right Sleeve Cable Pattern (multiple of 6 sts + 6)
Row 1 (right side): P1, * k4, p2; repeat from * to last 5 sts, k4, p1.
Row 2: K1, * p4, k2; repeat from * to last 5 sts, p4, k1.
Rows 3 - 6: Repeat Rows 1 and 2 two times.
Row 7: P1, * 2/2 LC, p2; repeat from * to last 5 sts, 2/2 LC, p1.
Row 8: Repeat Row 2.
Rows 9 - 14: Repeat Rows 1 and 2 three times.
Repeat Rows 7 – 14 for Right Sleeve Cable Pattern.
SWEATER Back
With knitting needles, cast on 95 (107, 117, 131,139) sts.
Set up Ribbing Pattern
Row 1 (wrong side): P1 selvedge st, k1, [p4, k2] 5 (5, 6, 6, 7) times, place first marker, p1, [k1, p1] 15 (21, 20, 27, 25) times, place second marker, [k2, p4] 5 (5, 6, 6, 7) times, k1, p1 selvedge st.
Keeping first and last st in St st for selvedge, and continuity of sts in rib pattern as established, work 6 more rows.
Dec and Set up Cable Panel Patterns
Next Row (right side): K1, work Row 1 of Cable Panel A across to first marker, slip marker, k1 (k3, k3, k1, k3), k2tog, * k2, k2tog; repeat from * to 0 (2, 0, 0, 2) sts before second marker, k0 (k2, k0, k0, k2), slip marker, work Row
1 of Cable Panel B to end row–87 (97, 107, 117, 127) sts. Keeping sts between markers in St st, continue in pattern as established until all rows of Cable Patterns have been worked, and Panels are completed.
Continue in St st until piece measures 13 (13½, 13¾, 14, 14¼)” from beginning, ending with a wrong side row
Shape Armholes
Bind off 4 (5, 6, 7, 8) sts at beginning of next 2 rows.
Continue to bind off at armhole edge 3 sts once, then 2 sts 2 (2, 2, 4, 6) times–69 (77, 85, 89, 93) sts. Dec 1 st at beginning and end of next row, then every other row 2 (2, 3, 4, 5) times–63 (71, 77, 79, 81) sts.
Work even until armhole measures 6¾ (7¼, 7¾, 8½, 9)”, ending with a wrong side row.
Shape Shoulders and Back Neck
Bind off 5 (6, 7, 7, 7) sts at beginning of next row, work until there are 14 (16, 18, 18, 19) sts on right hand needle, place center 25 (27, 27, 29, 29) sts on stitch holder for back neck; join a second ball of yarn and work to end.
Working both sides at once with separate balls of yarn, bind off 5 (6, 7, 7, 7) sts at beginning of next 3 rows, then bind off 5 (6, 7, 7, 8) sts at beginning of next 2 rows AND AT SAME TIME, bind off 2 sts at each neck edge twice.
Front
Work same as for Back, until armhole measures 4 (4¼, 4½, 5, 5½)”, ending with a wrong side row.
Shape Neck
Next Row: K25 (28, 31, 31, 32) sts, place center 13 (15, 15, 17, 17) sts on holder, join a second ball of yarn and k to end. Working both sides at once with separate balls of yarn, bind off 3 sts at each neck edge once, then bind off
2 sts each neck edge twice–18 (21, 24, 24, 25) sts each side. Dec 1 st each neck edge every other row 3 times–15 (18, 21, 21, 22) sts each side.
Work even until armhole measures same as Back to shoulder edge, ending with a wrong side row.
Shape Shoulders
Same as for Back.
Left Sleeve
With knitting needles, cast on 74 (82, 90, 90, 98) sts.
Row 1 (wrong side): * P1, k1; repeat from * across.
Repeat Row 1 for P1, k1 rib until piece measures 1”, ending with a wrong side row.
Next Row: Begin St st and dec across as follows: * k2, k2tog; repeat from * to last 2 sts, k2–56 (62, 68, 68, 74) sts.
Work even in St st until sleeve measures 11¾ (11½, 11¾, 11½, 11¾)” from beginning, ending with a wrong side row.
Set up Cable Pattern and Shape Sleeve
K1, work Row 1 of Cable Pattern for Left Sleeve across row to last st, k1. Working extra sts into cable pattern as they become available, inc 1 st at beginning and end of every fourth row 3 (2, 1, 8, 7) times, then every sixth row 3
(4, 5, 1, 2) times–68 (74, 80, 86, 92) sts.
Work even until piece measures 16¾ (16¾, 17¼, 17¼, 18)” from beginning, ending with a wrong side row.
Shape Sleeve Cap
Bind off 4 (5, 6, 7, 8) sts at beginning of next 2 rows, then bind off 3 sts at beginning of next 2 rows, then bind off 2 sts at beginning of next 2 (2, 2, 4, 6) rows–50 (54, 58, 58, 58) sts. Dec 1 st at beginning and end of next
row, then every other row 3 (4, 5, 3, 4) times, then every fourth row 2 (2, 3, 4, 3) times, then every other row 4 (4, 3, 4, 6) times–30 (32, 34, 34, 30)sts. Bind off 2 sts at beginning of next 4 rows, then bind off 3 sts at beginning of
next 2 rows, then bind off 4 sts at beginning of next 2 rows. Bind off remaining 8 (10, 12, 12, 8) sts.
Right Sleeve
Work same as for Left Sleeve, working Right Sleeve Cable Pattern.
FINISHING
Sew left shoulder seam.
Neckband
With right side facing and circular needles, pick up and k 108 (114, 118, 124, 124) sts evenly around neckline
including sts from back and front neck holders. Work in P1,
k1 rib same as for sleeves for 6 rows. Bind off loosely.
Sew right shoulder seam including sides of neckband.
Set in
Read NextLemon Curry Ease Pullover
Your Recently Viewed Projects
Thanks for your comment. Don't forget to share!
skwas2 3614224
Jul 31, 2017
Made this sweater in a burgundy wine color and have received such compliments. It was my first attempt at cables and it turned out lovely. Would encourage others to consider, especially if new at this type of design.
schiebet
May 08, 2017
Glad to see that carmeniglesias has worked this pattern. I'm very interested in starting it, but wanted to make sure it would work out. It's always nice to know someone has made it through. I am really attracted to cable panels instead of all over cables. I think it's gorgeous!
carmeniglesias397 5035783
Feb 14, 2014
A very nice sweater. The pattern is perfect. I am in the last few rows to finish it and I very happy.
McKnitter
Feb 02, 2013
WHY does AllFreeKnitting insist on changing pattern names? This is called Chic Cable Sweater on Red Heart's site. A pdf version can be downloaded from there.
Caitlin
Aug 06, 2013
Hi McKnitter, Thanks so much for the comment. Red Heart sends us patterns to post and allows us to reformat them into AllFreeKnitting's style. Hope this helps answer your question. Editors of AllFreeKnitting
Report Inappropriate Comment
Are you sure you would like to report this comment? It will be flagged for our moderators to take action.
Thank you for taking the time to improve the content on our site.


