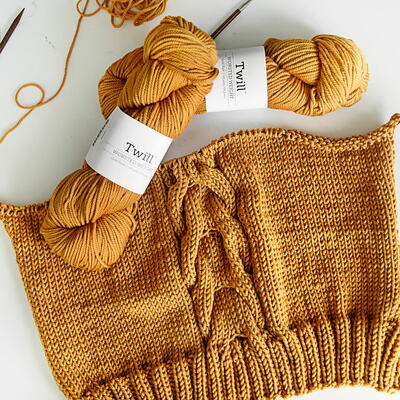
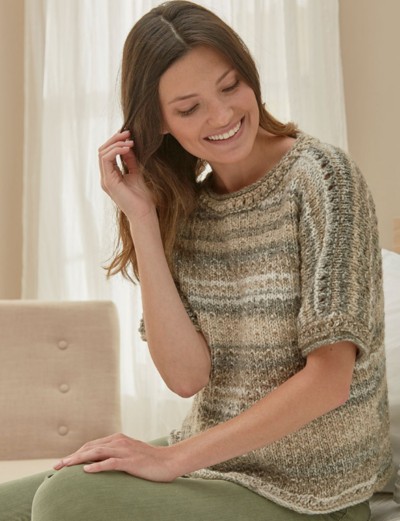
Oats and Honeycomb Cabled Pullover
This beautiful cable knit sweater pattern will become a wardrobe staple during the chilly months of the year.

Every beginning knitter probably starts with the goal of learning how to knit a sweater, and the Oats and Honeycomb Cabled Pullover is a great one to work towards. Knit in a neutral, natural shade that allows the cabled texture to really shine, this sweater is perfect for everyday wear. Cable knitting patterns like this gorgeous sweater from Patons free patterns make great conversation starters, too. No one will believe you knit this amazing sweater yourself, and you won't believe how warm the cozy cabled texture is.

Knitting Needle Size6 or 4 mm, 9 or 5.5 mm
Yarn Weight(4) Medium Weight/Worsted Weight and Aran (16-20 stitches to 4 inches)
Gauge19 sts and 25 rows = 4” [10 cm] in stockinette st with larger needles
Materials List
- Patons Classic Wool Worsted (3.5 oz/100g; 210 yds/192 m) Natural Mix 00229 - 8-9-10-11-13-15 balls
- Size US 6 (4 mm) and US 8 (5 mm) knitting needles or size needed to obtain gauge
- Cable needle
- 5 stitch holders
- Panel Pattern Chart
Sizes:
To fit bust measurement
Extra-Small/Small 28-34” [71-86.5 cm]
Medium 36-38” [91.5-96.5 cm]
Large 40-42” [101.5-106.5 cm]
Extra-Large 44-46” [112-117 cm]
2/3 X-Large 48-54” [122-137 cm]
4/5 X-Large 56-62” [142-157.5 cm]
Finished bust
Extra-Small/Small 40” [101.5 cm]
Medium 44” [112 cm]
Large 47” [119.5 cm]
Extra-Large 53” [134.5 cm]
2/3 X-Large 57” [144.5 cm]
4/5 X-Large 62” [157.5 cm]
For more sizing information, see size chart.
Abbreviations:
Alt = Alternate(ing)
Beg = Beginning
C4B = Slip next 2 stitches onto cable needle and leave at back of work. K2, then K2 from cable needle.
C4F = Slip next 2 stitches onto cable needle and leave at front of work. K2, then K2 from cable needle.
C5F = Slip next 2 stitches onto cable needle and leave at front of work. K2. P1, then K2 from cable needle.
Cont = Continue(ity)
Dec = Decrease(ing)
Inc = Increase(ing)
K = Knit
K1tbl = Knit next stitch through back of loop
K2(3)tog = Knit next 2(3) stitches together
P = Purl
P1tbl = Purl next stitch through back of loop
P2tog = Purl next 2 stitches together
P2togtbl = Purl next 2 stitches together through back loops
Pat = Pattern
Rem = Remaining
Rep = Repeat
RS = Right side
Ssk = Slip next 2 stitches knitwise one at a time. Pass them back onto left-hand needle, then knit through back loops together.
St(s) = Stitch(es)
T3B = Slip next stitch onto cable needle and leave at back of work. K2, then P1 from cable needle.
T3F = Slip next 2 stitches onto cable needle and leave at front of work. P1, then K2 from cable needle.
T4B = Slip next 2 stitches onto cable needle and leave at back of work. K2, then P2 from cable needle.
T4F = Slip next 2 stitches onto cable needle and leave at front of work. P2, then K2 from cable needle.
Tw2R = Knit into front of 2nd stitch on needle, then knit into front of first stitch and slip
both stitches off needle together
WS = Wrong side
Instructions:
The instructions are written for smallest size. If changes are necessary for larger size(s) the instructions will be written thus ( ). When only one number is given, it applies to all sizes.
PANEL PAT A (worked over 6 sts) - see Panel Pattern Chart.
1st row: (RS). C4F. K2.
2nd row: P6.
3rd row: K2. C4B.
4th row: P6.
These 4 rows form Panel Pat A.
PANEL PAT B (worked over 13 sts) - see Panel Pattern Chart.
1st row: (RS). P3. T3B. K1. T3F. P3.
2nd and alt rows: Knit all knit sts and purl all purl sts as they appear.
3rd row: P2. T3B. K1. P1. K1. T3F. P2.
5th row: P1. T3B. (K1. P1) twice. K1. T3F. P1.
7th row: T3B. (K1. P1) 3 times. K1. T3F.
9th row: T3F. (P1. K1) 3 times. P1. T3B.
11th row: P1. T3F. (P1. K1) twice. P1. T3B. P1.
13th row: P2. T3F. P1. K1. P1. T3B. P2.
15th row: P3. T3F. P1. T3B. P3.
17th row: P4. C5F. P4.
18th row: As 2nd row.
These 18 rows form Panel Pat B.
PANEL PAT C (worked over 34 sts) - see Panel Pattern Chart.
1st row: (RS). P3. C4B. (P4. C4B) 3 times. P3.
2nd and alt rows: Knit all knit sts and purl all purl sts as they appear.
3rd row: P1. (T4B. T4F) 4 times. P1.
5th row: P1. K2. P4. (C4F. P4) 3 times. K2. P1.
7th row: P1. (T4F. T4B) 4 times. P1.
8th row: As 2nd row.
These 8 rows form Panel Pat C.
BACK
**With smaller needles, cast on 111 (115-121-129-141-147) sts.
1st row: (RS). *K1tbl. P1. Rep from * to last st. K1tbl.
2nd row: *P1tbl. K1. Rep from * to last st. P1tbl.
Rep last 2 rows for twisted ribbing for 3" [7.5 cm], ending on a 2nd row and inc
23 (29-33-39-41-45) sts evenly across last row. 134 (144-154-168-182-192) sts.
Change to larger needles and proceed in pat as follows:
1st row: (RS). (P1. Work 1st row Panel Pat A) 0 (1-0-1-0-1) time. P4 (2-2-2-4-
2). Tw2R. P2. (Work 1st row Panel Pat A. P2. Tw2R. P2) 2 (2-3-3-4-4) times.
Work 1st row Panel Pat B. P2. Tw2R. P1.
Work 1st row Panel Pat C. P1. Tw2R. P2.
Work 1st row Panel Pat B. (P2. Tw2R. P2.
Work 1st row Panel Pat A) 2 (2-3-3-4-4) times. P2. Tw2R. P4 (2-2-2-4-2).
(Work 1st row Panel Pat A. P1) 0 (1-0-1-0-1) time.
2nd row: (K1. Work 2nd row Panel Pat A) 0 (1-0-1-0-1) time. K4 (2-2-2-4-2). P2. K2.
(Work 2nd row Panel Pat A. K2. P2. K2) 2 (2-3-3-4-4) times.
Work 2nd row Panel Pat B. K2. P2. K1.
Work 2nd row Panel Pat C. K1. P2. K2.
Work 2nd row Panel Pat B. (K2. P2. K2.
Work 2nd row Panel Pat A) 2 (2-3-3-4-4) times. K2. P2. K4 (2-2-2-4-2).
(Work 2nd row Panel Pat A. K1) 0 (1-0-1-0-1) time.
These 2 rows form pat. Panel pats are now in position.
Cont in established pat, until work from beg measures 17½ (17½-17-17-16½-16½)" [44.5 (44.5-43-43-42-42) cm], ending on a WS row.
Shape raglans:
Keeping cont of pat, cast off 2 (2-3-3-4-6) sts beg next 2 rows. 130 (140-148-162-174-180) sts.
1st row: (RS). K1. ssk. Pat to last 3 sts. K2tog. K1.
2nd row: P1. P2tog. Pat to last 3 sts. P2togtbl. P1.**
Rep last 2 rows 12 (16-14-27-29-30) times more. 78 (72-88-50-54-56) sts.
Sizes XS/S, M, L, XL and 4/5XL only:
1st row: (RS). K1. ssk. Pat to last 3 sts. K2tog. K1.
2nd row: P2. Pat to last 2 sts. P2. 76 (70-86-48-54) sts.
Sizes XS/S, M and L only:
1st row: (RS). K1. ssk. Pat to last 3 sts. K2tog. K1.
2nd row: P1. P2tog. Pat to last 3 sts. P2togtbl. P1.
3rd row: As 1st row.
4th row: P2. Pat to last 2 sts. P2.
Rep last 4 rows 4 (3-5) times more, then rep 3rd and 4th rows once. 44 (44-48) sts.
All sizes:
Leave rem 44 (44-48-48-54-54) sts on a st holder.
FRONT
Work from ** to ** as given for Back.
Rep last 2 rows 12 (16-14-19-20-21) times more. 78 (72-88-82-90-92) sts.
Sizes XS/S and L only:
1st row: (RS). K1. ssk. Pat to last 3 sts. K2tog. K1.
2nd row: P2. Pat to last 2 sts. P2.
3rd row: As 1st row.
4th row: P1. P2tog. Pat to last 3 sts. P2togtbl. P1.
5th row: As 3rd row.
6th row: As 2nd row.
Rep 3rd to 6th rows 0 (1) time more. 70 (74) sts.
Size M only:
1st row: (RS). K1. ssk. Pat to last 3 sts. K2tog. K1. 70 sts.
2nd row: P2. Pat to last 2 sts. P2.
Sizes XS/S, M and L only: Shape neck:
1st row: (RS). K1. ssk. Pat across 18 sts. K2tog (neck edge). Turn. Leave rem sts
on a spare needle.
2nd row: Pat to last 3 sts. P2togtbl. P1.
3rd row: K1. ssk. Pat to last 2 sts. K2tog.
4th row: Pat to last 2 sts. P2.
5th row: As 3rd row.
Rep 2nd to 5th rows twice more. 6 sts.
Next row: (WS). Pat to last 3 sts. P2togtbl. P1. 5 sts.
Next row: K1. K3tog. K1. 3 sts.
Next row: P3.
Next row: K1. ssk. 2 sts.
Next row: P2.
Next row: ssk. Fasten off.
With RS facing, slip next 24 (24-28) sts onto a st holder. Join yarn to rem sts and
proceed as follows:
1st row: ssk. Pat to last 3 sts. K2tog. K1.
2nd row: P1. P2tog. Pat to end of row.
3rd row: ssk. Pat to last 3 sts. K2tog. K1.
4th row: P2. Pat to end of row.
5th row: As 3rd row.
Rep 2nd to 5th rows twice more. 6 sts.
Next row: (WS). P1. P2tog. Pat to end of row. 5 sts.
Next row: K1. K3tog. K1. 3 sts.
Next row: P3.
Next row: K2tog. K1. 2 sts.
Next row: P2.
Next row: K2tog. Fasten off.
Sizes XL, 2/3XL and 4/5XL only: Shape neck:
1st row: (RS). K1. ssk. Pat across (22-24-25) sts. K2tog (neck edge). Turn. Leave rem sts on a spare needle.
2nd row: Pat to last 3 sts. P2togtbl. P1.
3rd row: K1. ssk. Pat to last 2 sts. K2tog.
Rep last 2 rows (5-6-6) more. 7 sts.
Next row: (WS). Pat to last 3 sts. P2togtbl. P1. 6 sts.
Sizes XL and 4/5XL only:
Next row: K1. ssk. K1. K2tog. 4 sts.
Next row: P1. P2togtbl. P1. 3 sts.
Next row: K1. ssk. 2 sts.
Next row: P2.
Next row: ssk. Fasten off.
Size 2/3XL only:
Next row: K1. ssk. K3. 5 sts.
Next row: P2. P2togtbl. P1. 4 sts.
Next row: K1. ssk. K1. 3 sts.
Next row: P2togtbl. P1. 2 sts.
Next row: ssk. Fasten off.
Sizes XL, 2/3XL and 4/5XL only:
With RS facing, slip next (28-30-32) sts onto a st holder. Join yarn to rem sts and proceed
as follows:
1st row: ssk. Pat to last 3 sts. K2tog. K1.
2nd row: P1. P2tog. Pat to end of row.
3rd row: ssk. Pat to last 3 sts. K2tog. K1.
Rep last 2 rows (5-6-6) more. 7 sts.
Next row: (WS). P1. P2tog. Pat to end of row. 6 sts.
Sizes XL and 4/5XL only:
Next row: ssk. K1. K2tog. K1. 4 sts.
Next row: P1. P2tog. P1. 3 sts.
Next row: K2tog. K1. 2 sts.
Next row: P2.
Next row: K2tog. Fasten off.
Size 2/3XL only:
Next row: K3. K2tog. K1. 5 sts.
Next row: P1. P2tog. P2. 4 sts.
Next row: K1. K2tog. K1. 3 sts.
Next row: P2tog. P1. 2 sts.
Next row: K2tog. Fasten off.
SLEEVES
With smaller needles, cast on 41 (41-43-47-47-47) sts.
Work 2” [5 cm] in twisted ribbing as given for Back inc 8 (8-6-18-18-18) sts evenly
across last row. 49 (49-49-65-65-65) sts.
Change to larger needles and proceed in pat as follows:
1st row: (RS). (P2. Work 1st row Panel Pat A) 0 (0-0-1-1-1) time. P2. Tw2R. P2.
Work 1st row Panel Pat A. P2. Tw2R. P2.
Work 1st row Panel Pat B. P2. Tw2R. P2.
Work 1st row Panel Pat A. P2. Tw2R. P2.
(Work 1st row Panel Pat A. P2) 0 (0-0-1-1-1) time.
2nd row: (K2. Work 2nd row Panel Pat A)
0 (0-0-1-1-1) time. K2. P2. K2.
Work 2nd row Panel Pat A. K2. P2. K2.
Work 2nd row Panel Pat B. K2. P2. K2.
Work 2nd row Panel Pat A. K2. P2. K2.
(Work 2nd row Panel Pat A. K2) 0 (0-0-1-1-1) time.
These 2 rows form pat. Panel pats are now in position.
Cont in established pat, inc 1 st each end of needle on next and following alt rows
until there are 55 (59-63-71-71-81) sts, then on following 4th rows until there are
95 (99-103-107-107-115) sts, taking inc sts into repeats of (Panel Pat A. P2. Tw2R. P2).
Cont even in pat until work from beg measures 18 (18-17½-17-17-16½)” [45.5 (45.5-44.5-43-43-42) cm], ending on a WS row.
Shape raglans:
Keeping cont of pat, cast off 2 (2-3-3-4-6) sts beg next 2 rows. 91 (95-97-101-99-103) sts.
Sizes XS/S and M only:
1st row: (RS). K1. ssk. Pat to last 3 sts. K2tog. K1.
2nd row: P1. P2tog. Pat to last 3 sts. P2togtbl. P1.
Rep last 2 rows 4 (2) times more. 71 (83) sts.
Next row: K1. ssk. Pat to last 3 sts. K2tog. K1.
Next row: P2. Pat to last 2 sts. P2. 69 (81) sts.
All sizes:
1st row: (RS). K1. ssk. Pat to last 3 sts. K2tog. K1.
2nd row: P1. P2tog. Pat to last 3 sts. P2togtbl. P1.
3rd row: As 1st row.
4th row: P2. Pat to last 2 sts. P2.
Rep last 4 rows 8 (10-11-13-11-11) times more. 15 (15-25-17-27-31) sts.
1st row: (RS). K1. ssk. Pat to last 3 sts. K2tog. K1.
2nd row: P2. Pat to last 2 sts. P2.
Rep last 2 rows 0 (0-5-0-5-7) times more.
Leave rem 13 (13-13-15-15-15) sts on a st holder.
FINISHING
Pin pieces to measurements. Cover with a damp cloth, leaving cloth to dry.
Sew raglan seams leaving left back raglan seam open.
Neckband:
With RS facing and smaller needles, K13 (13-13-15-15-15) from left sleeve st holder, dec 2 sts evenly across.
Pick up and knit 14 (14-14-14-14-16) sts down left front neck edge.
K24 (24-28-28-30-32) from Front st holder, dec 4 (4-4-4-6-6) sts evenly across.
Pick up and knit 14 (14-14-14-14-16) sts up right front neck edge.
K13 (13-13-15-15-15) from Right Sleeve st holder, dec 2 sts evenly across.
K44 (44-48-48-54-54) from Back st holder, dec 5 (5-5-5-7-7) sts evenly across. 109 (109-117-121-125-131) sts.
Beg and ending on a 2nd row, work 3½” [9 cm] in twisted ribbing as given for Back. Cast off loosely in ribbing.
Sew left back raglan and neckband seam.
Fold neckband in half to WS and sew in position.
Sew side and sleeve seams.
Read NextOversized Garter Stitch Sweater
Your Recently Viewed Projects
Thanks for your comment. Don't forget to share!
NEW49man 5464415
Jul 06, 2024
I found that an incorrect number of stitches were indicated in the pattern for the number in the design. And, the design did not have the same number of stitches on both halves. For the pattern to work, I had to turn the wrong side instructions upside down and backwards . I would not recommend this for anyone , The original pattern does include graphs, but that. would not cure the wrong number of stitches . Find another pattern.
NEW49man 5464415
Jul 04, 2024
I scrolled down and found the link to the original pattern. http//www.yarnspirations.com/patterns/honeycomb-ar == an.html?id=198229. I haven't tried this, but I'm going to give it a try. Good luck with the knitting, I will try to leave a comment after I try it.
NEW49man 5464415
Jul 04, 2024
There were many mistakes in the pattern, I was able to fix most of them but I'm still having problems making the first and last sections even. The Paton Design Team for transpirations.com obviously did not make the garment using these instructions . They really need to make a corrected pattern or remove it as a project. This is not fair to the knitter. A lot of money goes into the materials to construct this sweater.
cvhellinga 9643924
May 18, 2024
Tried 4 times to verify by email. Something is not working. Please post corrected pattern. I see that other knitters are having the same issue
cvhellinga 9643924
May 18, 2024
In size small/xsmall the increase is to 134 stitches and yet the first row only works 128 stitches. I counted them. Either the graphs are wrong or the increase. Please send correction of pattern to cvhellinga@gmail.com
Taryn
May 04, 2020
What a beautiful pattern to knit...knitted it for a friend and it looks gorgeous on..... Once into the pattern it was easy....please need more free aran patterns..... Thank you so much for a brilliant pattern
Marilyn
Oct 07, 2017
Never mind my question! I saw this Gauge1 stitches, 2 rows, 3 inches. stockinette stitch and stopped cold!! I should have read further.
Marilyn
Oct 07, 2017
Oats and Honeycomb Cabled pattern- would someone please explain the gauge for this pattern? I don't understand it.
winterraines1954 5 154981
Oct 06, 2017
Oats and Honeycomb cabled pattern seems to have many mistakes. Is there a corrected version of this pattern?
KathrynAllison
Oct 06, 2017
Hello winterraines1954 5 154981, the original version of this pattern can be found here: http://www.yarnspirations.com/patterns/honeycomb-aran.html?id=198229. If you still have questions, we suggest directly contacting the designer of the pattern via their website. Hope this helps! -Editors of AllFreeKnitting
joancooney41 29018 03
Jan 30, 2017
I cannot get past the first row on this pattern. I am trying to knit the first size and each time I end up with six extra stitches on the first row. Any know what I am missing.
3cats2love
Oct 06, 2017
Hi joancooney41 29018 03, my general rule for a complex pattern like this is to go slowly and to work for periods where you aren't interrupted, if possible. I'm a visual person so I print out the pattern and mark off each part as I work through it. This helps make sure I end up with the correct number of stitches, plus keeps my place for when the phone rings or I have to stop.
bmoore1016 5378239
Jan 08, 2017
Hi- I'm stuck on this Oats Honeycomb pattern. I've done the ribbing and the first 2 rows but this is where I'm stuck. Where do I go from here? Directions say that these two rows form the pattern. But for me to work the 1st row again I don't have enough stitches. But if I go to the 3rd row on Pat A is that what I do across the entire group of stitches and follow the row 3 and so on? Or, do I use row 1 and replace it with row 3? I'm really confused as to where to go next. Can someone please help me. I love this pattern just not sure where to go next. Thanks.
Member 7150627
Jan 10, 2017
I am not that far yet, but I did do it on paper, on row 3 I use row 3 of PATA, row 3 of PATB and row 3 of PATC...the other stiches I use the same as row 1. However I had to rework the whole back because those rows did not have enough stiches. Not sure what it will look like but I am giving it a try.
helen769nash 83120 24
Oct 09, 2016
hi I tried to knit this and found the instructions a bit difficult to understand, I wanted to make the xs one but every time I changed to the larger needles I couldn't get to the end of the row on the needles but came to the end of the row on the pattern what am I doing wrong???
The Designing Peng uin
Jun 25, 2016
very much want to knit this for the two older girls - hope the patterns for small are right but shall be careful knitting and see what happens
nanamargiek 317512 3
Jun 08, 2016
I am so pleased to have found this pattern again. I first knitted this jumper (or VERY similar) 54 years ago. The first time I wore it, I had a crash on my motor-bike and tore the arms and back out of it!! It was irreparable! I was devastated but always meant to knit it again but lost the pattern. I am a little concerned that some comments allude to mistakes - I the pattern I printed today the corrected version? I can't wait to knit this for my daughter. Thank you so much
Libra3024
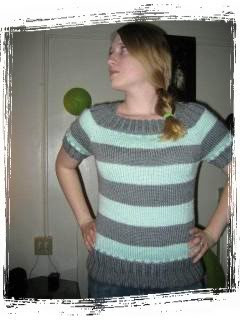
Jan 15, 2016
Since so many of you have asked for my spreadsheet, I thought I'd show how the last one of these sweaters turned out. I gave it to my g'daughter for Christmas and she was thrilled. Green is her favorite color and I think it turned out pretty well.
Susan S
Oct 27, 2016
Libra, this is gorgeous. Green is also my favorite color and I like the shade you chose. What type of yarn did you use (Patons Classic Wool or different) and how long did it take you to make the sweater? Did you make them in different colors, and if so, what color do you think showed the stitches the best? I'm not nearly skilled enough to knit this, but I am keeping the pattern as it is a classic and something to look forward to. Thanks for sharing your photo!
bmoore1016 5378239
Jan 09, 2017
Hi Libra - I wonder if you could tell me where to go after the first two rows. I'm stuck. I know I should go to row 3 but do you follow those same stitches across for that pattern? Shouldn't there be other stitches besides those to form the pattern? I've never been so lost. I used to knit all the time but haven't in many years. So if you can guide be as to where I go from here I'd appreciate it. Thanks, Barbara P.S. I love your sweater. Thanks for putting it up for all to see. You must be so proud.
Sheryl
Jun 02, 2017
Morning Libra please could you email me your spreadsheet? My email address is sherylp@ellipsys.co.za
gdyte25 7765053
Sep 03, 2017
Hi Libra, I've finished the front and back, but I just can't get the increases on the sleeves right. could you please share your spreadsheet with me? gdyte25@yahoo.com Thank you for your help. Spreadsheet was the only way I could get the pattern in my head for the front/back. )
Mrs Nesbitt
Jan 08, 2016
Definitely something that I'm going to knit once I'm more experienced. I love the color and the classic look. Exactly what a knit sweater should be )
Libra3024
Jan 10, 2016
It is a beautiful sweater, but check the pattern before you try it. You will have to adjust it as it is incorrect.
Janet CK
Oct 27, 2016
Libra3024 - can you tell me where it is ''incorrect''. I just started making it , please send response to kurczekjc@yahoo.com Tks in advance.
bmoore1016 5378239
Jan 09, 2017
Hi did you ever received a response from Libra? I curious because I need help also. I'm stuck after the first two rows. I just might have to try something else. Don't want to. Love this pattern.
Libra3024
Jan 07, 2016
Well, I've figured out that I can't upload a spreadsheet here. If anyone still wants it, I can email it to you. My email is Libra3024@aol.com In the subject line, include 'sweater inst' I've made two of them from the spreadsheet and they really are beautiful.
Janet CK
Oct 27, 2016
I have sent request for ''sweater inst'' to your email. Tks, still waiting for reply D
helenlackey 591329 5
Feb 04, 2017
Hi Libra Is there any chance that you could send me the spreadsheet - I too am an experienced daughter and thought I was going to go crazy until I found this review page. My email is wlackey@cogeco.ca. Many thanks in advance
merirose2 5102058
Jan 06, 2016
Is anyone still following my corrections for this pattern? Have figured out the arithmetic for back armhole decreases. If anyone wants them, let me know, and I will post them.
cateday 7447419
Dec 31, 2015
This is the second pattern in the last two weeks I have attempted that was written incorrectly. I am very disappointed in having to keep rewriting patterns in order to complete a project. That being said, I am hoping I have hit upon a simple solution for this particular pattern! Wish me luck! The sweater is beautiful, but having the first pattern row come out off count is off putting!!
cateday 7447419
Jan 01, 2016
The 6 extra stitches should be in between the two repeats of pattern A at the end of the RS row. Rather than rip it all out again and very likely changing to a different pattern altogether, I used these stitches at either end for a selvedge edge and left the pattern as two consecutive cables. At the very least, this makes this sweater uniquely mine and saved me time and aggravation in the long run. Sad that the patterns apparently test knit and corrected prior to publication!!
merirose2 5102058
Jan 06, 2016
And it does not get better! You can follow my successive posts as I worked my way through this pattern. You need them all, I'm afraid. Will post the back armhole decreases if anyone still wants them.
Janet CK
Oct 27, 2016
I'm just now starting this and would like all the hints/help I can get D I have seen 2 corrections you have posted are there any more? I'm trying to get the ''spreadsheet'' that was offered but haven't heard from her yet. Tks in advance. (kurczekjc@yahoo.com)
paulabirdlady 5290 173
Dec 16, 2015
Im pretty sick right now. Spent an entire evening knitting 3 inches of 1X1 twisted rib over 129 stitches only to find row 1 in XL is incorrect. I have 11 extra stitches! If that isn't a project ender right there, what is? Wish i had read these comments before i began a wasted night of knitting!
merirose2 5102058
Dec 03, 2015
Pattern B 2nd row (WS) Row 6 only K2. P1. K1. P1. K1. P1. K1. P1. K1. P1. K2
detmon 8012319
Dec 21, 2015
Thanks for all your help with the corrections. Have you got to the sleeve yet? Would welcome those corrections. Still working on the back.
merirose2 5102058
Jan 06, 2016
Sorry, still working on the back. Spent two weeks with an active four-year-old! But the second row of the sleeve pattern also has the "extra" stitches at the end of each pattern instead of at the beginning.
merirose2 5102058
Jan 06, 2016
And let me know if you need my changes for the armhole decreases, if you have not figured them out for yourself.
Cathywilkerson 731 2886
Nov 29, 2015
This is on Ravelry! http//www.ravelry.com/patterns/library/honeycomb-a == ran
merirose2 5102058
Nov 26, 2015
New erratum after the first complete pattern, one must start the second and subsequent ones, at row 3. Still doing the back.
merirose2 5102058
Nov 18, 2015
Have corrected the pattern for the smallest size as follows 1st row (RS) P1. P4. (1st row A. P2. Tw2R. P2.) x 2 (29 sts) 1st row B. P2. Tw2R. P1. (18 sts) 1st row C. P1. Tw2R. P2. (39 sts). 1st row B. P1. Tw2R. P2. (18 sts) (1st row A. P2. Tw2R. P2) x 2. P4. P1. 2nd row (WS) K1. K4. (K2. P2. K2. 2nd row A) x 2 K1. P2. K2. 2nd row B K2. P2. K1. 2nd row C K2. P2. K1. 2nd row B (K2. P2. K2. 2nd row A) x 2. K4. K1. Have started only the back, and am using 133 sts.
riverdaletml 82287 94
Feb 06, 2015
Would love this sweater in a button through jacket??
hamneggs
May 22, 2015
I know it is a bit late for a reply, but there is a pattern called "Cozy Cable" sweater on this website that is a gorgeous cardigan similar in pattern to this pullover. You can enter it in the search bar or look in the pattern index on the left side of screen for the cardigan. It's not exactly a jacket, but it is button front.
Libra3024
Jan 09, 2015
I love this sweater and am making it, but find the instructions confusing. As others have commented, the number of stitches aren't always correct. I finally made a chart on excel, fixing the pattern, and this has worked out well. I also am an experienced knitter. Rating for the sweater would be a 5 but I rated the pattern.
radhikasitaraman 6 318883
Feb 21, 2015
Hi Libra3024, could you share the excel spreadsheet. I am having the same issue of 6 stitches left on the needle when I follow the pattern. The pattern is quite confusing. I am an intermediate knitter and have frogged my pattern a few times already.
Libra3024
Jan 07, 2016
I'm trying to figure out how the heck to share the spreadsheet. I'll try to attach the whole thing. It won't let me share the spreadsheet.
schafer834 5401816
May 26, 2015
Is it possible for you to share your excel spreadsheet? Am an experienced knitter for quite computer illiterate for excel and spreadsheets. Thank you
cadwiz1 2360117
Oct 21, 2015
Libra3024 I would love to see your spreadsheet before I try making this sweater!
stephanieesmoot 58 47966
Oct 26, 2015
I noticed this issue on instructions BACK , 1st row, line six doing the A pattern. It seems to me that it is six stitches short. I would think the A pattern on one side of the sweater would be the same as the other side. It is not written that way and is six stitches short. Have others found this so and how have they fixed it. A sucessessful spreadsheet would be great if someone can send it to me as I am just starting.
Cathywilkerson 731 2886
Nov 27, 2015
I noticed this on the back too, but found that 1st row, line six is six stitches too many. I am knitting the medium size. Where it says P2. TW2R. P4 (2-2-2-4-2). I am knitting P2. TW2R. P4 (1-2-2-4-2). This looks better and reduces it by 6 to give me the proper stitch count. I charted it out on graph paper.
QRibbon 2695754
Nov 05, 2015
This sweater is so beautiful but I don't want to attempt it without corrections that you have figured out. Would really appreciate it if you could share your spreadsheet. Thanks so very much.
madeinitaly114 428 8043
Nov 12, 2015
Hi Libra, Would you possibly share your spreadsheet? I'm an experienced knitter w/ the cable design am very frustrated as I cannot get the pattern to work out. Thanks!
Cathywilkerson 731 2886
Nov 27, 2015
I would love a copy of the spread sheet too. This pattern is very confusing and I would consider my self an advanced knitter.
kfarinholt 5940147
Jan 04, 2016
as with alot of others, wish I had read the comments before I started this. I am an experienced knitter too, but was really not in the mood to pull out the charting paper. Anyone willing to share theirs? Otherwise I am just going to pull another basic sweater pattern and chart my own stitches from scratch.
Libra3024
Jan 07, 2016
I apologize. I haven't been on here for a while. But yes, I can share the spreadsheet but need to add a few notes to it. I understand it but doubt if anyone else would. I've made one or two little changes. I like to keep two stitches at the beginning and end of each row in stockinette stitch. It makes a much more pleasing seam. Give me a day or two to work on the spreadsheet so someone besides me would understand it and I'll post it.
Azzurromac 1422793
Nov 09, 2014
Too many stitches for the pattern. Tried to adjust but in the end gave up and found another pattern elsewhere. I'm a very experienced knitter
the pickled pug
Oct 22, 2014
There seems to be six stitches left over making the smallest size!
Report Inappropriate Comment
Are you sure you would like to report this comment? It will be flagged for our moderators to take action.
Thank you for taking the time to improve the content on our site.