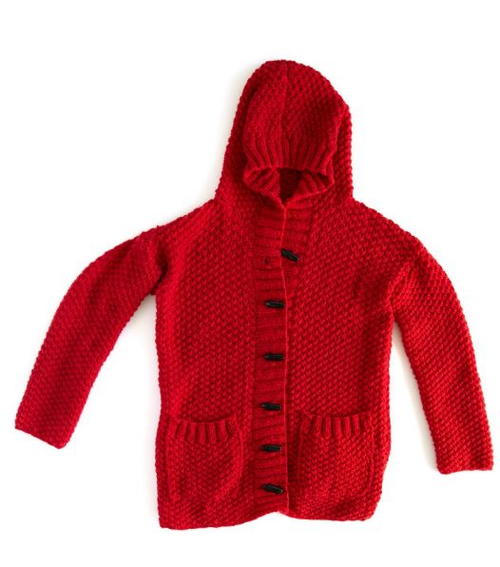
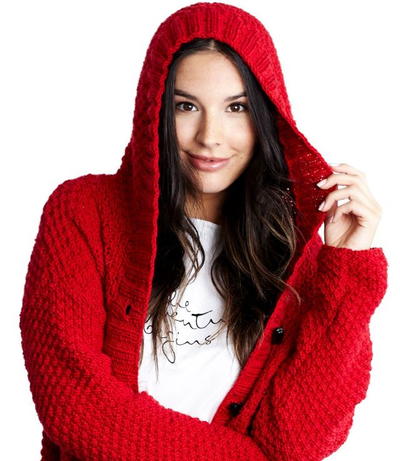
Lazy Day Chic Knit Sweater
This knit sweater pattern is perfect for lounging at home this winter!

Are you planning for a low-key day at home? You can still look trendy while staying totally relaxed with this Lazy Day Chic Knit Sweater! The intermediate knitting pattern is warm, comfortable, and fashion-forward, and is definitely one item you'll want to wear this winter. The cozy knit sweater includes toggle buttons for ease of use and even has two pockets that are the perfect size for storing your phone, keys, and even your wallet. Whether you have scheduled a day of lounging or will run a few quick errands, you're sure to look trendy as can be with this knit sweater!

Knitting Needle Size8 or 5 mm, Circular Knitting Needles
Yarn Weight(4) Medium Weight/Worsted Weight and Aran (16-20 stitches to 4 inches)
Gauge18 sts = 4" (10 cm); 27 rows = 4" (10 cm) in Double Moss st, after blocking. CHECK YOUR GAUGE. Use any size needles to obtain the gauge.
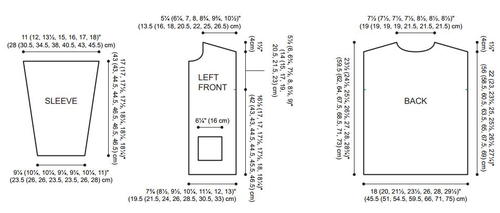
Finished SizeCardi measures 36 (40, 43, 47, 52, 56, 59)" (91.5 (101.5, 109, 119.5, 132, 142, 150) cm) around bust and 23½ (24½, 25¼, 26½, 27, 28, 28¾)" (59.5 (62, 64, 67.5, 68.5, 71, 73) cm) in length not including hood.
Materials List
- Red Heart® Chic Sheep by Marly Bird™: 9 (10, 11, 13, 14, 16, 17) balls 5390 Lipstick
- Susan Bates® Circular Knitting Needles: 5mm [US 8] 40" (101.5 cm)
- Susan Bates® split lock stitch markers
- Six (6) 2" (5 cm) toggle buttons
- Stitch holders
- Yarn needle
You can discover even more great free sweater patterns! Get started by taking a look at our free eBook
Instructions
Notes
-
Sweater is worked back and forth in rows. The long circular needle is used in order to hold the full width of the sts.
-
When instructed to pick up a large number of sts over a wide piece of fabric, use the following marker technique to make it easier to evenly space them: Fold the fabric in half, and place a marker at the halfway point, dividing it into 2 segments. Now you only need to evenly space half the number of sts over each segment. Fold each segment in half again, and place a marker at the halfway point. Repeat this process until each segment is only a couple of inches long, then divide the number of sts required by the number of segments you have to find out how many sts go in each segment. If this is not evenly divisible, it’s ok to pick up a st less or a st more here and there in order to reach the desired total.
-
Directions are for size XS; changes for sizes S, M, L, XL, 2X, and 3X are in parentheses.
Special Stitches
-
M1 (make 1 inc) = Lift strand between needles to left-hand needle and knit strand through the back loop, twisting it to prevent a hole.
-
Ssk (slip, slip, knit) = Slip next two sts knitwise to right needle, insert point of left needle through front of sts, knit these sts together through back loop.
-
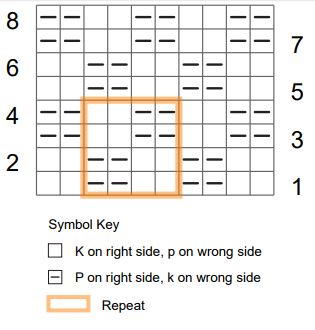
Double Moss Stitch
Worked over a multiple of 4 sts + 2.
Row 1 (right side): K2, * p2, k2; repeat from * to end.
Row 2: P2, * k2, p2; repeat from * to end.
Row 3: P2, * k2, p2; repeat from * to end.
Row 4: K2, * p2, k2; repeat from * to end.
Repeat rows 1-4 for Double Moss st.
Back
-
Cast on 84 (92, 100, 108, 120, 128, 136) sts.
-
Row 1 (right side): K1 (edge st), k2, * p2, k2; repeat from * to last st (this is Row 1 of Double Moss st), k1 (edge st). Work in established Double Moss st, keeping edge sts in Stockinette st, until piece measures 22 (23, 23¾, 25, 25½, 26½, 27¼)" (56 (58.5, 60.5, 63.5, 65, 67.5, 69.5) cm), ending after a Row 4 of pattern.
-
Shape Shoulders
Working in established pattern, bind off 6 (7, 8, 9, 10, 11, 12) sts at beginning of next 6 rows, then 7 (8, 9, 10, 11, 12, 13) sts at beginning of next 2 rows – 34 (34, 34, 34, 38, 38, 38) sts.
Cut yarn and place all remaining sts on a holder.
Right Front
-
Cast on 36 (40, 44, 48, 52, 56, 60) sts.
-
Row 1 (right side): K1 (edge st), p2, * k2, p2; repeat from * to last st (this is Row 3 of Double Moss st), k1 (edge st).
Work in established Double Moss st, keeping edge sts in Stockinette st, until piece measures 8 rows less than Back, not including Back shoulder shaping, ending after a Row 2 of pattern. -
Shape Neck
Row 1 (right side): K1, p2, k2, place 5 sts just worked on a holder, work to end.
Row 2: Work as established to end. Bind off 2 sts at beginning of next 2 right side rows. Work 1 wrong side row evenly.
Next row (dec row, right side): Ssk, work as established to end. Work 1 wrong side row evenly, then rep the dec row above once more. -
Shape Shoulder
Bind off 6 (7, 8, 9, 10, 11, 12) sts at beginning of next 3 wrong side rows, then bind off remaining 7 (8, 9, 10, 11, 12, 13) on next wrong side row.
Left Front
-
Cast on 36 (40, 44, 48, 52, 56, 60) sts.
-
Row 1 (right side): K1 (edge st), p2, * k2, p2; repeat from * to last st (this is Row 3 of Double Moss st), k1 (edge st).
-
Work in established Double Moss st, keeping edge sts in Stockinette st, until piece measures 8 rows less than Back, not including Back shoulder shaping.
-
Shape Neck
Row 1 (right side): Work in established pattern to last 5 sts, place last 5 sts on a holder. Bind off 2 sts at beginning of next 2 wrong side rows.
Next 2 rows:
Row 1 (dec row, right side): work as established to last 2 sts, k2og.
Row 2: Work evenly. Repeat the last 2 rows once more. -
Shape Shoulder
Bind off 6 (7, 8, 9, 10, 11, 12) sts at beginning of next 3 right side rows, then bind off remaining 7 (8, 9, 10, 11, 12, 13) on next right side row.
Sleeves (make 2)
-
Cast on 44 (48, 48, 44, 44, 48, 52) sts.
-
Row 1 (right side): K1 (edge st), K2, * p2, k2; repeat from * to last st (this is Row 1 of Double Moss st), k1 (edge st). Work 17 (17, 9, 9, 1, 1, 1) more rows in established Double Moss st, keeping edge sts in Stockinette st.
-
Next 5 rows:
Row 1 (inc row, right side): K1 (edge st), M1, p2, * k2, p2; repeat from * to last st, M1, k1 (edge st) – 46 (50, 50, 46, 46, 50, 54) sts.
Row 2: P1 (edge st), p1, * k2, p2; repeat from * to end.
Row 3: K1 (edge st), k1, * p2, k2; repeat from * to end.
Row 4: P1 (edge st), p1, * k2, p2; repeat from * to end.
Row 5: K1 (edge st), k1, * p2, k2; repeat from * to end.
Repeat Rows 2-5 4 (4, 1, 0, 0, 0, 0) more times, then Rows 2-4 only once more. -
Next 5 rows:
Row 1 (inc row, right side): K1 (edge st), M1, k1, * p2, k2; repeat from * to last 4 sts, p2, k1, M1, k1 (edge st) – 48 (52, 52, 48, 48, 52, 56) sts.
Row 2: P1 (edge st), p2, * k2, p2; repeat from * to last st, p1 (edge st).
Row 3: K1 (edge st), k2, * p2, k2; repeat from * to last st, k1 (edge st).
Row 4: P1 (edge st), p2, * k2, p2; repeat from * to last st, p1 (edge st).
Row 5: K1 (edge st), k2, * p2, k2; repeat from * to last st, k1 (edge st).
Repeat Rows 2-5 4 (4, 1, 0, 0, 0, 0) more times, then Rows 2-4 only once more. -
Next 5 rows:
Row 1 (inc row, right side): K1 (edge st), M1, k2, * p2, k2; repeat from * to last st, M1, k1 (edge st) – 50 (54, 54, 50, 50, 54, 58) sts.
Row 2: P1 (edge st), k1, p2 * k2, p2; repeat from * to last 2 sts, k1, p1 (edge st).
Row 3: K1 (edge st), p1, k2, * p2, k2; repeat from * to last 2 sts, p1, k1 (edge st).
Row 4: P1 (edge st), k1, p2 * k2, p2; repeat from * to last 2 sts, k1, p1 (edge st).
Row 5: K1 (edge st), p1, k2, * p2, k2; repeat from * to last 2 sts, p1, k1 (edge st).
Repeat Rows 2-5 4 (4, 1, 0, 0, 0, 0) more times, then Rows 2-4 only once more. -
Next 5 rows:
Row 1 (inc row, right side): K1 (edge st), M1, p1, k2, * p2, k2; repeat from * to last 2 sts, p1, M1, k1 (edge st) – 52 (56, 56, 52, 52, 56, 60) sts.
Row 2: P1 (edge st), k2, * p2, k2; repeat from * to last st, p1 (edge st).
Row 3: K1 (edge st), p2, * p2, k2; repeat from * to last st, k1 (edge st).
Row 4: P1 (edge st), k2, * p2, k2; repeat from * to last st, p1 (edge st).
Row 5: K1 (edge st), p2, * p2, k2; repeat from * to last st, k1 (edge st).
Repeat Rows 2-5 4 (4, 1, 0, 0, 0, 0) more times, then Rows 2-4 only once more. -
Repeat from ** 0 (0, 0, 1, 2, 2, 2) more times, then from ** to *** only 0 (0, 1, 1, 1, 1, 1) more times – 52 (56, 62, 66, 74, 78, 82) sts.
-
For last 5 sizes only:
Next 2 rows:
Row 1 (inc row, right side): K1 (edge st), M1, p1, k2, * p2, k2; repeat from * to last 2 sts, p1, M1, k1 (edge st) – 52 (56, 64, 68, 76, 80, 84) sts.
Row 2: P1 (edge st), k2, * p2, k2; repeat from * to last st, p1 (edge st). -
For all sizes:
Work 19 (19, 22, 18, 0, 0, 0) more rows in established Double Moss st, keeping edge sts in Stockinette st. Bind off all sts.
Pockets
-
Cast on 28 sts.
-
Row 1 (right side): K1 (edge st), k2, * p2, k2; repeat from * to last st (this is Row 1 of Double Moss st), k1 (edge st). Work in established Double Moss st, keeping edge sts in Stockinette st, until piece measures 5" (12.5 cm).
-
Ribbed Top Edge
Next 2 rows:
Row 1 (right side): K1 (edge st), k2, * p2, k2; repeat from * to last st, k1 (edge st).
Row 2: P1 (edge st), p2, * k2, p2; repeat from * to last st, p1 (edge st).
Repeat these 2 rows 3 more times, then bind off all sts loosely.
Finishing
-
Block all pieces to measurements.
Place a marker 5½ (6, 6¾, 7½, 8, 8½, 9)" (14 (15, 17, 19, 20.5, 21.5, 23) cm) below shoulder on outer edge of Fronts and Back. Sew bound off edges of Sleeves to body, positioning them between the markers.
Sew side and sleeve seams.
Sew a Pocket to each front piece, about 1½" (4 cm) away from side seam and 2½" (6 cm) above bottom edge. -
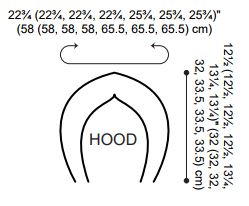
Hood
Sew shoulder seams.
Row 1 (right side): With right side facing, pick up and knit 18 sts from Right Front neck curve, work in established pattern across back neck, pick up and knit 18 sts from Left Front neck curve, work in established pattern across sts from Left Front holder.
Row 2: Work in established pattern across all sts, including Right Front holder sts. This will be a Double Moss Row 4 – 80 (80, 80, 80, 84, 84, 84) sts.
Work as established until hood measures 12½ (12½, 12½, 12½, 13¼, 13¼, 13¼)" (32 (32, 32, 32, 33.5, 33.5, 33.5) cm), ending after a Row 2 or 4 of pattern.
With wrong side facing, fold hood in half, and join top seam using Three-needle Bind-off. -
Ribbed Edging
With right side facing, pick up and knit 102 (108, 112, 118, 120, 126, 128) sts up right front edge to beginning of hood, 126 (126, 126, 126, 134, 134, 134) sts around hood, and 102 (108, 112, 118, 120, 126, 128) sts down left front edge – 330 (342, 350, 362, 374, 386, 390) sts.
Row 1 (wrong side): P2, * k2, p2; repeat from * to end.
Row 2: K2, * p2, k2; repeat from * to end. Repeat Rows 1 and 2 3 (3, 3, 3, 5, 5, 5) more times, then Row 1 only once more. -
Buttonholes
Create buttonholes with short rows as follows:
Row 1 (right side): K2, [p2, k2] 2 (3, 3, 2, 2, 3, 3) times, turn work.
Row 2: P2, [k2, p2] 2 (3, 3, 2, 2, 3, 3) times, turn work.
Row 3: [K2, p2] 2 (3, 3, 2, 2, 3, 3) times, k2tog, yo, (1st buttonhole made), [p2, k2] 4 (4, 4, 5, 5, 5, 5) times, turn work.
Row 4: [P2, k2] 4 (4, 4, 5, 5, 5, 5) times, turn work.
Row 5: [P2, k2] 3 (3, 3, 4, 4, 4, 4) times, p2, k2tog, yo, (2nd buttonhole made), [p2, k2] 4 (4, 4, 5, 5, 5, 5) times, turn work.
Rows 6-11: Repeat Rows 4 and 5 alternately – 3rd, 4th, and 5th buttonholes made.
Row 12: [P2, k2] 3 (3, 3, 4, 4, 4, 4) times, p2, k2tog, yo, (6th buttonhole made), * p2, k2; repeat from * to end.
Complete Ribbed Band.
Next 2 Rows:
Row 1 (wrong side): P2, * k2, p2; repeat from * to end.
Row 2: K2, * p2, k2; repeat from * to end.
Repeat Rows 1 and 2 (2, 2, 2, 4, 4, 4) more times, then Row 1 only once more. Bind off all sts loosely in rib pattern. -
Weave in all loose ends.
-
Click here for a larger version of the photo below.
Diagrams
-
Click here for a larger version of the diagram key.
-
Click here for a larger version of the diagram below.
-
Click here for a larger version of the diagram below.
Abbreviations
- dec
- decrease
- inc
- increase
- k
- knit
- k2tog
- knit next 2 sts together
- p
- purl
- st(s)
- stitch(es)
- yo
- yarn over
- [ ]
- work directions in brackets the number of times specified
- * or **
- repeat whatever follows the * or ** as indicated
What is your favorite color of yarn for loungewear?
Tell us in the comments below!
Read NextHenley Knit Sweater Pattern
Your Recently Viewed Projects

Thanks for your comment. Don't forget to share!
dcglonek10 7484225
May 14, 2020
I am knitting the sleeves for lazy day chic knit sweater and don't understand #7. Repeat from 0 (0, 0, 1, 2, 2, 2) more times, then from to only 0 (0, 1, 1, 1, 1, 1) more times 52 (56, 62, 66, 74, 78, 82) sts. I can't find any where in the pattern where the 2 stars and 3 stars are so I don't know what to repeat.. Help!
Tricia108
Feb 28, 2018
I really like a pattern with a lot of details and this is one of them. It is basically a simple sweater but the details such as the hood and pockets add to it. The detail about making the buttonholes is a plus as well. This is a sweater that will never go out of style. I have learned to appreciate hoods as well. You never know when the weather is going to change and hoods come in handy. Thank you for the free pattern.
RachelAnne
Jan 18, 2018
Wow this is gorgeous! It looks so cozy and so sophisticated, no one would believe it's hand made. I'll have to give it a try!
Report Inappropriate Comment
Are you sure you would like to report this comment? It will be flagged for our moderators to take action.
Thank you for taking the time to improve the content on our site.