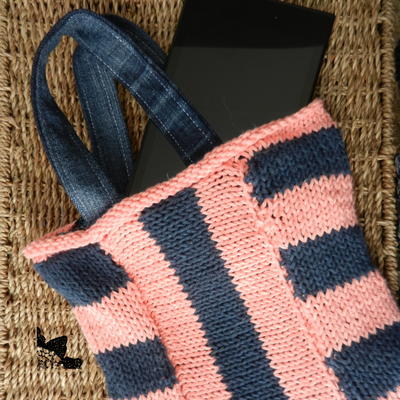
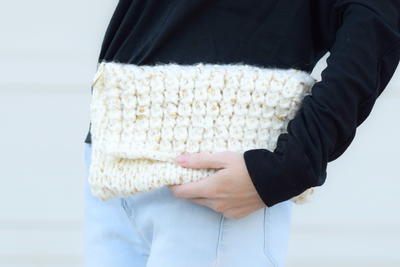
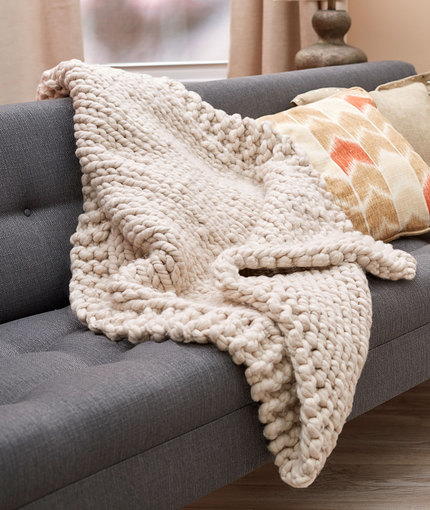
Swirls and Stripes Mosaic Bag

The Swirls and Stripes Mosaic Bag is a fun way to use two colors and create a folkloric pattern perfect for the warmer months. This design is created with a slip stitch technique and only one color per row. This knitted tote bag is the perfect first mosaic project. In the end, you will have both a beautiful and functional piece you can use when you're running errands around town. Prepare to receive a lot of compliments the first time you use this knit tote because it will catch everyone's eye. The cream and charcoal colors work perfectly together to create a bag you will enjoy for years to come.

Knitting Needle Size4 or 3.5 mm, 7 or 4.5 mm, Double-Pointed Knitting Needles (DPNs)
Yarn Weight(4) Medium Weight/Worsted Weight and Aran (16-20 stitches to 4 inches)
Gauge16 sts = 4" [10 cm]; 21 rows = 4" [10 cm] in Mosaic patterns. CHECK YOUR GAUGE. Use any size needles to obtain the gauge.
Finished SizeBag measures about 12" [30.5 cm] wide and 15" [38 cm] tall
Materials List
- RED HEART® Super Saver®: 1 skein each 313 Aran A and 3950 Charcoal B
- Susan Bates® Knitting Needles: 4.5mm [US 7] straight needles, 3.5mm [US 4] set of 2 double pointed needles (for I-cord only)
- ½ yard [½ m] cotton fabric (for lining), matching color sewing thread, yarn needle
For even more knit bag patterns, be sure to check out our wonderful collection of
Notes
1. Bag is made from two identical panels sewn together. The color pattern on the panels is worked using mosaic knitting. Panels are sewn together and a cotton fabric lining sewn inside. Handles are made from braided I-cord and sewn to bag.
2. Mosaic knitting is a comparatively easy way to knit with multiple colors. Instead of the stranding of Fair Isle or the color blocks of Intarsia, Mosaic knitting creates color patterns with a slip stitch technique that uses only one color per row. Two rows of one color are alternated with two rows of a second color. Some of the stitches in each row are slipped to bring up the color of the previous row, creating the illusion of working with more than one color in each row.
3. Slip all stitches as if to purl. On right side rows, hold yarn in back as stitches are slipped. On wrong side rows, hold yarn in front as stitches are slipped.
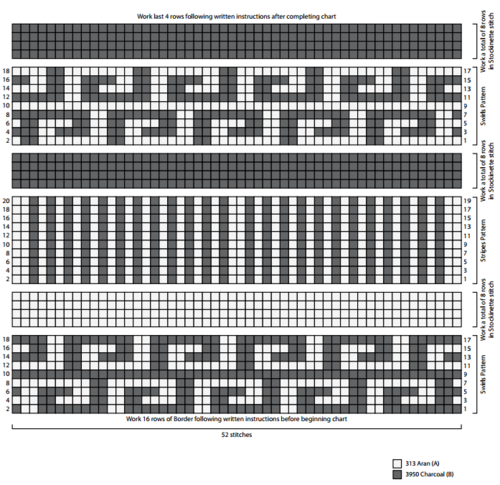
4. Mosaic patterns can be worked by following the written instructions or reading the charts. Work from the charts as follows:
• Every row of a Mosaic knitting chart represents two rows of knitting worked with the same color yarn. Each block of the chart represents one stitch of the indicated color.
• Work the first two rows using the yarn color indicated in the first block (lower right corner). Work the next two rows with the other yarn color. Continue to alternate the yarn color every two rows.
• Read each right side row of the chart from right to left. Then read the same row again from left to right for the following wrong side row.
• To work a right side row, knit all the stitches of the current yarn color and slip all stitches of the other color. To work the following wrong side row, purl all the stitches of the current yarn color and slip all the stitches of the other color.
Panel (make 2)
Beginning at top of bag with A, cast on 52 sts.
Border
Rows 1-7: Knit.
Row 8 (wrong side): Purl.
Row 9 (right side): Knit.
Row 10: Purl.
Row 11 (folding row – right side): Purl.
Row 12: Purl.
Row 13: Knit.
Row 14: Purl.
Rows 15 and 16: Repeat Rows 13 and 14.
Swirls Pattern
Row 1 (right side): With B, k1, *k8, slip next 2 sts with yarn in back (wyib); repeat from * to last st, k1.
Row 2: With B, p1, *slip next 2 sts with yarn in front (wyif), p8; repeat from * to last st, p1.
Row 3: With A, k1, *slip next 2 sts wyib, k4, slip next 2 sts wyib, k2; repeat from * to last st, k1.
Row 4: With A, p1, *p2, slip next 2 sts wyif, p4, slip next 2 sts wyif; repeat from * to last st, p1.
Row 5: With B, k1, *k2, slip next 2 sts wyib, k4, slip next 2 sts wyib; repeat from * to last st, k1.
Row 6: With B, p1, *slip next 2 sts wyif, p4, slip next 2 sts wyif, p2; repeat from * to last st, p1.
Row 7: With A, k1, *slip next 2 sts wyib, k8; repeat from * to last st, k1.
Row 8: With A, p1, *p8, slip next 2 sts wyif; repeat from * to last st, p1.
Row 9: With B, knit.
Row 10: With B, purl.
Row 11: With A, k4, *slip next 2 sts wyib, k8; repeat from * to last 8 sts, slip next 2 sts wyib, k6.
Row 12: With A, p6, *slip next 2 sts wyif, p8; repeat from * to last 6 sts, slip next 2 sts wyif, p4.
Row 13: With B, k2, *slip next 2 sts wyib, k2, slip next 2 sts wyib, k4; repeat from * to end of row.
Row 14: With B, p4, *slip next 2 sts wyif, p2, slip next 2 sts wyif, p4; repeat from * to last 8 sts, slip next 2 sts wyif, p2, slip next 2 sts wyif, p2.
Row 15: With A, *k4, slip next 2 sts wyib, k2, slip next 2 sts wyib; repeat from * to last 2 sts, k2.
Row 16: With A, p2, *slip next 2 sts wyif, p2, slip next 2 sts wyif, p4; repeat from * to end of row.
Row 17: With B, k6, *slip next 2 sts wyib, k8; repeat from * to last 6 sts, slip next 2 sts wyib, k4.
Row 18: With B, p4, *slip next 2 sts wyif, p8; repeat from * to last 8 sts, slip next 2 sts wyif, p6.
With A, work in Stockinette st (knit on right side, purl on wrong side) for 8 rows.
Stripes Pattern
Row 1 (right side): With B, slip next 2 sts wyib, [k1, slip next st wyib] 11 times, k1, slip next 2 sts wyib, k1, [slip next st wyib, k1] 11 times, slip last 2 sts wyib.
Row 2: With B, slip next 2 sts wyif, [p1, slip next st wyif] 11 times, p1, slip next 2 sts wyif, p1, [slip next st wyif, p1] 11 times, slip last 2 sts wyif.
Row 3: With A, k2, [slip next st wyib, k1] 11 times, slip next st wyib, k2, slip next st wyib, [k1, slip next st wyib] 11 times, k2.
Row 4: With A, p2, [slip next st wyif, p1] 11 times, slip next st wyif, p2, slip next st wyif, [p1, slip next st wyif] 11 times, p2.
Rows 5-20: Repeat Rows 1-4 four more times.
With B, work in Stockinette st for 8 rows.
Swirls Pattern
Row 1 (right side): With A, k1, *k8, slip next 2 sts with yarn in back (wyib); repeat from * to last st, k1.
Row 2: With A, p1, *slip next 2 sts with yarn in front (wyif), p8; repeat from * to last st, p1.
Row 3: With B, k1, *slip next 2 sts wyib, k4, slip next 2 sts wyib, k2; repeat from * to last st, k1.
Row 4: With B, p1, *p2, slip next 2 sts wyif, p4, slip next 2 sts wyif; repeat from * to last st, p1.
Row 5: With A, k1, *k2, slip next 2 sts wyib, k4, slip next 2 sts wyib; repeat from * to last st, k1.
Row 6: With A, p1, *slip next 2 sts wyif, p4, slip next 2 sts wyif, p2; repeat from * to last st, p1.
Row 7: With B, k1, *slip next 2 sts wyib, k8; repeat from * to last st, k1.
Row 8: With B, p1, *p8, slip next 2 sts wyif; repeat from * to last st, p1.
Row 9: With A, knit.
Row 10: With A, purl.
Row 11: With B, k4, *slip next 2 sts wyib, k8; repeat from * to last 8 sts, slip next 2 sts wyib, k6.
Row 12: With B, p6, *slip next 2 sts wyif, p8; repeat from * to last 6 sts, slip next 2 sts wyif, p4.
Row 13: With A, k2, *slip next 2 sts wyib, k2, slip next 2 sts wyib, k4; repeat from * to end of row.
Row 14: With A, p4, *slip next 2 sts wyif, p2, slip next 2 sts wyif, p4; repeat from * to last 8 sts, slip next 2 sts wyif, p2, slip next 2 sts wyif, p2.
Row 15: With B, *k4, slip next 2 sts wyib, k2, slip next 2 sts wyib; repeat from * to last 2 sts, k2.
Row 16: With B, p2, *slip next 2 sts wyif, p2, slip next 2 sts wyif, p4; repeat from * to end of row.
Row 17: With A, k6, *slip next 2 sts wyib, k8; repeat from * to last 6 sts, slip next 2 sts wyib, k4.
Row 18: With A, p4, *slip next 2 sts wyif, p8; repeat from * to last 8 sts, slip next 2 sts wyif, p6.
With B, work in Stockinette st (knit on right side, purl on wrong side) for 8 rows.
Next 2 Rows: With B, knit.
Next Row: With B, purl.
Next Row: With B, knit.
Bind off loosely.
Handles
For short handles make 19 in. [48.5 cm] I-cords. For longer handles make 28 in. [71 cm] I-cords. Handles will stretch with use.
Make six I-cords, 2 with A and 4 with B, as follows:
With double-pointed needles, cast on 3 sts, *knit all the sts, do not turn work. Slide all the stitches to opposite end of needle. Carry yarn tightly across back of work, and knit all the stitches; repeat from * until I-cord measures desired length. Braid one A-colored I-cord and two B-colored I-cords tightly together for each handle. Secure ends of braids.
Finishing
Sew side and lower edges of panels together (bind-off edge is lower edge of bag). Weave in any remaining ends.
Lining
Cut a piece of cotton fabric, 32" [81.5 cm] long and 13" [33 cm] wide. Bring right sides together, fold piece in half to form a double layer, 16" [40.5 cm] long and 13" [33 cm] wide. Sew ½" [13 mm] seams along side edges of folded piece. Fold down 1" [2.5 cm] around top of lining, folding to the wrong side (outside) of the lining. Insert lining into bag. Fold top edge of bag to inside along Row 11 (folding row) over the top of lining. With sewing needle and thread, sew top edge of lining to underside of folded top edge of bag.
Sew one handle to inside of top of each panel. Sewing ends about 6" [15 cm] apart.
-
Click image to enlarge
Abbreviations
- A and B
- Color A and Color B
- k
- knit
- p
- purl
- st(s)
- stitch(es)
- wyib
- with yarn in back
- wyif
- with yarn in front
- []
- work directions in brackets the number of times specified
- *
- repeat whatever follows the * as indicated
What do you love most about knitting a bag?
Read NextMoondoggie Bag
Your Recently Viewed Projects
Thanks for your comment. Don't forget to share!
trishclark529
Apr 02, 2017
This is a beautiful bag. I started this today. I have one panel done. It's a fairly easy knit. This is definitely something that beats the boredom. I was able to binge watch TV while making this. I can't wait for it to be done. I used some springy colors (white and light green) so that I could use my new bag right away. I can't wait to make more for other seasons!
Lynn K
Jan 27, 2017
This bag looks so much like tapestry crochet work but it is actually knitted! I have done tapestry crochet but have never knitted mosaic before. I love learning new things so this is going to be such a great project for me. I LOVE bags and this one is absolutely gorgeous - the colours are perfect too. Im off to the wool store TODAY - can not wait to get startedlol!
Susan S
Jan 26, 2017
How fascinating is this! I never read about or tried mosaic knitting and it's so clever. I will probably try it on a simpler project first but this is definitely a pattern I'd come back to because it creates a pretty and useful bag.
3cats2love
Jan 25, 2017
This is a great looking pattern. I haven't tried mosaic knitting before. It looks very interesting, though, and the instructions above seem clear. I'm always interested in learning new techniques so this would be a great project to try. It will be something different that will keep me interested in working on it.
Report Inappropriate Comment
Are you sure you would like to report this comment? It will be flagged for our moderators to take action.
Thank you for taking the time to improve the content on our site.