This project was submitted by one of our readers, just like you.
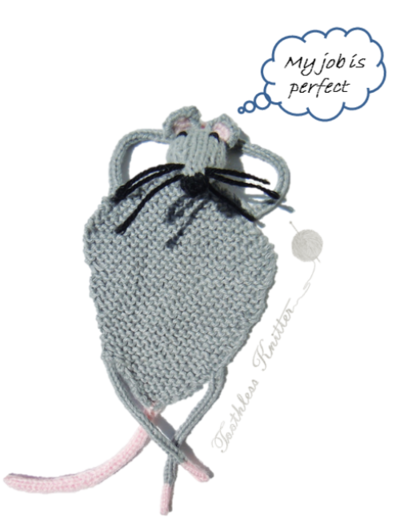
Flat Rat Bookmark

Flat Rat Bookmark
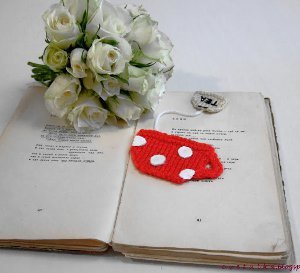
"Some time ago, when I lived in Canada, I was often able to buy used books for one dollar. Sometimes I became the owner of books which had been read and deliberately left in various public places so that someone else could read them. I found most of these free books at a nearby university, where there was a bookstore which had a school desk outside with a note taped to it saying that all the books on that desk were free. They were mostly textbooks, but from time to time I found my favorite detective stories... With so many books to read, I thought about making a unique bookmark."
NotesNote: the paws and tail can be made on double-pointed knitting needles. I would suggest, however, reducing the number of cast-on stitches by one and reworking fewer rows as the tension of the weave is looser when knitting by hand.
After finishing the knitting, I hid all the hanging threads.

Knitting Needle SizeDouble-Pointed Knitting Needles (DPNs)
Yarn Weight(1) Super Fine (27-32 stitches to 4 inches)
Materials List
- Leftower gray, black, and pink yarns.
Instructions
The head of the rat was executed as in the original post, with minor changes to the finishing touches. I started by casting-on yarn on double-pointed needles. After finishing the head and nose, I attached six pieces of yarn imitating the rat's whiskers just before the base of the nose. After stuffing the head, rather than finishing it like in the original post by binding-off, I decided to thread a yarn through the initial 18 stitches and pull it tight, thus forming a round head (the head must be well stuffed to achieve a good effect). I masked the end point of this thread with few stitches. The ears were formed by casting-on 4 stitches and knitting 4 rows on double-pointed needles. To form rounded ears I added additional stitches on the edges with matching yarn. The inside of the ear was embroidered with pink yarn. Then the ears were sewn to the head. The eyes were embroidered in black yarn. The body was started by weaving a yarn through a section of the base of the head in order to form three stitches. Then I knitted 54 rows using garter stitch, adding increases and decreases on both sides evenly to form the body, which was widest in the place where the front paws were to be attached. The front paws were made on a knitting machine using I-cord settings. I cast-on 4 stitches and worked 22 rows using gray yarn, then I changed to pink yarn and worked another 7 rows. The rear paws were made in the same way as the front paws, but with 25 rows of gray yarn, and 9 rows of pink yarn. The tail was also made in the form of an I-cord made on a knitting machine. I cast-on 5 stitches of pink yarn and worked 40 rows.

Read NextAngelina Skirt
Your Recently Viewed Projects
Thanks for your comment. Don't forget to share!
mulberrygalprinces s
Apr 09, 2018
I can see the point that the previous commenter made. This is a very cute project but very complicated to figure out without bouncing back and forth between the two patterns. I really couldn't understand it at all and I too, gave up on it. It's just beyond me right now.
craftedbyfox
Feb 28, 2017
This was linked from the ''easy" patterns list and as stated above is intermediate rather than easy as you need to be able to knit icords on DPN's and be able to understand the minimal instructions. It links back to an original different pattern with some changes having been made so is not the easiest pattern to understand and to be honest I gave up part way through the head as I got fed up of flicking from one website to the other and still not understanding it, it is a shame as I really like the idea and I will probably come back to it at some point.
Report Inappropriate Comment
Are you sure you would like to report this comment? It will be flagged for our moderators to take action.
Thank you for taking the time to improve the content on our site.