This project was submitted by one of our readers, just like you.
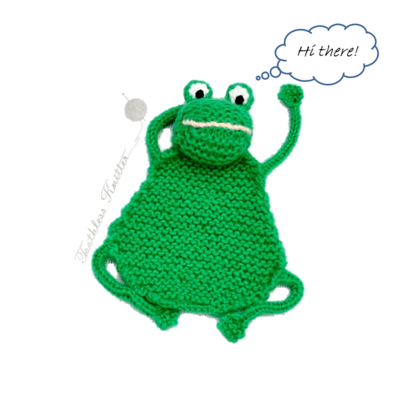
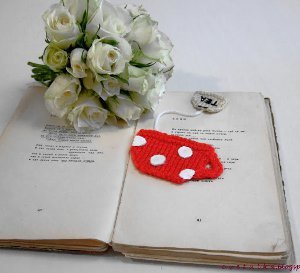
Flat Frog Bookmark

Flat Frog Bookmark
"Some time ago, I wrote about a bookmark in the shape of a flat rat. I made a few of these rats for people, including for my Mum and myself. My sister, on the other hand, wished for a frog. That's how the flat frog came to life... I made the frog from leftover green, white, black, and pink yarns. The body of the frog was formed in the shape of pear, with big round head, and long thin legs."
NotesThe legs can be made on double-pointed knitting needles. I would suggest, however, either to use needles one size smaller or reducing the number of cast-on stitches by one and reworking fewer rows as the tension of the weave is looser when knitting by hand.
After finishing the knitting, I waved in all the hanging threads.

Knitting Needle SizeDouble-Pointed Knitting Needles (DPNs)
Yarn Weight(1) Super Fine (27-32 stitches to 4 inches)
Materials List
- Leftover green, white, black, and pink yarns.
Instructions
The body of the frog was formed in the shape of pear. I knitted about 55 rows using garter stitch, adding increases and decreases on both sides evenly. After finishing it, I picked up a few stitches along the red lines shown on picture above, and started to form the head. Then I stuffed the head and threaded a yarn through the remaining stitches and pulled it tight, thus forming a round head (the head must be well stuffed to achieve a good effect). I masked the end point of this thread with a few stitches. The eyes were formed by casting-on 4 stitches and knitting 4 rows on double-pointed needles. To form rounded eyes I added additional stitches on the edges with matching yarn. The inside of the eye was embroidered with white yarn for the whites of the eyes, and black yarn for pupils. Then the eyes were sewn to the head. The front legs were made on a knitting machine using I-cord settings. I cast-on 4 stitches and worked 25 rows. The rear legs were made in the same way as the front legs, but with 5 cast-on stitches and working 15 rows, then reducing to 4 stitches and working for another 12 rows. To bend the legs I tied the calves to the edges of the body. The ends of the legs were made in the shape of a fan, starting with 2 stitches and increasing to 5 stitches over 3 rows.