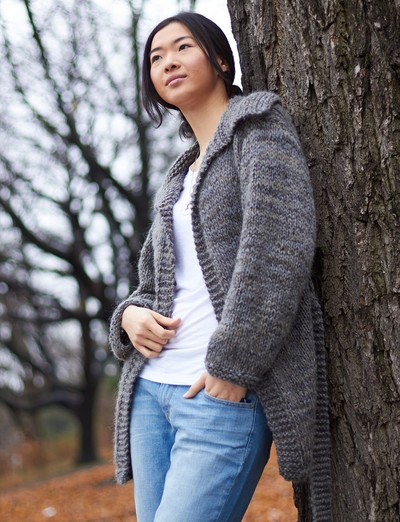
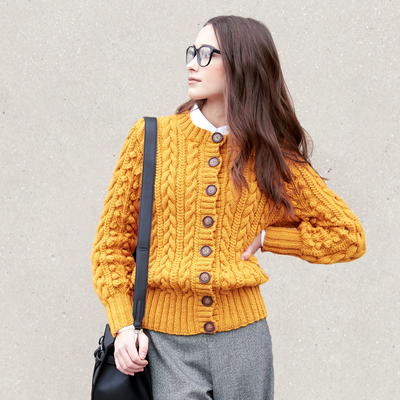
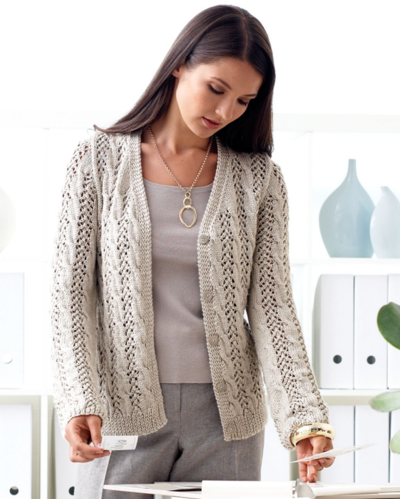
Lovely Lacy Cable Cardigan
This lacy cardigan pattern is perfect for your next project if you want to give yourself a bit of a challenge!

This Lovely Lacy Cable Cardigan will become a classic staple in your wardrobe. With dainty knit lace stitches and thick knit cable stitches, this cardigan provides the perfect combination of comfort and style. Filled with pretty details, this sweater is the epitome of casual elegance. You'll reach for this gorgeous knit whenever you feel a chill in the air.
This future favorite will keep you warm and cheery. Live richly by knitting this cardigan out of Patons luxurious silk bamboo yarn. This charming sweater is an absolute essential for your closet.

Knitting Needle Size3 or 3.25 mm, 5 or 3.75 mm
Yarn Weight(3) Light/DK (21-24 stitches to 4 inches)
Gauge23 sts and 30 rows = 4 ins [10 cm] with larger needles in stocking st.
Materials List
- Patons® Silk Bamboo (65 g / 2.2 oz) 102 yds - 11 (12, 13, 14, 16, 17) balls
- Sizes 3.25 mm (U.S. 3) and 3.75 mm (U.S. 5) knitting needles or size needed to obtain tension.
- Cable needle
- 5 buttons
Pattern
Measurements:
- To fit bust measurement
- Extra-Small / Small | 28-34 ins [ 71-86.5 cm ]
- Medium | 36-38 ins [ 91.5-96.5 cm ]
- Large | 40-42 ins [ 101.5-106.5 cm ]
- Extra-Large | 44-46 ins [ 112-117 cm ]
- 2/3 Extra-Large | 48-54 ins [ 122-137 cm ]
- 4/5 Extra-Large | 56-62 ins [ 142-157.5 cm ]
- Finished bust
- Extra-Small / Small | 37 ins [ 94 cm ]
- Medium | 41 ins [ 104 cm ]
- Large | 45 ins [ 114.5 cm ]
- Extra-Large | 48 1/2 ins [ 123 cm ]
- 2/3 Extra-Large | 56 ins [ 142 cm ]
- 4/5 Extra-Large | 64 ins [ 162.5 cm ]
Knitting abbreviations here.
Instructions:
The instructions are written for smallest size. If changes are necessary for larger sizes the instructions will be written thus ( ). Numbers for each size are shown in the same color throughout the pattern. When only one number is given in black, it applies to all sizes.
Back
**With smaller needles, cast on 103 (115-125-137-157-179) sts.
1st row: (RS). K1. *P1. K1. Rep from * to end of row.
2nd row: P1. *K1. P1. Rep from * to end of row. Rep last 2 rows of (K1. P1) ribbing for 2 ins [5 cm], ending on a 2nd row and inc 4 (3-4-3-5-5) sts evenly across last row. 107 (118-129-140-162-184) sts.
Change to larger needles and proceed in pat as follows:
1st row: (RS). K1. *K6. yfwd. Sl1. K1. psso. K1. K2tog. yfwd. Rep from * to last 7 sts. K7.
2nd and alt rows: Purl.
3rd row: K1. *K7. yfwd. Sl1. K2tog. psso. yfwd. K1. Rep from * to last 7 sts. K7.
5th row: As 1st row.
7th row: As 3rd row.
9th row: As 1st row.
11th row: K1. *C6F. K1. yfwd. Sl1. K2tog. psso. yfwd. K1. Rep from * to last 7 sts. C6F. K1.
12th row: As 2nd row. These 12 rows form pat. Cont even in pat until work from beg measures 14 ins [35.5 cm], ending with a WS row.
Shape armholes: Keeping cont of pat, cast off 7 (8-8-9-12-14) sts beg next 2 rows. 93 (102-113-122-138- 156) sts. Dec 1 st each end of needle on next 5 (5-7-9-15-21) rows, then every following alt row 3 (4-4-4-3-3) times. 77 (84-91- 96-102-108) sts. Cont even until armhole measures 71/2 (8-8-81/2 -9-10) ins [19 (20.5-20.5-21.5- 23-25.5) cm], ending with a WS row.
Shape shoulders: Cast off 9 (10-11-12- 13-14) sts beg next 2 rows, then 9 (10- 12-13-14-14) sts beg following 2 rows. Cast off rem 41 (44-45-46-48-52) sts.
Left Front
With smaller needles, cast on 57 (69- 71-79-89-99) sts.
1st row: (RS). P1. *K1. P1. Rep from * to last 2 sts. K2.
2nd row: K1. (Slwyif. K1) 4 times. *P1. K1. Rep from * to end of row. Rep last 2 rows for 2 ins [5 cm], ending on a 2nd row and inc 3 (2-3-3- 4-5) sts evenly across last row. 60 (71-74-82-93-104) sts.
Change to larger needles and proceed in pat as follows:
1st row: (RS). K1 (1-4-1-1-1). *K6. yfwd. Sl1. K1. psso. K1. K2tog. yfwd. Rep from * to last 15 sts. K6. (P1. K1) 4 times. K1.
2nd and alt rows: K1. (Slwyif. K1) 4 times. Purl to end of row.
3rd row: K1 (1-4-1-1-1). * *K7. yfwd. Sl1. K2tog. psso. yfwd. K1. Rep from * to last 15 sts. K6. (P1. K1) 4 times. K1.
5th row: As 1st row.
7th row: As 3rd row.
9th row: As 1st row.
11th row: K1 (1-4-1-1-1). *C6F. K1. yfwd. Sl1. K2tog. psso. yfwd. K1. Rep from * to last 15 sts. C6F. (P1. K1) 4 times. K1.
12th row: As 2nd row. These 12 rows form pat. Cont even in pat until work from beg measures 14 ins [35.5 cm], ending with a WS row.
Shape armhole and V-neck: Keeping cont of pat, cast off 7 (8-8-9-12-14) sts beg of next row. 53 (63-66-73-81-90) sts. next row: Work even in pat. Proceed as follows:
1st row: Work 2tog. Pat to last 11 sts. K2tog. (P1. K1) 4 times. K1.
2nd row: K1. (Slwyif. K1) 4 times. Purl to last 2 sts. Work 2tog. Rep last 2 rows 1 (1-2-3-6-9) time(s) more. 47 (57-57-61-60-60) sts.
next row: (RS). Work 2tog. Pat to last 11 sts. K2tog. (P1. K1) 4 times. K1.
next row: K1. (Slwyif. K1) 4 times. Purl to end of row. Rep last 2 rows 3 (4-4-4-3-3) times more. 39 (47-47-51-52-52) sts.
next row: (RS). Pat to last 11 sts. K2tog. (P1. K1) 4 times. K1.
next row: K1. (Slwyif. K1) 4 times. Purl to end of row. Rep last 2 rows 6 (17-11-14-12-10) times more. 32 (29-35-36-39-41) sts. Sizes XS/S, l, Xl, 2/3Xl and 4/5Xl only: next row: (RS). Pat to last 11 sts. K2tog. (P1. K1) 4 times. K1. Work 3 rows even. Rep last 4 rows 4 (2-1-2-3) time(s) more. 27 (32-34-36-37) sts. all sizes: Cont even in pat until armhole measures same length as Back, ending with a WS row.
Shape shoulder: Cast off 9 (10-11-12- 13-14) sts beg of next row. Work 1 row even. Cast off 9 (10-12-13-14-14) sts. Pat to end of row. 9 sts rem. next row: K1. (Slwyif. K1) 4 times. Cast on 1 st. 10 sts. (Left Front Extension).
next row: K1. (P1. K1) 4 times. K1. Work on these 10 sts as established for 7 (71/2 -8-8-81/2 -9) ins [18 (19-20.5-20.5- 21.5-23) cm] (when slightly stretched), ending with a WS row. Cast off. Place 5 markers for buttons on Left Front button band, having bottom button 1 inch [2.5 cm] up from cast on edge, top button at beg of V-neck shaping and rem 3 buttons spaced evenly between. Work buttonholes to correspond to button markers as follows:
next row: (RS). K1. K1. P1. Sl1. K1. psso. yfwd. Pat to end of row.
Right Front
With smaller needles, cast on 57 (69- 71-79-89-99) sts.
1st row: (RS). K1. *K1. P1. Rep from * to end of row.
2nd row: *K1. P1. Rep from * to last 9 sts. K1. (Slwyif. K1) 4 times Rep last 2 rows for 2 ins [5 cm], noting position of buttonhole, ending on a 2nd row and inc 3 (2-3-3-4-5) sts evenly across last row. 60 (71-74-82- 93-104) sts.
Change to larger needles and proceed in pat, noting position of buttonholes as follows:
1st row: (RS). K1. (K1. P1) 4 times. *K6. yfwd. Sl1. K1. psso. K1. K2tog. yfwd. Rep from * to last 7 (7-10-7-7-7) sts. K7 (7-10-7-7-7).
2nd and alt rows: Purl to last 9 sts. K1. (Slwyif. K1) 4 times.
3rd row: K1. (K1. P1) 4 times. *K7. yfwd. Sl1. K2tog. psso. yfwd. K1. Rep from * to last 7 (7-10-7-7-7) sts. K7 (7- 10-7-7-7).
5th row: As 1st row.
7th row: As 3rd row.
9th row: As 1st row.
11th row: K1. (K1. P1) 4 times. *C6F. K1. yfwd. Sl1. K2tog. psso. yfwd. K1. Rep from * to last 7 (7-10-7-7-7) sts. C6F. K1 (1-4-1-1-1).
12th row: As 2nd row. These 12 rows form pat. Cont even in pat until work from beg measures 14 ins [35.5 cm], ending with a RS row.
Shape armhole and V-neck: Keeping cont of pat, cast off 7 (8-8-9-12-14) sts beg of next row. 53 (63-66-73-81- 90) sts.
Proceed as follows:
1st row: K1. (K1. P1) 4 times. Sl1. K1. psso. Pat to last 2 sts. Work 2tog.
2nd row: Work 2tog. Pat to end of row. Rep last 2 rows 1 (1-2-3-6-9) time(s) more. 47 (57-57-61-60-60) sts.
next row: (RS). K1. (K1. P1) 4 times. Sl1. K1. psso. Pat to last 2 sts. Work 2tog.
next row: Work even in pat. Rep last 2 rows 3 (4-4-4-3-3) times more. 39 (47-47-51-52-52) sts.
next row: (RS). K1. (K1. P1) 4 times. Sl1. K1. psso. Pat to end of row.
next row: Work even in pat. Rep last 2 rows 6 (17-11-14-12-10) times more. 32 (29-35-36-39-41) sts. Sizes XS/S, l, Xl, 2/3Xl and 4/5Xl only: next row: (RS). K1. (K1. P1) 4 times. Sl1. K1. psso. Pat to end of row. Work 3 rows even. Rep last 4 rows 4 (2-1-2-3) time(s) more. 27 (32-34-36-37) sts. all sizes: Cont even in pat until armhole measures same length as Back, ending with a RS row.
Shape shoulder: Cast off 9 (10-11-12- 13-14) sts beg of next row. Work 1 row even. Cast off rem 18 (19-21-22-23- 23) sts.
Sleeves
With smaller needles, cast on 59 (59- 59-67-67-67) sts.
Work 4 rows in (K1. P1) ribbing as given for Back, inc 4 sts evenly across last row. 63 (63-63-71-71-71) sts.
Change to larger needles and proceed in pat as follows:
1st row: (RS). K1 (1-1-5-5-5). *K6. yfwd. Sl1. K1. psso. K1. K2tog. yfwd. Rep from * to last 7 (7-7-11-11-11) sts. K7 (7-7-11-11-11).
2nd and alt rows: Purl.
3rd row: K1 (1-1-5-5-5). *K7. yfwd. Sl1. K2tog. psso. yfwd. K1. Rep from * to last 7 (7-7-11-11-11) sts. K7 (7-7-11-11-11).
5th row: As 1st row.
7th row: As 3rd row.
9th row: As 1st row.
11th row: K1 (1-1-5-5-5). *C6F. K1. yfwd. Sl1. K2tog. psso. yfwd. K1. Rep from * to last 7 (7-7-11-11-11) sts. C6F. K1 (1-1-5-5-5).
12th row: As 2nd row. These 12 rows form pat. Cont in pat, inc 1 st each end of needle on next and every following 12th (8th-6th-8th-4th-4th) row until there are 67 (67-69-93-77-95) sts, then every following 14th (10th-8th-10th- 6th-6th) row until there are 77 (83-89- 95-101-107) sts, taking inc sts into stocking st. Cont even in pat until work from beg measures 171/2 (18-18-181/2-17-16) ins [44.5 (45.5-45.5-47-43-40.5) cm], ending with a WS row.
Shape top: Keeping cont of pat, cast off 5 (5-5-6-8-9) sts beg next 2 rows. 67 (73-79-83-85-89) sts. Dec 1 st each end of needle on next and every following alt row until there are 43 (53-63-67-61-61) sts, then every row until there are 13 (13-15-15- 17-17) sts. Cast off.
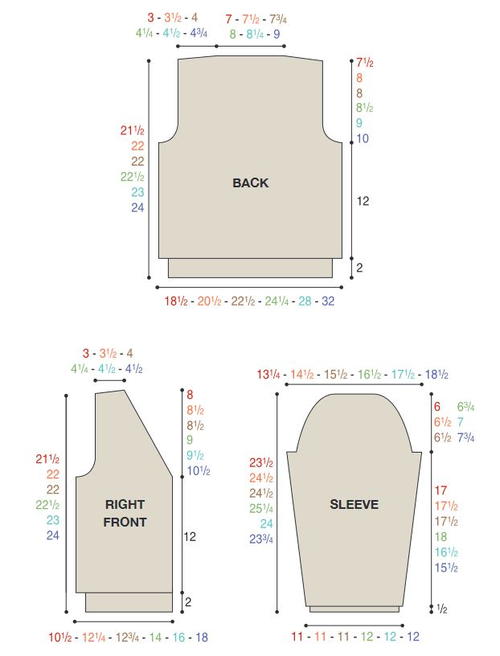
Finishing
Pin garment pieces to measurements. Cover with a damp cloth, leaving cloth to dry. Sew shoulder seams. Sew in sleeves. Sew Left Front Extension across back neck edge. Sew side and sleeve seams. Sew buttons to correspond to buttonholes.
See diagram below for blocking measurements:
Your Recently Viewed Projects
Thanks for your comment. Don't forget to share!
dinonurse 3808796
Dec 02, 2023
What increase stitch are we supposed to use after the ribbing? It doesnt say.
dechendawa 2293273
Oct 20, 2020
How do I make the buttonholes in the right side? Are the instructions there somewhere and I have missed them??
Lisa
Oct 22, 2020
The instructions for the button holes are at the bottom of the left front instructions, which makes no sense when they are needed on the right side of the cardigan- Work buttonholes to correspond to button markers as follows next row (RS). K1. K1. P1. Sl1. K1. psso. yfwd. Pat to end of row.
Lozzy Knitter
Sep 27, 2020
Don't forget you will be increasing 4 stitches on the last row of ribbing making a total of 107 stitches across the back
dechendawa 2293273
Aug 10, 2019
The pattern for the back (Small) starts with 103 stitches. When you get to decrease for armhole it says "cast off 7 stitches next two rows" which is total of 14 stitches. If you subtract 14 from 103 you don't end up with 93 you end up with 89. So you already have the wrong number of stitches to continue your armhole shaping. Help! What am I missing???
theknittinglady 99 44163
Apr 22, 2019
This looks so pretty I want to try it in a heavier gauge yarn.
lewia20 4202138
Apr 07, 2019
What does slwyif mean. I have never come across this before.
Kristina K
Apr 08, 2019
Hi lewia20, slwyif means that you slip the next stitch onto the righthand needle with the yarn pulled in front of your work, as if to purl. We hope this helps! Happy knitting! -Editors of AllFreeKnitting
Member 1629285
Jul 07, 2018
I can't seem to find the measurements for blocking Can you help Love the sweater but need to block and sew together
Kristina K
Jul 09, 2018
Hi there! The pattern has been updated to include a diagram of all blocked pieces and their measurements before piecing together. Please click the link at the bottom of the pattern that reads "See diagram for blocking measurements." We hope this helps! -Editors of AllFreeKnitting
Carol
May 30, 2018
I do not understand the instruction on sleeve k1(1-1-5-5-5)
Kristina K
May 31, 2018
Hi cgoyette1, is it that particular instruction that you don't understand? If you are knitting the extra small/small, medium, or large size, you begin by knitting 1. If you are knitting the extra large, 2/3 extra large, or 4/5 extra large size, you begin by knitting 5. The numbers in the parentheses stand for sizes medium to 4/5 extra large, and the default number given is for the smallest size. We hope this helps! -Editors of AllFreeKnitting
achumley0003 31706 34
Aug 09, 2017
I love cardigans because you can wear them anytime and anywhere. this cardigan is perfect for the office when you need some coverage or want to keep warm. I really like the lace pattern and I have wanted to try the silk bamboo yarn for a while and this seems like the perfect project.
jasmuz 3811812
Mar 29, 2017
I am having a terrible time with this pattern. I keep losing stitches. I am an advanced knitter and can't figure out what I am doing wrong. I have done many practice samples and cannot get it right. For those of you who have successfully made this, HELP! Thanks
Betty
Apr 02, 2017
I have become a big fan of writing out patterns. I am making a shawl for a friend and had to start 4 times. I finally wrote the pattern out and found out where my mistake was. Good luck.
Punki
May 09, 2017
I had the same problem and it came to me to put markers between repeats in pattern. Each pattern set is 11 stitches. It helped so much to figure out I had made a mistake before doing entire row. It is easy to forget to yarn over which affects your count and markers make it so much easier. After you do the pattern over and over, it gets easier.
mdsaucoin 8215160
Feb 16, 2017
How do you know how much yarn to buy?
lerdmann7 9476466
Feb 25, 2017
There is a chart that has a number for each size. I am thinking that is the number of balls of the Patton worsted to buy.
3cats2love
Feb 25, 2017
Hi, the chart above shows how many balls of the Patons Silk Bamboo yarn you would need. That yarn comes in small balls (102 yards), that's why you need so many for the sweater. And the yarn is expensive, too, like $6 or $7 a ball, if you do the math, that's a pretty expensive sweater!
gretchenruhl 94753 53
Feb 11, 2017
Where are the directions for the buttonholes?
gretchenruhl 94753 53
Feb 11, 2017
I found the directions for the buttonholes. Oops! Didn't read closely enough.
Linda
Feb 06, 2017
Gorgeous cardigan! Would like to make this lace cable pattern for accessories to match. Plan to convert to one piece without seams.
grandmajo1 2130149
Dec 29, 2016
Just finished knitting, but would like the measurements to block it.
pattistrong 271948 5
Oct 14, 2016
I"m on the back where it says to cast off and continue in pattern. If I cast off 9 stitches I will have 3 left in the pattern. I'm on row 1 and don't know what stitches to do next. Help!
quanahs 5032097
Mar 19, 2016
The bamboo rayon and silk yarn used in this pretty sweater should make it perfect for your year round wardrobe. I've used this yarn before and love how it drapes and provides nice stitch definition which will make the lace and cables stand out.
deepaguha 5892264
Dec 20, 2015
I have started this cardigan, but got stuck making the left front as I did not understand what the abbreviation 'Slwyif' stands for. It is not mentioned in the abbreviations. Can you tell me what it stands for, please?
KathrynAllison
Dec 21, 2015
Hello! "Slwyif" stands for "slip one stitch with yarn in front." Hope this helps! - Kathryn, Editor of AllFreeKnitting
dulcestradicionale s 3371346
May 09, 2015
Can you give us a grafic patterns? It's easy for me to read ti.
michelle 9050195
May 08, 2015
Where do I find the abbreviations for this pattern?
Kristina K
May 08, 2015
Hey there, Michelle! I've updated the pattern with a link to the Yarnspirations abbreviations listing. I hope that helps! Happy knitting! -The Editors of AllFreeKnitting
dejzyk 8746454
May 30, 2015
That list does not include the abbreviation used starting with the left front Slwyif. If this is Slip with yarn in front, on the following K1 an additional stitch is created. This is repeated 4 times???? There is no special handling in the following row. Is the yarn to be brought back following the slip, prior to knitting the K1?
Lisa
Nov 23, 2015
slwyif does not create an additional stitch if its does correctly and the yarn would always be moved back to the correct position to do the K1. Hope this helps, happy knitting.
megamumto2
Apr 26, 2015
I used a dusky pink yarn and it turned out beautiful the yarn I used came from Turkey
Member 7706356
Jul 26, 2014
I love the look of this sweater, it is beautiful! I'm going to try knitting it but using a different yarn.
Report Inappropriate Comment
Are you sure you would like to report this comment? It will be flagged for our moderators to take action.
Thank you for taking the time to improve the content on our site.