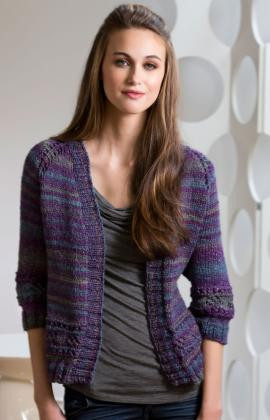
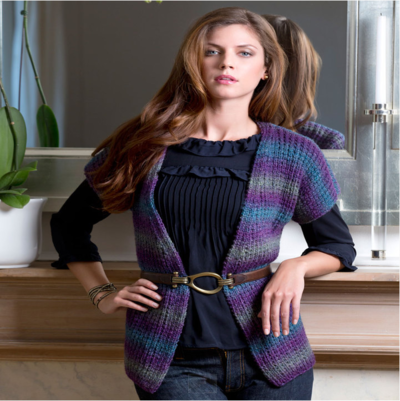
Evening Allure Sweater

Make some midnight knitting magic with the Evening Allure Sweater. This pretty knit sweater pattern is a beautiful blend of purples, blues, and grays stitched together in a cool, short sleeved, cozy knit. The Evening Allure Sweater looks great layered over a plain t-shirt or simple dress. It looks attractive belted or left open. However you choose to wear this stylish knit, the Evening Allure Sweater is a cold weather layering must have.
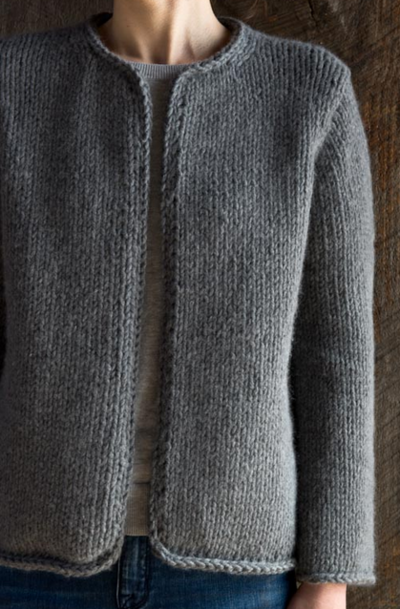
BONUS! For even more wonderful knitting patterns, be sure to check out the 26 Straight Needle Knitting Patterns You Need.

Knitting Needle Size10 or 6 mm
Yarn Weight(4) Medium Weight/Worsted Weight and Aran (16-20 stitches to 4 inches)
MATERIALS:
- RED HEART® Boutique Midnight®: 8 (9, 10, 11, 12) balls 1933 Aura
- Susan Bates® Knitting Needles: 6mm [US 10]
- Stitch markers
- yarn needle
GAUGE:
16 sts = 4” (10 cm); 24 rows = 4” (10 cm) in Garter Rib pattern.
CHECK YOUR GAUGE. Use any size needles to obtain the gauge.
Construction Diagram and Measurements
INSTRUCTIONS
Directions are for size Small. Changes for sizes Medium, Large, 1X and 2X are in parentheses.
Finished Bust: 37 (41, 45, 49, 53)” (94 (104, 114.5, 124.5, 134.5) cm), closed
Finished Length: 22½ (23, 23½, 24, 24½)” (57 (58.5, 59.5, 61, 62) cm)
Special Stitches
M1 (Make 1 Increase) = Lift strand between needles to left-hand needle and knit strand through the back loop, twisting it to prevent a hole.
M1P (Make 1 purl Increase) = Lift strand between needles to left-hand needle and purl strand through the back loop, twisting it to prevent a hole.
Stitch Patterns
1x1 Rib (over odd number of sts)
Row 1 (right side): P1, *k1, p1; repeat from * to end of row.
Row 2: K1, *p1, k1; repeat from * to end of row.
Repeat Rows 1 and 2 for 1x1 Rib.
Garter Rib (over odd number of sts)
Row 1 (right side): P1, *k1, p1; repeat from * to end of row.
Row 2: Purl.
Repeat Rows 1 and 2 for Garter Rib pattern.
BACK
Cast on 73 (81, 89, 97, 105) sts.
Lower Ribbing
Beginning with a right side row (Row 1) work in 1x1 Rib for 4 rows.
Begin Garter Rib Pattern
Beginning with a right side row (Row 1) work in Garter Rib pattern until piece measures 12” (30.5cm) from beginning, end with a wrong side row.
Shape for Sleeve
Row 1 (right side - increase): P1, M1P, *k1, p1; repeat from * to last 2 sts, k1, M1P, p1— 75 (83, 91, 99, 107) sts.
Row 2: Purl.
Row 3: P2, *k1, p1; repeat from * to last 3 sts, k1, p2.
Row 4: Purl.
Row 5 (increase): P1, M1, P1, *k1, p1; repeat from * to last 3 sts, P1, M1, P1—77 (85, 93, 101, 109) sts.
Row 6: Purl.
Row 7: P1, *k1, p1; repeat from * to end of row.
Row 8: Purl.
Rows 9 and 10: Repeat Rows 1 and 2—79 (87, 95, 103, 111) sts at the end of Row 9.
Rows 11 and 12: Repeat Rows 5 and 6—81 (89, 97, 105, 113) sts at the end of Row 12.
Rows 13–20: Repeat Rows 9–12 twice—89 (97, 105, 113, 121) sts at the end of Row 19.
Begin Sleeve
Row 21: Cast on 6 sts for sleeve band, p1, *k1, p1; repeat from * to end of row—95 (103, 111, 119, 127) sts.
Row 22: Cast on 6 sts for sleeve band, purl to end of row—101 (109, 117, 125, 133) sts.
Row 23: K2, [p1, k1] twice, place marker, p1, *k1, p1; repeat from * to last 6 sts, place marker, [k1, p1] twice, k2.
Row 24: [K1, p1] 3 times, slip marker, purl to 2nd marker, slip marker, [p1, k1] 3 times.
Repeat last 2 rows, keeping stitches between markers in Garter Rib pattern and first and last 6 stitches in the indicated rib pattern, until armhole from sleeve cast-on measures 7 (7½, 8, 8½, 9)” (18 (19, 20.5, 21.5, 23) cm), end with a wrong side row.
Bind off in pattern.
LEFT FRONT
Cast on 45 (49, 53, 57, 61) sts.
Lower Ribbing
Row 1 (wrong side): K1, *p1, k1; repeat from * to end of row.
Row 2: P1, *k1, p1; repeat from * to last 2 sts, k2.
Rows 3 and 4: Repeat Rows 1 and 2.
Begin Garter Rib Pattern
Row 5: [K1, p1] 3 times, place marker, purl to end of row. Slip marker as you come to it.
Row 6: P1, *k1, p1; repeat from * to last 2 sts, k2.
Repeat last 2 rows until piece measures 12” (30.5cm) from beginning, end with a wrong side row.
Shape for Sleeve and Front Edge
Row 1 (right side): P1, M1P, *k1, p1; repeat from * to 2 sts before marker, p2tog, slip marker, [k1, p1] twice, k2.
Row 2 and all wrong side rows: [K1, p1] 3 times, slip marker, purl to end of row.
Row 3: P2, *k1, p1; repeat from * to 1 st before marker, p1, slip marker, [k1, p1] twice, k2.
Row 5: P1, M1, P1, *k1, p1; repeat from * to 3 sts before marker, k1, p2tog, slip marker, [k1, p1] twice, k2.
Row 6: Repeat Row 2.
Row 7: P1, *k1, p1; repeat from * to marker, slip marker, [k1, p1] twice, k2.
Row 9: Repeat Row 1.
Row 11: P1, M1, P1, *k1, p1; repeat from * to 3 sts before marker, k1, p2, slip marker, [k1, p1] twice, k2—46 (50, 54, 58, 62) sts.
Row 13: P1, M1P, *k1, p1; repeat from * to 3 sts before marker, k1, p2tog, slip marker, [k1, p1] twice, k2.
Row 15: P1, M1, P1, *k1, p1; repeat from * to marker, slip marker, [k1, p1] twice, k2—47 (51, 55, 59, 63) sts.
Row 17: Repeat Row 1.
Row 19: Repeat Row 11—48 (52, 56, 60, 64) sts.
Begin Sleeve
Row 21 (right side): Cast on 6 sts for sleeve band, p1, *k1, p1; repeat from * to 3 sts before marker, k1, p2tog, slip marker, [k1, p1] twice, k2—53 (57, 61, 65, 69) sts.
Row 23: P1, *k1, p1; repeat from * to marker, slip marker, [k1, p1] twice, k2.
Row 25: P1, *k1, p1; repeat from * to 2 sts before marker, p2tog, slip marker, [k1, p1] twice, k2—52 (56, 60, 64, 68) sts.
Row 27: *P1, k1; repeat from * to 2 sts before marker, p2, slip marker, [k1, p1] twice, k2.
Row 29: P1, *k1, p1; repeat from * to 3 sts before marker, k1, p2tog, slip marker, [k1, p1] twice, k2—51 (55, 59, 63, 67) sts.
Repeat Rows 22-29, 4 (4, 4, 5, 5) more times—43 (47, 51, 53, 57) sts.
Next Row (wrong side): Repeat Row 2.
Next Row: P1, *k1, p1; repeat from * to marker, slip marker, [k1, p1] twice, k2.
Repeat last 2 rows, keeping stitches between markers in Garter Rib pattern and last 6 stitches in the indicated rib pattern, until armhole from sleeve cast-on measures 7 (7½, 8, 8½, 9)” (18 (19, 20.5, 21.5, 23) cm), end with a wrong side row.
Neckband Extension
Next Row (right side): Bind off all sts to last 6 sts.
Next Row: [K1, p1] 3 times.
Next Row: [K1, p1] twice, k2.
Repeat last 2 rows until neckband extension measures 3¼ (3¼, 3¼, 3¾, 3¾)” (8.5 (8.5, 8.5, 9.5, 9.5) cm).
Bind off.
RIGHT FRONT
Cast on 45 (49, 53, 57, 61) sts.
Lower Ribbing
Row 1 (wrong side): K1, *p1, k1; repeat from * to end of row.
Row 2: K2, p1, *k1, p1; repeat from * to end of row.
Rows 3 and 4: Repeat Rows 1 and 2.
Begin Garter Rib Pattern
Row 5: Purl to last 6 sts, place marker, [p1, k1] 3 times. Slip marker as you come to it.
Row 6: K2, p1, *k1, p1; repeat from * to end of row.
Repeat last 2 rows until piece measures 12” (30.5cm) from beginning, end with a wrong side row.
Shape for Sleeve and Front Edge
Reverse shaping of left front as follows
Row 1 (right side): K2, [p1, k1] twice, slip marker, p2tog, *p1, k1; repeat from * to last st, M1P, P1.
Row 2 and all wrong side rows: Purl to marker, slip marker, [p1, k1] 3 times.
Row 3: K1, [p1, k1] twice, slip marker, p2, *k1, p1; repeat from * to last st, p1.
Row 5: K1, [p1, k1] twice, slip marker, p2tog, *k1, p1; repeat from * to last st, M1, p1.
Row 7: K1, [p1, k1] twice, slip marker, p1, *k1, p1; repeat from * to end of row.
Row 9: Repeat Row 1.
Row 11: K1, [p1, k1] twice, slip marker, p2, *k1, p1; repeat from * to last st, M1, p1—46 (50, 54, 58, 62) sts.
Row 13: K1, [p1, k1] twice, slip marker, p2tog, k1, *p1, k1; repeat from * to last st, M1P, p1.
Row 15: K1, [p1, k1] twice, slip marker, p1, *k1, p1; repeat from * to last st, M1, p1—47 (51, 55, 59, 63) sts.
Row 17: Repeat Row 1.
Row 19: Repeat Row 11—48 (52, 56, 60, 64) sts.
Begin Sleeve
Row 21 (right side): K1, [p1, k1] twice, slip marker, p2tog, *k1, p1; repeat from * to end of row, cast on 6 sts—53 (57, 61, 65, 69) sts.
Row 23: K1, [p1, k1] twice, slip marker, p1, *k1, p1; repeat from * to end of row.
Row 25: K1, [p1, k1] twice, slip marker, p2tog, p1, *k1, p1; repeat from * to end of row—52 (56, 60, 64, 68) sts.
Row 27: K1, [p1, k1] twice, slip marker, p2, *k1, p1; repeat from * to end of row.
Row 29: K1, [p1, k1] twice, slip marker, p2tog, *k1, p1; repeat from * to end of row—51 (55, 59, 63, 67) sts.
Repeat Rows 22-29, 4 (4, 4, 5, 5) more times—43 (47, 51, 53, 57) sts.
Next Row (wrong side): Repeat Row 2.
Next Row: K1, [p1, k1] twice, slip marker, p1, *k1, p1; repeat from * to end of row.
Repeat last 2 rows, keeping stitches between markers in Garter Rib pattern and last 6 stitches in the indicated rib pattern, until armhole from sleeve cast-on measures 7 (7½, 8, 8½, 9)” 18 (19, 20.5, 21.5, 23) cm), end with a right side row.
Neckband Extension
Next Row (right side): Bind off all sts to last 6 sts.
Next Row: [P1, k1] 3 times.
Next Row: K2, [p1, k1] twice.
Repeat last 2 rows until neckband extension measures 3¼ (3¼, 3¼, 3¾, 3¾)” (8.5 (8.5, 8.5, 9.5, 9.5) cm).
Bind off.
FINISHING
Sew shoulder seams. Sew neckband extensions to back at neck edge, meeting at center back. Neatly sew bound-off edges of neckband extensions together. Sew side seams from lower edge up to armhole. Weave in ends.
If you like the Evening Allure Sweater, be sure to check out 20 Straight Needle Knitting Patterns You Need for more gorgeous sweaters knit on straight needles!
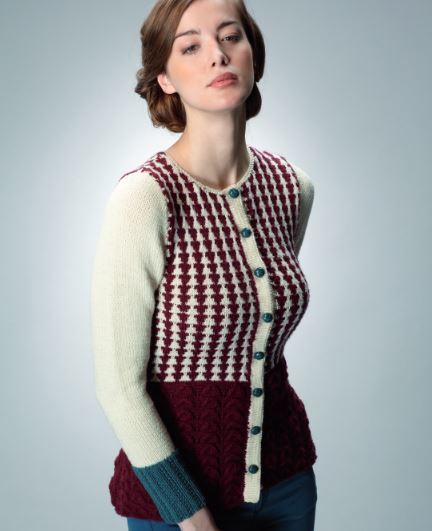
Read NextSunday Best Cardigan
Your Recently Viewed Projects
Thanks for your comment. Don't forget to share!
achumley0003 31706 34
Sep 01, 2017
This is one of those patterns that have been on my list for a while. I'm hoping to get to it soon.I love the yarn used for this but it is hard to find anymore, so I will have to find a suitable substitute. I love the 3/4 sleeves on this cardigan and it looks great with a belt. I think it would also look great with a button for the closure.
mrscp1946
Jul 21, 2017
Again no picture to show what the pattern looks like
KathrynAllison
Jul 21, 2017
Hello mrscp1946, there was a temporary glitch in our system and the photo for this pattern was removed. It has now been restored. Our apologies for the inconvenience. -Editors of AllFreeKnitting
spizzz 5403655
Oct 05, 2013
re : eveing allure sweater. There is no pattern in instructions when clicking on print pattern
Report Inappropriate Comment
Are you sure you would like to report this comment? It will be flagged for our moderators to take action.
Thank you for taking the time to improve the content on our site.