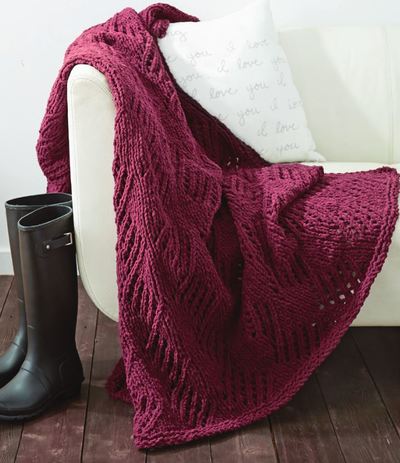
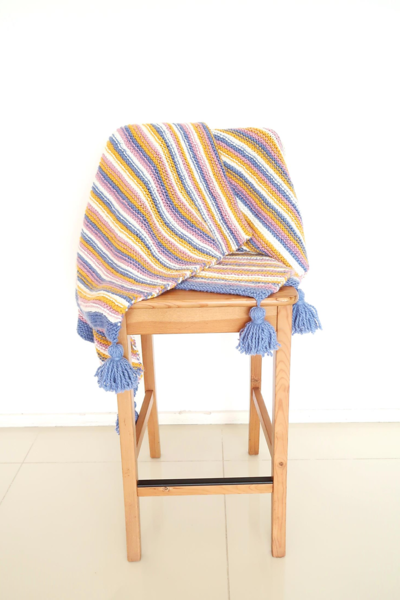
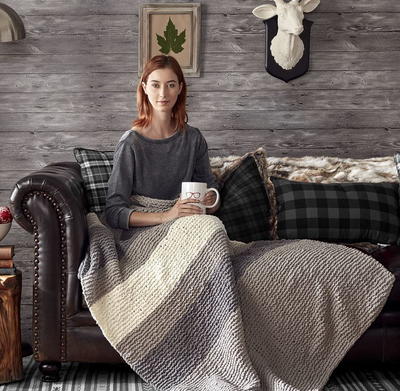
Essential Effortless Afghan
Everyone needs an afghan or two to throw over the couch for chilly days, and the more basic, the better. The Essential Effortless Afghan is a super-simple knit blanket pattern that can be adapted to fit any color scheme or decorating theme. Beginners learning how to knit a blanket will appreciate this easy knitting pattern, which is pieced together from five knitted strips. Made using the stockinette stitch, this is one of the easiest beginner knitting patterns in existence and is sure to impress. Don't miss this chance to wrap yourself in the quick and easy comfort of this classic checkerboard pattern.

Knitting Needle Size8 or 5 mm
Gauge1 stitches, 2 rows, 3 inches. stockinette stitch
Materials:
- RED HEART Super Saver [7 oz (198 g), 364 yd (333 m)]
- Color A: 313 Aran, 2 skeins
- Color B: 382 Country Blue, 2 skeins
- Color C: 380 Windsor Blue, 2 skeins
- Susan Bates Knitting Needles: 5 mm [US 8]
- Yarn needle
Gauge:
17 sts = 4” [10 cm]; 24 rows = 4” [10 cm]. CHECK YOUR GAUGE. Use any size needles to obtain the gauge.
Measurements:
Afghan measures 37½” [95 cm] square
Abbreviations:
A, B, C, etc = Colors A, B, C, etc
K = knit;
mm = millimeter
P = purl
st(s) = stitch(es);
( ) = work directions in parentheses as indicated
Instructions:
Strips 1 and 4:
With A, cast on 33 sts.
Row 1 (Right side): Knit across.
Row 2: P1, (K1, P1) across.
Repeat Rows 1 and 2 for pattern until piece measures 7½” [19 cm] from cast on edge, ending by working Row 2. Drop A.
With B, repeat Rows 1 and 2 for pattern until piece measures 15” [38 cm] from cast on edge, ending by working Row 2. Drop B.
With C, repeat Rows 1 and 2 for pattern until piece measures 22½” [57 cm] from cast on edge, ending by working Row 2. Drop C.
With A, repeat Rows 1 and 2 for pattern until piece measures 30” [76 cm] from cast on edge, ending by working Row 2. Drop A.
With B, repeat Rows 1 and 2 for pattern until piece measures 37½” [95 cm] from cast on edge, ending by working Row 2.
Bind off all stitches in pattern.
Strips 2 and 5:
With B, cast on 33 sts.
Row 1 (Right side): Knit across.
Row 2: P1, (K1, P1) across.
Repeat Rows 1 and 2 for pattern until piece measures 7½” [19 cm] from cast on edge, ending by working Row 2. Drop B.
With C, repeat Rows 1 and 2 for pattern until piece measures 15” [38 cm] from cast on edge, ending by working Row 2. Drop C.
With A, repeat Rows 1 and 2 for pattern until piece measures 22½” [57 cm] from cast on edge, ending by working Row 2. Drop A.
With B, repeat Rows 1 and 2 for pattern until piece measures 30” [76 cm] from cast on edge, ending by working Row 2. Drop B.
With C, repeat Rows 1 and 2 for pattern until piece measures 37½” [95 cm] from cast on edge, ending by working Row 2.
Bind off all stitches in pattern.
Strip 3
With C, cast on 33 sts.
Row 1 (Right side): Knit across.
Row 2: P1, (K1, P1) across.
Repeat Rows 1 and 2 for pattern until piece measures 7½” [19 cm] from cast on edge, ending by working Row 2. Drop C.
With A, repeat Rows 1 and 2 for pattern until piece measures 15” [38 cm] from cast on edge, ending by working Row 2. Drop A.
With B, repeat Rows 1 and 2 for pattern until piece measures 22½” [57 cm] from cast on edge, ending by working Row 2. Drop B.
With C, repeat Rows 1 and 2 for pattern until piece measures 30” [76 cm] from cast on edge, ending by working Row 2. Drop C.
With A, repeat Rows 1 and 2 for pattern until piece measures 37½” [95 cm] from cast on edge, ending by working Row 2.
Bind off all stitches in pattern.
Finishing:
Thread yarn needle with desired color. With right sides together, using the photo as a guide and matching rows, sew strips together in numerical order.
Read NextWonderful Big Stitch Throw
Your Recently Viewed Projects
Thanks for your comment. Don't forget to share!
lenorehf 4030257
Jun 01, 2022
Im working on this and I dont see how the edges are NOT going to roll. Any suggestions?
Lisa
Jun 07, 2022
It's a broken rib stitch pattern, this pattern lays flat, unless it is knit too tight. The seams add some additional stability to keep it flat after it is completed too.
joaneporter 895055 3
Oct 19, 2017
Completed knitting but having a hard time getting it ready to sew together. Since they are different sizes they dont seem to match to the pattern. How do you know what size to sew together?
Lisa
Aug 21, 2018
All of the panels should be the same size and you will sew them together in the order indicated by the panel number and finishing instructions.
lnelmel
Aug 26, 2017
I am going to help a couple of real beginners make this, but one has asked about making it bigger. Does anyone have suggestions on doing that simply?
Lisa
Nov 09, 2020
There are two ways to make this bigger add additional sections of the colors to the panels for length and make additional panels for width, the other option would be to, use a bigger cast on and knit the individual sections larger. so instead of changing colors a 7.5" you can continue to 8/9 or 10", it will work as long as you apply all your changes to each panel. I know this is late but it may help someone else.
3cats2love
Jun 25, 2017
Sometimes a simple pattern comes out looking great, like this one does. You could easily adapt the colors to match your decor, or just use your favorite color shades. You could also do seasonal colors, like pumpkin, tan, and dark brown for fall, or white, or use a self patterning yarn in one of the color blocks.
racheles79 9028400
Feb 22, 2017
I've worked out that on size 5mm needles its 32 rows per coloured section. t seems to work and look beautiful! I hope this is of some help to someone! Thanks x Rachele x
Daughter of Light
Nov 19, 2016
This afghan is such a beautiful, classic design! I'm picking up knitting again and I think I'll ease into it by doing this afghan in aran, light sage, and hunter green. My son will be moving out into his first apartment soon and this will make the perfect house warming gift!
darleneleach73 049 5289
Aug 16, 2016
I'm not sure how to drop A then puck it up again later
Lisa
Jan 30, 2017
You can do it two ways, you can carry it loosely up the side of the strip or you can cut it leaving a decent end to darn it later. Cutting the yarn and leaving an end does create more work but if you're not experienced at carrying the yarn up the side, this is the way to go.
Lisa
Oct 11, 2015
I'm doing this one right now and I had to go to a 6mm needle because the 5mm seemed to make the stitches too tight.
isacou 2524021
Mar 05, 2016
Hello! i am starting this blanket also in 6mm and casted on the same amount of stiches as tha pattern requires (33 sts). How did you convert and did one square still measure 7,5 inches? Mine is more like 8 inches. Did you calculate the rows or go by measurement to know when to start next square? Theese information would really help me! Thanks in advance...
Lisa
Aug 24, 2016
Everything stays the same except the size needle used. I still used the same measurements to complete the pattern. Hope this helps someone.
moncamoncha 524591 7
Jan 23, 2015
I have this pattern knitting and crocheting, have both patterns
Report Inappropriate Comment
Are you sure you would like to report this comment? It will be flagged for our moderators to take action.
Thank you for taking the time to improve the content on our site.