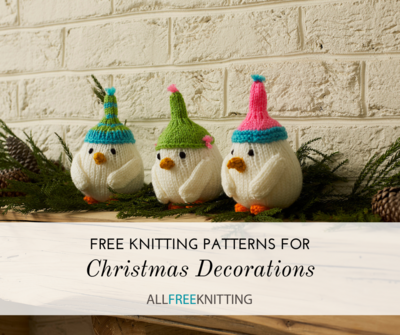
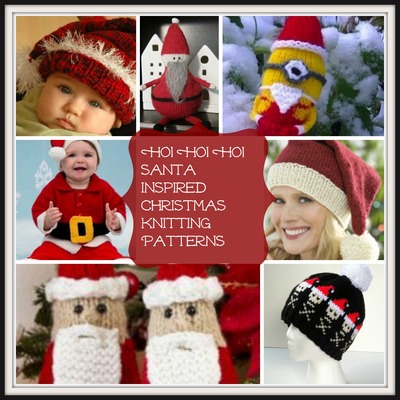
Snowbird Mantle Toppers
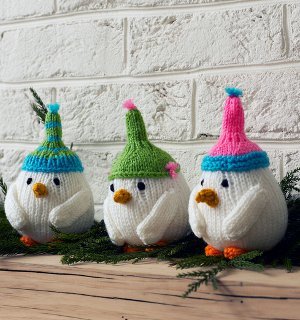
If you're looking for fun and festive mantle decorating ideas, look no further than the Snowbird Mantle Toppers. These darling Christmas knits are a cute and colorful way to decorate your fireplace for the holiday season. Perfect for the novice knitter, these miniature birds are a fun way to mix up traditional winter knitting. With just a little knowledge of crochet, you can create these perky birds for your own mantle this Christmas season.

Knitting Needle Size6 or 4 mm, Double-Pointed Knitting Needles (DPNs)
Yarn Weight(4) Medium Weight/Worsted Weight and Aran (16-20 stitches to 4 inches)
Materials:
- RED HEART® Super Saver® (Art. E300 available in solid color 7 oz (198 g), 364 yd (333 m); multicolor, heather and print 5 oz (141 g), 244 yd (223 m), flecks 5 oz (141 g), 260 yds (238 m) skeins.) : 1 skein of 316 Soft White A, and a small amount each of 321 Gold B, 254 Pumpkin C, 312 Black D, 722 Pretty N’ Pink E, 512 Turqua F, and 672 Spring Green G
- Susan Bates® Double Pointed Knitting Needles: 4 mm [US 6], set of 4
- Susan Bates® Crochet Hook: 3.25 mm [US D-3] (for attaching fringe only)
- Stitch Marker
- yarn needle
- fiberfill
GAUGE: 18 sts = 4” (10 cm); 28 rows = 4” (10 cm) in Stockinette Stitch.
CHECK YOUR GAUGE. Use any size needles to obtain the gauge.
ABBREVIATIONS
A, B, C, etc = Colors A, B, C, etc
cm = centimeter
K = knit
k2tog = knit 2 together
P = purl
st(s) = stitch(es)
tog = together
( ) = follow instructions in parentheses as indicated.
Special Stitch
kfb: Knit into the front and the back of the next stitch (1 stitch increase).
Finished Size: 6½” (16.5 cm) tall x 4” (10 cm) wide
Notes
Body is worked from the bottom up. Stuff Body firmly with fiberfill as it is worked. Wings, Beak, Feet, and Hat are worked separately then sewn to Body.
BIRD (Make 3)
Body
With A and leaving a 6” (15 cm) tail, cast on 6 sts and divide sts evenly onto 3 needles. Join, being careful that sts are not twisted, and begin working in the round. Place marker to indicate beginning of round.
Round 1 (Right side): Kfb around—12 sts.
Round 2: (Kfb, K1) around—18 sts.
Round 3: (Kfb, K2) around—24 sts.
Round 4: (Kfb, K3) around—30 sts.
Round 5: (Kfb, K4) around—36 sts.
Round 6: (Kfb, K5) around—42 sts.
Rounds 7-20: Knit around.
Round 21: (K2tog, K5) around—36 sts.
Rounds 22-24: Knit around.
Round 25: (K2tog, K4) around—30 sts.
Rounds 26-28: Knit around.
Round 29: (K2tog, K3) around—24 sts.
Rounds 30-32: Knit around.
Round 33: (K2tog, K2) around—18 sts.
Rounds 34-36: Knit around.
Round 37: (K2tog, K1) around—12 sts.
Round 38: K2tog around—6 sts.
Cut yarn, leaving a 6” (15 cm) tail. Thread yarn needle with tail and weave through remaining stitches. Draw up firmly; fasten securely and weave in ending tail. Thread yarn needle with beginning tail and close beginning opening by weaving and drawing the tail through the cast-on sts.
Wings (Make 2)
With A and leaving a 6” (15 cm) tail, cast on 6 sts and divide sts evenly onto 3 needles.
Join, being careful that sts are not twisted and begin working in the round. Place marker to indicate beginning of round.
Round 1 (Right side): Kfb around—12 sts.
Rounds 2-4: Knit around.
Round 5: (K2tog, K2) around—9 sts.
Rounds 6–14: Knit around.
Round 15: (K2tog) 4 times, k1—5 sts.
Cut yarn, leaving a 12” (30.5 cm) tail for sewing. Thread yarn needle with beginning tail and close beginning opening by weaving and drawing the tail through the cast-on sts.
Thread yarn needle with ending tail and weave through remaining stitches. Draw up firmly; fasten securely. Do not trim or weave in ending tail.
Beak
With B and leaving a 12” (30.5 cm) tail for sewing, cast on 9 sts and divide sts evenly onto 3 needles. Join, being careful that sts are not twisted and begin working in the round.
Place marker to indicate beginning of round.
Round 1 (Right side): Knit around.
Round 2: (K2tog, K1) around—6 sts.
Round 3: K2tog around—3 sts
Cut yarn, leaving a 6” (15 cm) tail. Thread yarn needle with ending tail and weave through remaining stitches. Draw up firmly; fasten securely and weave in tail.
Do not weave in beginning tail.
Feet (Make 2)
With C, cast on 6 sts and divide sts evenly onto 3 needles. Join, being careful that sts are not twisted, and begin working in the round.
Place marker to indicate beginning of round.
Round 1 (Right side): Kfb around—12 sts.
Round 2: Knit around.
Round 3: (K2tog, K2) around—9 sts.
Round 4: Knit around.
Round 5: (K2tog, K1) around—6 sts.
Round 6: K2tog around—3 sts.
Cut yarn, leaving a 12” (30.5 cm) tail for sewing. Thread yarn needle with ending tail and weave through remaining stitches. Draw up firmly; fasten securely. Do not trim or weave in ending tail.
HATS
Pink and Blue
With E and leaving a 6” (15 cm) tail, cast on 6 sts and divide evenly onto 3 needles. Join, being careful that sts are not twisted, and begin working in the round. Place marker to indicate beginning of round.
Round 1 (Right side): (Kfb, K1) around—9 sts.
Rounds 2-10: Knit around.
Round 11: (Kfb, K2) around—12 sts.
Rounds 12-14: Knit around.
Round 15: (Kfb, K1) around—18 sts.
Round 16: (Kfb, K2) around—24 sts.
Round 17: (Kfb, K3) around—30 sts.
Round 18: (Kfb, K4) around—36 sts. Cut E.
Round 19: With F, knit around.
Round 20: Purl around.
Rounds 21 and 22: Repeat Rounds 19 and 20.
Bind off all sts in knit. Fasten off, leaving a long tail for sewing. Thread yarn needle with beginning tail of Hat and close beginning opening by weaving and drawing the tail through the cast-on sts.
Weave in beginning tail.
Fringe
Cut 3 lengths of F, each 3” (7.5 cm) long. Fold a length in half. Insert crochet hook in top of hat, place fold on hook and draw fold through, forming a loop. Insert ends of length in loop and pull to tighten. Repeat to attach remaining lengths. Unravel the lengths by brushing them with your hook or a comb. Trim fringe to desired length.
Green Hat
With G and leaving a 6” (15 cm) tail, cast on 6 sts divided evenly onto 3 needles. Join, being careful that sts are not twisted, and begin
working in the round. Place marker to indicate beginning of round.
Round 1 (Right side): (Kfb, K1) around—9 sts.
Rounds 2-10: Knit around.
Round 11: (Kfb, K2) around—12 sts.
Rounds 12-14: Knit around.
Round 15: (Kfb, K1) around—18 sts.
Round 16: (Kfb, K2) around—24 sts.
Round 17: (Kfb, K3) around—30 sts.
Round 18: (Kfb, K4) around—36 sts.
Round 19: (Kfb, K5) around—42 sts.
Rounds 20-22: Knit around.
Bind off all sts in knit. Fasten off, leaving a long tail for sewing. Thread yarn needle with beginning tail of Hat and close beginning opening by weaving and drawing the tail through the cast-on sts.
Weave in beginning tail.
Fringe
Cut 9 lengths of E, each 3” (7.5 cm) long. Fold a length in half. Insert crochet hook in top of hat, place fold on hook and draw fold through, forming a loop. Insert ends of length in loop and pull to tighten. Repeat to attach 2 more lengths to top of hat, and 3 lengths to each side of hat. Unravel the lengths by brushing them with your hook or a comb. Trim fringe to desired length.
Green and Blue Striped Hat
With G and leaving a 6” (15 cm) tail, cast on 6 sts divided evenly onto 3 needles. Join, being careful that sts are not twisted, and begin working in the round. Place marker to indicate beginning of round.
Round 1 (Right side): (Kfb, K1) around—9 sts.
Rounds 2 and 3: Knit around, at end of Round 3 drop G.
Rounds 4 and 5: With F, knit around, at end of
Round 5 drop F.
Rounds 6-8: With G, knit around, at end of
Round 8 drop G.
Rounds 9 and 10: With F, knit around, at end of Round 5 drop F.
Round 11: With G, (Kfb, K2) around—12 sts.
Rounds 12 and 13: Knit around, at end of
Round 13 drop G.
Round 14: With F, knit around.
Round 15: (Kfb, K1) around—18 sts. Drop F.
Round 16: With G, (Kfb, K2) around—24 sts.
Round 17: (Kfb, K3) around—30 sts.
Round 18: (Kfb, K4) around—36 sts. Drop G.
Rounds 19-22: With F, (K1, P1) around.
Bind off all sts in knit. Fasten off, leaving a long tail for sewing. Thread yarn needle with beginning tail of Hat and close beginning opening by weaving and drawing the tail through the cast-on sts.
Weave in beginning tail.
Fringe
Cut 3 lengths of F, each 3” (7.5 cm) long. Fold a length in half. Insert crochet hook in top of hat, place fold on hook and draw fold through, forming a loop. Insert ends of length in loop and pull to tighten. Repeat to attach remaining lengths. Unravel the lengths by brushing them with your hook or a comb. Trim fringe to desired length.
FINISHING
With ending tail of Wing, and using photograph as a guide, sew Wing to Body in a hugging, diagonal position. Repeat for second Wing. Thread yarn needle with ending tail of Foot. Using photograph as a guide, sew Foot to Body. Repeat for second Foot. Thread yarn needle with beginning tail of Beak. Using photograph as a guide, sew Beak to Body. Thread yarn needle with a 12” (30.5 cm) length of D. Using photograph as a guide, embroider eyes on Body. Thread yarn needle with ending tail of Hat. Using photograph as a guide, sew Hat to Body.
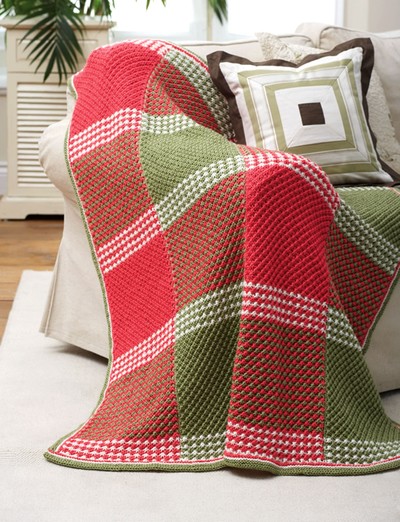
Read NextFestive Star Afghan
Your Recently Viewed Projects
Thanks for your comment. Don't forget to share!
mulberrygalprinces s
Apr 08, 2018
Oh my these are adorable. I just have to make one for each of my grand kids. Here in Florida the term snow bird is used a lot. People from colder climates come here to get away from the cold and snow in the Winter. So these will get a chuckle out of anyone who sees them.
Member 7902542
Nov 27, 2017
These are a MUST on my To Do Knit projects. Wish there was an easy way to download and print the pattern.
KathrynAllison
Nov 28, 2017
Hi Member 7902542, if you click the gray "More" button at the bottom of the pattern, you will see a button with a printer icon. If you click that button, you will be able to access a printer-friendly version of the full pattern. Hope this helps! -Editors of AllFreeKnitting
Tricia108
Jul 16, 2017
These are adorable. I will definitely make these. I can also give them as gifts. I know it is only July but the holidays will be here before you know it. It is a great stash buster as well. I love birds so I can have some extra "friends" without having to feed them. Thank you for the pattern.
paver2
Feb 01, 2017
Snowbirds! They're so cute I want to make them. I don't have a mantle to put them on but I can find some place for them. When it says a little crochet knowledge that kind of threw me, but you just use a crochet hook to make the fringe and that's not a big deal.
Report Inappropriate Comment
Are you sure you would like to report this comment? It will be flagged for our moderators to take action.
Thank you for taking the time to improve the content on our site.