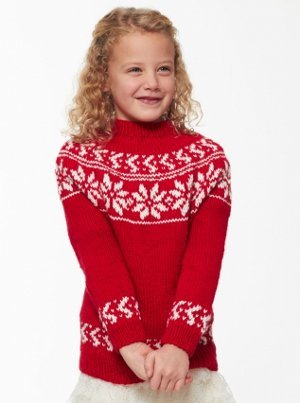
Girl's Knit Cable Sweater
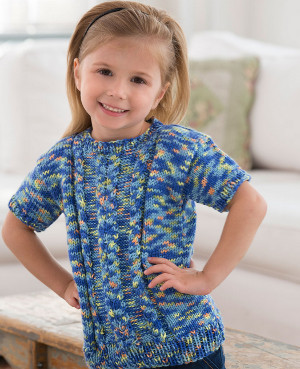
Dress your little girl up in something extra special with the Girls Cable Knit Sweater. A cable pattern down the front of this sweet knit sweater pattern gives the sweater some visual interest, without becoming too complicated to knit. Youll enjoy creating this appealing little knit sweater for the special girl in your life. Choose a yarn thats her favorite color to make this sweater an extra special surprise. Knitting up this sweater pattern will be an enjoyable experience, since it will go quickly while still engaging your interest.

Knitting Needle Size8 or 5 mm
Yarn Weight(4) Medium Weight/Worsted Weight and Aran (16-20 stitches to 4 inches)
Materials
- RED HEART® Gumdrop®: 2 (2, 3, 4) balls 530 Blueberry
- Susan Bates® Knitting Needles: 5mm [US 8]
- Cable needle
- removable stitch markers (for sleeve placement)
- ring stitch markers (for cable pattern)
- yarn needle
GAUGE: 18 sts = 4” (10 cm); 24 rows = 4” (10 cm); in Stockinette st (k on right side, p on wrong side). CHECK YOUR GAUGE. Use any size needles to obtain the gauge.
INSTRUCTIONS
Directions are for child size 2. Changes for child sizes 4, 6, and 8/10 are in parentheses Finished Chest: 24 (26, 28, 30)” (61 (66, 71, 76) cm)
Finished Length: 15 (16, 17, 18)” (38 (40.5, 43, 45.5) cm)
Special Stitches
2/2 LC (2 over 2 Left Cross) = Slip next 2 stitches to cable needle and hold in front, k2, then k2 from cable needle.
2/2 RC (2 over 2 Right Cross) = Slip next 2 stitches to cable needle and hold in back, k2, then k2 from cable needle.
kfb (Knit into front and back) = Knit next st but do not remove from needle, knit into back loop of same st and remove from needle.
ssk = Slip next 2 stitches, one at a time as if to knit, to right needle, insert point of left needle through front of sts, knit these sts together through back loop.
Pattern Stitch
1x1 Rib (over odd number of sts)
Row 1 (RS): K1, *p1, k1; repeat from * across.
Row 2: P1, *k1, p1; repeat from * across.
Repeat Rows 1 and 2 for 1x1 Rib.
Notes
1. Front and Back are worked separately beginning at the lower edge. The pieces are then joined at the shoulders.
2. To begin working the Sleeves, stitches are picked up across side edges of joined Front/Back piece.
BACK
Cast on 53 (57, 63, 67) sts.
Work in 1x1 Rib until piece measures about 2” (5 cm) from beginning; end with a wrong side row.
Increase Row (right side): K26 (28, 31, 33), kfb, knit to end of row—54 (58, 64, 68) sts. Work even in Stockinette st until piece measures 15 (16, 17, 18)” (38 (40.5, 43, 45.5) cm) from beginning.
Bind off.
FRONT
Cast on 53 (57, 63, 67) sts.
Work in 1x1 Rib until piece measures about 2” (5 cm) from beginning; end with a wrong side row.
Increase Row (right side): [K6 (6, 7, 7), kfb] 7 times, knit to end of row—60 (64, 70, 74) sts.
Begin Cable Patterns
Set-Up Row (wrong side): P12 (14, 17, 19), place marker, k4, p4, k6, p8, k6, p4, k4, place marker, p12 (14, 17, 19).
Row 1 (right side): Knit to first marker, slip marker, p4, 2/2 RC, p6, 2/2 RC, 2/2 LC, p6, 2/2 LC, p4, slip marker, knit to end of row.
Row 2: Purl, slipping markers as you come to them.
Row 3: Knit, slipping markers as you come to them.
Row 4: Purl, slipping markers as you come to them.
Repeat Rows 1–4 until piece measures 13 (14, 15, 16)” (33 (35.5, 38, 40.5) cm) from beginning; end with a Row 4.
Shape Neck
Row 1 (right side): Knit to first marker, slip marker, [p2tog] twice, 2/2 RC, p2tog, p1, join 2nd ball of yarn and bind off center 14 sts for neck, p1 (this st is already on right needle at end of bind-off), p2tog, 2/2 LC, [p2tog] twice,
slip marker, knit to end of row—20 (22, 25, 27) sts on each side of neck.
Work both sides at the same time using separate balls of yarn. Slip markers as you come to them.
Row 2: On first side, purl across; on 2nd side, BO 2 sts, purl to end of row.
Row 3: On first side, knit across; on 2nd side, BO 2 sts, knit to end of row—18 (20, 22, 24) sts each side.
Rows 5–7: Repeat last 2 rows 2 more times—14 (16, 18, 20) sts on each side.
Row 8: Purl across all sts of both sides using separate balls of yarn.
Row 9: Knit across all sts of both side using separate balls of yarn.
Repeat last 2 rows until Front measures same as Back.
Bind off.
Sew left shoulder seam. Leave right shoulder seam unsewn for now.
NECKBAND
With right side facing, beginning at 15 (17th, 19th, 20th) on top back edge, pick up and k26 sts across back neck edge, 10 sts down left front neck edge, 14 sts across front neck edge, and 11 sts up right front neck edge—
61 sts.
Work in 1x1 Rib for ½” (12.7 mm).
Bind off. Sew right shoulder seam, including edges of neckband.
SLEEVES (work 2)
Measure 5 (5½, 6, 6½)” (12.5 (14, 15, 16.5) cm) from shoulder seam on both sides of Front and Back and place markers for Sleeve placement.
With right side facing, pick up and k45 (49, 55, 59) sts evenly between markers on one side of body.
Work in Stockinette st for 3 rows.
Decrease Row (right side): K1, k2tog, knit to last 3 sts, ssk, k1—43 (47, 53, 57) sts.
Repeat last 4 rows 2 (3, 4, 5) more times—39 (41, 45, 47) sts.
Work even in Stockinette st until Sleeve measures 2½ (3½, 3½, 4½)” (6.5 (9, 9, 11.5) cm).
Work in 1x1 Rib for ½” (1.5 cm).
Bind off. Repeat on other side of body for 2nd
Sleeve.
FINISHING
Sew side and Sleeve seams. Weave in ends.
Your Recently Viewed Projects
Thanks for your comment. Don't forget to share!
Report Inappropriate Comment
Are you sure you would like to report this comment? It will be flagged for our moderators to take action.
Thank you for taking the time to improve the content on our site.