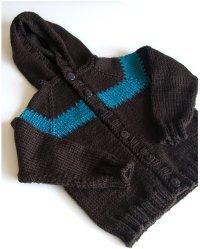
Cool Kid Hoodie
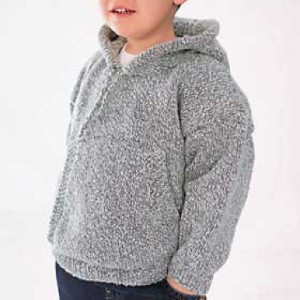
This simple knit sweater pattern will make your kid look effortlessly cool. Knit the Cool Kid Hoodie to make sure that everyone in school knows your child has style.This cozy gray hoodie will quickly become your child's favorite sweater. Your kid will always be ready to play outside or climb trees with friends in this comfortable hoodie. Help your cool kid stay warm with this toasty pattern. This understated classic will never go out of style. Your child will want to wear this sweater again and again.

Knitting Needle Size6 or 4 mm, 8 or 5 mm
Yarn Weight(4) Medium Weight/Worsted Weight and Aran (16-20 stitches to 4 inches)
Materials:
- Bernat Denimstyle (3.5 oz/ 100 g; 196 yds/179.22 m) 4 (4, 5) balls
- Sizes 4 mm (U.S. 6) and 5 mm (U.S. 8) knitting needles or size needed to obtain gauge
- 4 st holders
Gauge: 18 sts and 24 rows = 4 ins
Measurements:
Chest measurement:
- 2 22"
- 4 24"
- 6 26"
Finished chest:
- 2 27.5"
- 4 29.5"
- 6 32"
Abbreviations:
- alt = Alternate(ing).
- approx = Approximately.
- inc = Increase 1 stitch by
- knitting into front and back of
- next stitch.
- K = Knit.
- K2tog = Knit next 2 stitches
- together.
- Psso = Pass slipped stitch over.
- rem = Remain(ing).
- rep = Repeat.
- rnd(s) = Round(s).
- rS = Right side.
- Sl1 = Slip next stitch knitwise.
- St(s) = Stitch(es).
- Yo = Yarn over
Instructions:
BACK
**With smaller needles, cast on 59 (63-69) sts.
1st row: (RS). K1. *P1. K1. Rep from * to end of row.
2nd row: P1. *K1. P1. Rep from * to end of row.
Rep these 2 rows (K1. P1) ribbing for 1G ins [3 cm] ending on a 2nd row and inc 3 sts evenly across last row. 62 (66-72) sts.**
Change to larger needles and proceed in stocking st until work from beg measures 15 (16-17½) ins [38 (40.5-44) cm] ending with RS facing for next row. Cast off. Place markers 17 (19-22) sts in from side edges along cast off edge to mark shoulders.
FRONT
Work from ** to ** as given for Back.
Change to larger needles and proceed in stocking st until work from beg measures 12 (13-13½) ins [30.5 (33-35) cm], ending with RS facing for next row.
Neck shaping: Next row: K26 (28-31) (neck edge). Turn. Leave rem sts on a spare needle. Dec 1 st at neck edge on next 9 rows. 17 (19-22) sts. Cont even until work from beg measures same length as Back, ending with RS facing for next row. Cast off. With RS of work facing, cast off center 10 sts. Knit to end of row. Dec 1 st at neck edge on next 9 rows. 17 (19-22) sts. Cont even until work from beg measures same length as Back, ending with RS facing for next row. Cast off.
SLEEVES
With smaller needles, cast on 31 (33-35) sts. Work in (K1. P1) ribbing as given for Back for 1¼ ins [3 cm] ending on a 2nd row and inc 4 sts evenly across last row. 35 (37-39) sts.
Change to larger needles and proceed in stocking st inc 1 st each end of needle on 3rd and following alt rows to 45 (57-61) sts, then every following 4th row to 59 (63-69) sts. Cont even until work from beg measures 9½ (10½-12) ins [24 (26.5-30.5) cm] ending with RS facing for next row. Cast off.
HOOD
With larger needles, cast on 91 (95-99) sts loosely.
Proceed in stocking st for 10 rows.
Dec 1 st at each end of needle on next 8 rows. 75 (79-83) sts. Cont even until Hood from beg measures 7½ (8-8½) ins [19 (20.5-21.5) cm] ending with RS facing for next row. Place marker at each end of last row. Cast off 4 sts beg every row until 3 sts rem. Cast off rem sts.
Kangaroo Pocket: With larger needles, cast on 49 sts.
1st row: (RS). (K1. P1) twice. Knit to last 4 sts. (P1. K1) twice.
2nd row: (K1. P1) twice. K1. Purl to last 5 sts. (K1. P1) twice. K1. Rep last 2 rows until work from beg measures 1½ ins [4 cm], ending with a 2nd row.
Shape sides: 1st row: (RS). (K1. P1) twice. K1. K2tog. Knit to last 7 sts. Sl1. K1. psso. (K1. P1) twice. K1. Work 3 rows even (keeping cont of seed st pat at each end). Rep last 4 rows 8 times more. 31 sts. Cont even (keeping cont of seed st pat at each end) until Pocket from beg measures 7½ ins [19 cm], ending with RS facing for next row. Cast off.
Sew Pocket in position to Front as illustrated, sewing bottom 1¼ ins [3 cm] of pocket sides closed.
FINISHING
Sew shoulder seams. Place markers on Front and Back side edges 6½ (7-7½) ins [16.5 (18-19.5) cm] down from shoulder seams. Sew in sleeves between markers. Sew side and sleeve seams.
Fold hood in half and sew cast off edges from markers. Fold first 4 rows of cast on edge of Hood to WS and sew in position to form casing. Sew hood in position around neck edge leaving openings at ends of casing to insert drawstring.
Drawstring: Cut 2 strands of yarn 48 ins [122 cm] long. With both strands tog hold one end and with someone holding other end, twist strands to the right until they begin to curl. Fold the 2 ends tog and tie in a knot so they will not unravel. The strands will now twist themselves tog. Draw through casing on Hood. Knot ends.
Your Recently Viewed Projects
Thanks for your comment. Don't forget to share!
Catsitt
Jan 31, 2017
I love the look of this kids hoody, I think it would be a great one to try for my nephew to keep him warm in school! I have never taken a project on this size before, would any have any advice for me on it? Is it as hard as I'm making it out to be in my head? Any help or words of encouragement would be great!
juliereid695 68072 19
May 24, 2021
Honestly its one of the easiest knits I have attempted. The end results were great.
achumley0003 31706 34
Oct 26, 2016
i really wish this hoodie was in larger child sizes. All of my children are too big for a size 6 now. Hopefully, I will find a pattern big enough. if not, maybe I will try to adjust this pattern. It is definitely a nice jacket for some of the chilly fall mornings.
rsdb
Mar 10, 2016
I want to make this hoodie for my nephew for spring - that means he doesnt have to carry or lose his hat! From the other comments it seems as though the pattern is more complicated than it looks. Has anyone had success making this hoodie?
mom1pookie 9818338
Jan 22, 2016
I am all oat finished with the sweater and I realized I don't see any instructions for the neck area that we castes off on the front of the sweater. I I know some of the stitches will be taken up with the hood possibly but there are 10 stitches that are cast off across the front that don't seem to be covered. Please advise so I can finish this for my grandson. Not sure how to rate this yet.
Lisa
Nov 23, 2021
None of the stitches are used for the hood, the hood is made separately, all of the instructions for the front are shown in the pattern, including the 10 stitch cast off you mentioned in your comment. Maybe it wasn't there when you left your comment, but it is all there now.
jpup 5361279
Jan 02, 2016
I thought I wrote a couple of days ago but don't see my comment. I knit this sweater with no difficulty and it looks great on my great-grandson, however the hood only goes up to the back of his head and does not cover his head. I made the 81/2 inches before decreasing. Any Ideas? Would rate it a 5 if this problem is solved.
Lisa
Nov 23, 2021
The problem is not with the pattern, your great-grandson either has a larger head or longer neck, but is easily customized by lengthening the hood to customize it for him, instead of going to 8 1/2 " before the shaping you would knit to 10 or possibly 12" then start the shaping.
Wendy1953
Oct 31, 2015
The instruction is not clear on what closing is used for the front. The pattern I think, shows a zipper. Please explain.
Lisa
Nov 23, 2021
The instructions are quite clear, it is a pullover, that's why all the neck shaping instructions are there, no zipper, if a zipper was required it would be in the materials list.
lisknits
Oct 28, 2015
I am making the largest size in the pattern, and the decreases for the front neck shaping do not add up correctly - it is impossible to have the right number of stitches with the given instructions. Can anyone help?
desireray2 3516760
Jun 26, 2015
I am a beginner an don't understand the second roll where it says Rep these 2rows (k1,p1) ribbing for 1G what is 1G? (3cm)?
LaurieKnitCrochet
Aug 10, 2015
This is a bit late, but if no one has replied, it's a mistake. Read the pattern for the sleeves, the beginning k1,p1 ribbing is for 1 1/4 in. (3cm). You'll want to match the ribbing on the body to the same as the sleeves. Hope this helps. L.
PatsyRiggs42 69807 46
Apr 16, 2015
pacedesperatehorse wife Cut yarn and rejoin to second side and complete as first side count stitches each row to be sure it matches
pacedesperatehorse wife 6879143
Dec 18, 2014
Having problems with the neck shaping. I've finished the first half (large size)and now I'm supposed to cast off 10 stitches for the neck opening. Where is my yarn? Am I supposed to carry it down from the top where I cast off or do I attach it somewhere in the body? I'm a beginner and although this seems like a very easy pattern, they don't supply this detail. HELP??? Thanks. -)
Lisa
Nov 23, 2021
After you have cast off the stitches as instructed, you would have to move and reattach the yarn to continued with the pattern, this is not a "very easy" pattern, it is easy but not a beginner pattern.
pacedesperatehorse wife 6879143
Dec 18, 2014
Everything is going fine EXCEPT...doing the neck shaping. After I finish the first side and get ready to cast off 10 across the neck opening (I'm doing the large size, 72 stitches total) WHERE do I find the other yarn thread? I've cast off at the top...so do I carry it down, or attach it somewhere else in the work?
dianemacca 0250401
Dec 02, 2014
I am a beginner and having problems understanding directions re Back of sweater once measuring the 16 inches. What do you do after this as it is not really that clear and would love all the help I can get thanks
Editor JD
Dec 02, 2014
Hi dianemacca 0250401, Once your work measures 16 inches, it looks as though you're going to place stitch markers, cast off, and begin working on the front half of the sweater. Hope this helps! -Editors of AllFreeKnitting
Report Inappropriate Comment
Are you sure you would like to report this comment? It will be flagged for our moderators to take action.
Thank you for taking the time to improve the content on our site.