How to Block Knitting
Blocking knitting is easier than it sounds, and you'll really notice a difference in the final fabric!

If you've ever finished a knit project, or if you've read an entire pattern before, chances are you've come across the mysterious term "blocking." As knitters, that leaves us to ask, "What is blocking and is it necessary?"
While not every knitter blocks their items, it's a relatively simple process that can help improve garment shaping and sizing. Depending on the type of yarn you're using, there are various blocking methods and techniques available to knitters.
To find the best tried-and-true knitting tips we asked for our talented readers' input! In this collection of AllFreeKnitting readers' best tips on blocking knitting, you'll know which methods work the best, what obstacles to watch out for and how to achieve the ultimate blocking results.
Thanks to you, the readers, we're all able to learn and grow in our knitting adventure! Enjoy the insider secrets and feel free to use them for your next project. If you have additional tips on how to block knitting, please feel free to share them in the comment section.
How to Block Knitting
Blocking refers to the process of stretching and shaping a finished piece to ensure it is the proper size and shape. There are various ways to block a garment depending on the type of yarn used. Check out the following to learn invaluable tips for blocking knitting.
Because acrylic yarn is sensitive to heat, garments made with this type of yarn should not be steam blocked. Always make sure you follow the care instructions on your yarn label prior to blocking.
There's much more to caring for your knitted items than just blocking alone. For more on how to take care of your knitted fabrics to ensure they last forever, check out our guide to how to care for knitted items:

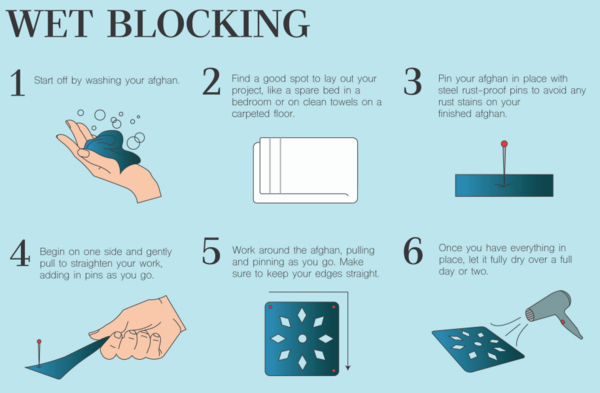
1. Wet Blocking
- Take note of the measurements of your garment and wash according to the yarn label instructions
- Lay your garment flat on a clean towel and roll the towel, pressing out as much water as possible.
- Repeat this process with other towels until the item is mostly dry.
- On a flat, clean surface, such as a towel or blocking board, lay out your item and pull it into the desired shape. Pin to a blocking board if desired. Let the garment air dry.
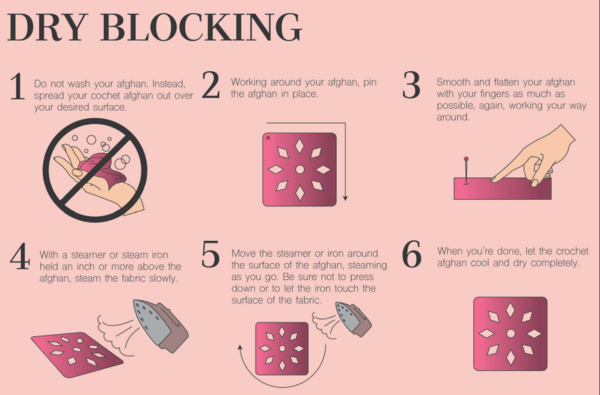
2. Steam Blocking (Dry Blocking)
- Lay your item on a clean, dry towel on a flat surface.
- Place a cool wet washcloth over your item.
- After heating your iron to the appropriate setting for your fiber, press the iron on your washcloth for a few seconds. Doing so will create steam.
- Repeat as necessary, rewetting your washcloth as needed.
- Pull your item into the proper shape while steaming.
- After steaming, allow your item to air dry. Pin your fabric to a blocking board if desired.
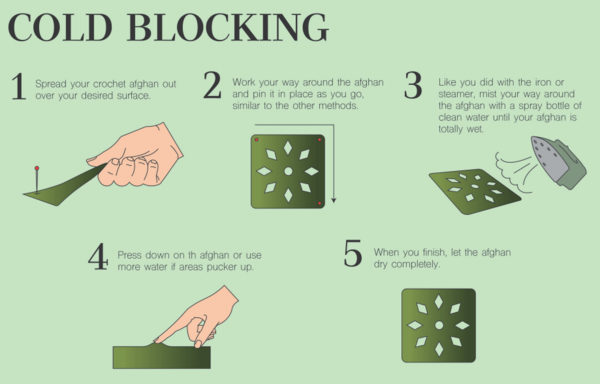
3. Spray Blocking (Cold Blocking)
- Lay your item on a dry towel on a flat surface.
- Mist with a spray bottle of room-temperature water.
- Pull the item into the desired shape.
- Pin to a blocking board if desired. Allow the item to air dry.
What Are Blocking Wires?
Blocking wires are a great tool for knitters who want to step up their blocking game. They're mostly useful for blocking lace, although you can use them for any type of knit fabric.
The wires are attached to the fabric through the individual stitches themselves. Then pins are used to hold the fabric in place during blocking. This process can get a little tedious, but it will prevent scalloping along the edges of your piece.

22 Tips for Blocking Knitting
1. "I usually soak the item in cool water. Then roll it in a towel to remove excess water. Lay another dry towel on my spare room bed and lay the knit item out onto the towel, making sure all edges are flat and even. Then turn on the ceiling fan and it's amazing how quickly it dries!" -Pamela
2. "Make sure your spray bottle is easy to squeeze! Learn from my mistake and arthritic hand." -Dawn
3. "My mother taught me to soak the item in warm water, pat it down and lay it flat on a dry towel. Then place dressmaker pins in critical areas such as shoulders, neckline, and sleeves. Place the towel on a flat surface and allow to air dry." -Barb J.
4. "I like to block cotton dishcloths on thick towels after I have picked out the stitch definitions in the designs. I think the designs pop more than letting them dry on a blocking mat." -Knittingdancer
5. "I lay the item flat on a towel and use a spray bottle of water and spray it until it's damp. Then I shape the item and let it dry." -Lori L.
7. "I’ve only ever blocked crocheted doilies and snowflakes (cotton thread). I soak the doilies until thoroughly wet, pat it with a towel to remove excess water and use a lot of pins. For snowflakes, which need a bit of stiffening, I use a mixture of starch and water. It’s also helpful to have a blocking board with radiating lines so the item is stretched evenly. My mother always used a ceiling tile either covered with an old towel or plastic wrap (so the items aren’t touching the tile directly)." -Carmen
8. "I bought these great foamy interlocking play mats for the kids years ago and I ended up stealing them. The interlocking blocks are great because I can move a piece and even set it on its side if I need to for a short time. In addition to the pads, I would not be able to do anything without my stretching rods. They work so well to stretch a piece uniformly at the edges and prevent 'pin puckers.'" -Jessica N.
9. "I use a sugar water mix of 4 parts sugar and 1 part water, and boil that until it's clear. Allow it to cool. Dip doilies in the mixture, making sure that they're soaked through. Squeeze well and then pin the doilies on a piece of thick Styrofoam covered in heavy plastic. Let dry." -Terry S.
10. "I use blocking wires for lace shawls; they really quicken up the process!" -Susan
11. "Make sure the item you are blocking is damp, but not soaking wet." -Susan

13. "I use rust-proof welding rods as blocking wires and slide them through the edge stitches. After my wet item is spread out on a sewing cutting board covered with a vinyl tablecloth, I pin between the wire and knitting every 2-3 inches and allow it to try." -Pat
14. "All of my items at least get lightly blocked by being washed and laid out to dry. I think it makes the project look a lot better. Lacy items and clothes are sprayed with a water bottle and laid out on a huge cardboard box I have and pinned into shape and left to dry." -Mary K.
15. "Since I live in FL, I just wet my finished pieces, roll in a towel and lay on a flat surface in my outdoor laundry room until dry. I do measure to make sure that it is correct in length and width, etc." -Joan S.
16. "I love the set of 8 interlocking foam floor mats I purchased from Costco for $20. I can configure them any way I want for blocking different items – i.e. all in a row for a stole or scarf, 4 in a square for a sweater, or even all 8 in a large square for a big shawl. With my mats, blocking wires and T-pins, I’m ready for anything!" -Mary B.
17. "I wet the item slightly, lay flat with another towel on top then place a book on top." -Mary M.
18. "I’m a spinner, so to block my yarn after it’s spun, I soak it in warm water then sling it around in the air to release excess water, then I hang the skein from a clothes hanger from my paddle fan on the porch." -Evelyn R.

20. "If it’s a crocheted item, I take thick towels and/or batting and lay it on the iron board, dampen crocheted item, lightly starch then use non-rust T-pins and pin crocheted item where needed to put it back into its original shape. Then lightly spray starch again if needed." -Lynn G.
21. "I’ve only done a few items that required blocking. I dampened the item, and with a towel on top to absorb any excess water, I pin it to the correct shape." -Jeanette
22. "To block, I first wash the item in cold water with a gentle detergent. I then blot out the excess water with a towel and take another towel out and lay that out on the top of my washer. Then I lay the item out flat without stretching it. Sometimes to make sure the edges don’t roll, I will pin to the towel." -Anne
Your Recently Viewed Projects
Thanks for your comment. Don't forget to share!
nataliegrace
Mar 02, 2018
This is really helpful! I've never tried blocking before, so it's great to get tried-and-true tips from fellow readers.
craftedbyfox
Jan 11, 2017
Some great tips here, I agree that the kids interlocking mats are just as good as the expensive blocking mats I got a pack of 20 from Amazon for just a few pounds whereas the real thing would have cost four times the price. The great thing about the interlocking mats is that you can piece them together to match the size of your project.
Maeve
May 07, 2013
I have lace wires for my lace knitting and after do the roll in the towel procedure, I pin the item to children's puzzle mats, which are a lot cheaper than the same thing sold by knitting stores. I have a big craft table that I open up to full size, put my puzzle mats on it and pin my little heart out. BTW KnitPicks.com sells lace wires.
kangaruby 6731304
Jun 23, 2012
very useful artical-- i had trouble buying blocking wires in australia so i had stainless steel wire cut to length at the local steel yard
Report Inappropriate Comment
Are you sure you would like to report this comment? It will be flagged for our moderators to take action.
Thank you for taking the time to improve the content on our site.