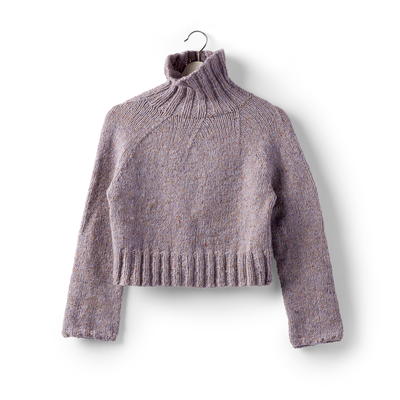
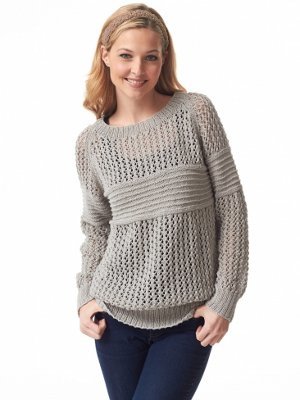
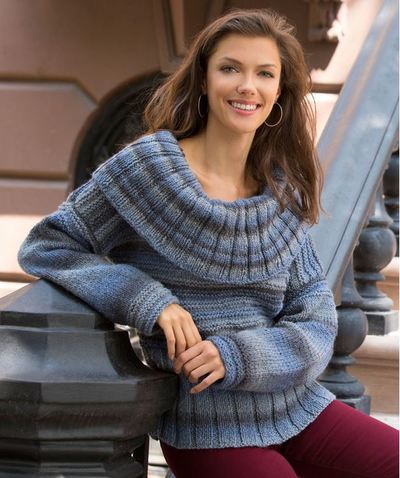
Rippling Pond Knit Sweater

Sit back and relax for a while, and knit this Rippling Pond Knit Sweater. The gorgeous colors in this sweater range from a gray-navy to pale blue, so the folding collar resembles exactly the ripples in a clear pond on a beautiful, cloudless day. While better suited for intermediate knitters, beginner knitters should keep this project in mind while searching for their first more difficult knitting patterns. Free sweater knitting patterns don't get more elegant and peaceful than this one. All you need now is the buzz of locusts and a good book.

Knitting Needle Size10 or 6 mm, Circular Knitting Needles
Yarn Weight(4) Medium Weight/Worsted Weight and Aran (16-20 stitches to 4 inches)
Gauge1 stitches, 2 rows, 3 inches. stockinette stitch
Materials:
- Red Heart® Boutique Midnight® 1936 Misty - 9 (9, 10, 11, 12) balls
- Susan Bates® Knitting Needles: 6mm [US 10]
- Susan Bates® Circular Knitting Needles: 6mm [US 10], 16” (40 cm)
- Stitch markers
- Stitch holders
- Yarn needle
Measurements:
Finished Bust: 40 (43, 49, 52, 58)” [101.5 (109, 124.5, 132, 147.5) cm]
Finished Length (back neck): 23 (23½, 24½, 25½, 26)” [58.5 (59.5, 62, 65, 66) cm], not including collar
Abbreviations:
K = knit
P = purl
St st = stockinette stitch (Knit on right side rows; Purl on wrong side rows)
st(s) = stitch(es)
inc = increase 1 stitch
[ ] = work directions in brackets the number of times specified
* = repeat whatever follows the * as indicated.
Special Abbreviations:
Cable Cast-On = Turn work so stitches are on left needle, *insert needle between first and 2nd stitch on left needle, wrap and draw loop through (as if making a knit st), slip the new stitch back onto the left needle; repeat from * until the desired number of stitches have been cast-on.
dec 1 = for left shoulder, work to 3 sts before neck edge, k2tog, k1; at neck edge for right shoulder, begin k1, ssk (slip, slip, knit), work to end of row.
Kf&b = Knit next st but do not remove from needle, knit into back loop of same st and remove from needle
M1 = Make 1 (increase) – Lift strand between needles to left-hand needle and work strand through the back loop, twisting it to prevent a hole; knit or purl as indicated by pattern stitch
Gauge: 6 sts = 4” [10 cm]; 20 rows = 4” [10 cm] in St st. CHECK YOUR GAUGE. Use any size needles to obtain the gauge
Instructions
Directions are for size Small; changes for sizes Medium, Large, 1X and 2X are in parentheses.
Pattern Stitches
4 x 2 Rib (multiple of 6 sts + 2)
Row 1 (Right Side): *P2, k4; repeat from * to last 2 sts, p2.
Row 2: *K2, p4; repeat from * to last 2 sts, k2. Repeat these 2 rows for 4 x 2 Rib.
Garter Welt (worked over any number of sts)
Rows 1-4: Knit.
Row 5 (Right Side): Knit.
Row 6: Purl.
Repeat these 6 rows for Garter Welt pattern.
2 x 4 Rib in the round (multiple of 6 sts)
All rounds (Right Side): *P4, k2; repeat from *.
Note
The 4 x 2 Rib in the round pattern used on the collar reverses bottom border instructions so the same side will show when it is folded over.
BACK
With straight needles, cast on 80 (86, 98, 104, 116) sts. Work 4 x 2 Rib until piece measures 8” [20.5 cm] from beginning, ending after completing a Wrong Side row. Work Garter Welt pattern until piece measures 13½ (13½, 14, 14½, 14½)” [34.5 (34.5, 35.5, 37, 37) cm] from beginning.
Shape Armholes
Inc 1 st each end of every right side row 4 times—88 (94, 106, 112, 124) sts. Using cable cast-on, cast on 2 (2, 3, 4, 4) stitches at beginning of next 2 rows—92 (98, 112, 120, 132) sts. Work even for 7 (7½, 8, 8½, 9)” [18, (19, 20.5, 21.5, 23) cm].
Shape Shoulders
Bind off 8 (8, 10, 11,12) at the beginning of the next 6 rows; bind off 8 (11, 11, 11, 13) sts at beginning of next 2 rows. Bind off remaining back neck sts.
FRONT
Cast on 80 (86, 98, 104, 116) sts. Work 4 x 2 Rib until piece measures 8” [20.5 cm] from beginning, ending after completing a Wrong Side row. Work Garter Welt pattern until piece measures 13½ (13½, 14, 14½, 14½)” [34.5, (34.5, 35.5, 37, 37) cm] from beginning.
Shape Armhole
Increase 1 st each end of every right side row 4 times—88 (94, 106, 112, 124) sts. Using cable cast-on, cast on 2 (2, 3, 4, 4) stitches at beginning of next 2 rows—92 (98, 112, 120, 132) sts. Work even for 4 (4½, 4½, 5, 5)” [10 (11.5, 11.5, 12.5, 12.5) cm].
Shape Neck
Work across 39 (42, 49, 52, 58) sts, join second ball of yarn, bind off 14 (14, 14, 16, 16) sts, work to end of row.
Working both sides at same time with separate balls of yarn, bind off 2 sts at each neck edge once, dec 1 st at each neck edge every right side row 3 (3, 3, 3, 4) times, then every other right side row 2 (2, 3, 3, 3) times – 32 (35, 41, 44, 49) sts per shoulder. Work even until piece measures same as Back to shoulder shaping.
Shape Shoulders
Bind off 8 (8, 10, 11, 12) at the beginning of the next 6 rows; bind off remaining 8 (11, 11, 11, 13) sts each shoulder.
SLEEVE
(Make 2)
Cast on 40 (42, 44, 46, 48) sts. Repeat 6-row Garter Welt pattern twice, then Rows 1-4 once.
Increase row (Right Side): K1, M1, work to last stitch, M1, k1—42 (44, 46, 48, 50) sts.
Continuing in St st, repeat Increase Row every 6 (6, 4, 4, 4) rows 2 (6, 1, 4, 8) more times, then every 8 (8, 6, 6, 6) rows 5 (2, 8, 6, 3) times—56 (60, 64, 68, 72) sts.
Work even until sleeve measures 15 (15¼, 14½, 14½, 14)” [38 (38.5, 37, 37, 35.5) cm]. Work Garter Welt pattern twice. Bind off.
FINISHING
Block pieces. With yarn needle, sew shoulder seams.
Collar
With right side facing, beginning at left shoulder, and using circular needle, pick up approximately 3 sts for every 4 rows and 1 st in every st around neck to a multiple of 6 sts – 84 (84, 90, 96, 102) sts. Place marker and join to work in rounds, being careful not to twist the sts.
Increase round: Kf&b in each st of round – 168 (168, 180, 192, 204) sts.
Work 2 x 4 Rib in the round until collar measures 10” [25.5 cm]. Bind off loosely in pattern.
With yarn needle, sew sleeves to body; sew side seams. Weave in all loose ends.

Read NextBig Comfy Ribbed Cardi Pattern
Your Recently Viewed Projects
Thanks for your comment. Don't forget to share!
schiebet
Mar 29, 2017
This is the first time I've seen this sweater. It looks really warm and feminine at the same time. I think I would really like it in just a plain cream. I would really like to do it in the round. Does anyone have any tips for converting a pattern from flat to round?
ladyhauch 5929549
Dec 03, 2016
I really wish that more of your patterns were PDFs. I would like this pattern to be in that easily printed format.Trying to print these types of patterns that are not pdf is sometimes frustrating, so for the most part as much as I like the pattern I will not print or save it. I also would like to know how to do this sweater in the round from the bottom up or top down. I do not like sewing pieces together! Thanks.
KathrynAllison
Dec 05, 2016
Hello ladyhauch 5929549! If you click the "Print" button directly under the name of the pattern, you will be able to access a printer-friendly version of the pattern. Hope this helps! -Editors of AllFreeKnitting
Report Inappropriate Comment
Are you sure you would like to report this comment? It will be flagged for our moderators to take action.
Thank you for taking the time to improve the content on our site.