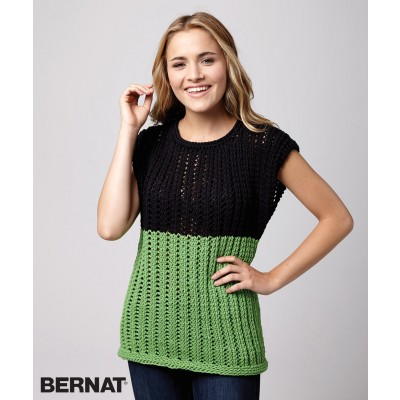
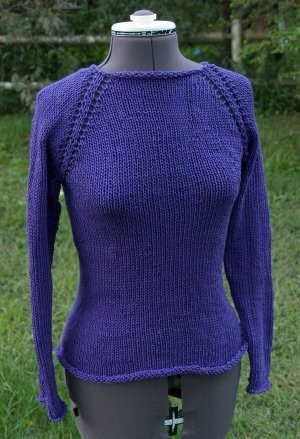
District 12 Sweater Pattern

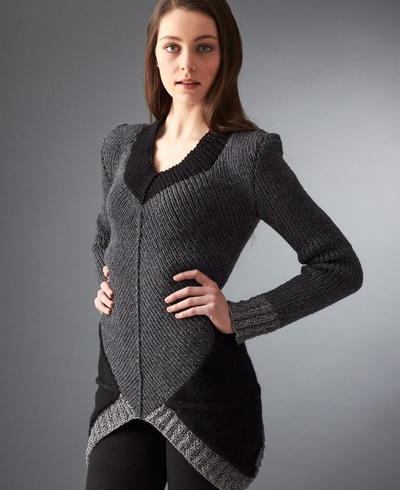
May the odds be ever in your favor when you knit this District 12 Sweater Pattern! The chic colorblocked design on this knit sweater pattern is perfect for fashionistas and classic ladies alike. The best part about free sweater patterns like this one is that it's worked in separate pieces, so you don't have to fuss with a yoke or other seamless knitting method. This gives you the freedom for more unique designs, like with this sweater. While we love the stylish black and gray coloring, try pastel colors for a more cheerful spring sweater.

Knitting Needle Size7 or 4.5 mm
Yarn Weight(3) Light/DK (21-24 stitches to 4 inches)
Gauge21 sts and 26 rows = 4" [10 cm] with Patons® Classic Wool DK™ in stocking st.
Finished SizeExtra-Small/Small: 28-34" [71-86.5 cm]; Medium: 36-38" [91.5-96.5 cm]; Large: 40-42" [101.5-106.5 cm]; Extra-Large 44-46": [112-117 cm]; 2/3X-Large: 48-54" [122-137 cm]; 4/5X-Large: 56-62" [142-157.5 cm
Materials List
- 2 stitch holders
- 2 stitch markers
-
Patons® Classic Wool DK™ (1.75 oz/50 g; 125 yds/114 m)
Main Color (MC): Dark Grey Heather (12042) - 7 (8, 9, 10, 11, 12) balls
Contrast A: Black (12040) - 2 (2, 2, 2, 3, 3) balls -
Patons® Metallic™ (3 oz/85 g; 252 yds/230 m)
Contrast B: Pewter (95044) - 1 (1, 1, 2, 2, 3) ball(s)
Sweater
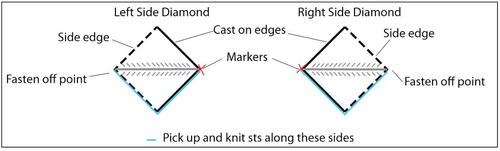
Side Diamonds (make 2)
With A, cast on 103 (117-131-131-131-131) sts. PM on 52nd (59th-66th-66th-66th-66th) stitch.
1st row: (RS). Knit to 2 sts before marked st. ssk. K1. PM on last st. K2tog. Knit to end of row.
2nd row: Purl to 2 sts before marked st. P2tog. P1. P2togtbl. Purl to end of row
3rd row: As 1st row.
4th row: Purl.
Rep last 4 rows until there are 7 (3-5-5-5-5) sts rem.
Sizes L, XL, 2/3XL and 4/5XL only:
Rep 1st row once more. 3 sts.
Next row: Sl2P. P1. P2sso. Fasten off.
Size XS/S only: Rep 1st and 2nd rows once more. 3 sts.
Sizes XS/S, M, XL, 2/3XL and 4/5XL only:
Next row: Sl2K. K1. P2sso. Fasten off.
-
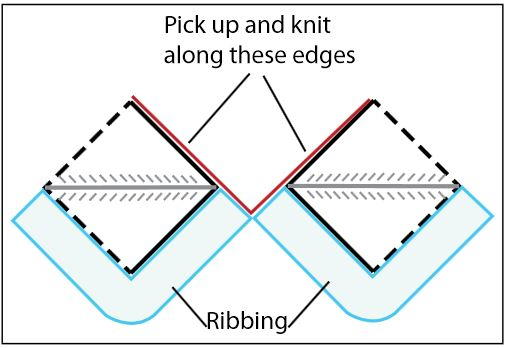
Ribbing for Left and Right Side Diamonds
Note: See diagram to pick up sts for Left and Right Side Diamonds.
With RS facing of Left Side Diamond and B, pick up and knit 105 (121-133-133-133-133) sts along cast on edge and side edge between marked st and fasten off point.
1st row: (WS). K2. *P1. K3. Rep from * to last 3 sts. P1. K2.
2nd row: *P1. K3. Rep from * to last st. P1.
Rep last 2 rows for Mistake Rib Pat until work from pick up row measures 3 (3-3-4 1/2-7-9)" [7.5 (7.5-7.5-11.5-18-23) cm], ending on a WS row. Cast off.
Rep for Right Side Diamond.
Front
**With RS facing and MC, pick up and knit 75 (83-92-101-117-134) sts down Right Side Diamond along cast on edge and side of ribbing. Cast on 1 st.
PM on center cast on st. Pick up and knit 75 (83-92-101-117-134) sts up side of ribbing and Left Side Diamond along cast on edge. 151 (167-185-203-235-269) sts.
1st row: (WS). *P1. K1. Rep from * to last st. P1.
2nd row: Sl1. M1. Work in (K1. P1) ribbing to 1 st before marked st. Sl2K. K1. P2sso. PM on last st. Work in (K1. P1) ribbing to last st. M1. K1.
3rd row: Sl1. M1P. Work in (K1. P1) ribbing to 1 st before marked st. Sl2P. P1. P2sso. Work in (K1. P1) ribbing to last st. M1P. P1.
Last 2 rows form Diagonal Rib Pat with side increases and center decreases. Cont in Diagonal Rib pat, until work from pick up row measures 12" [30.5 cm] along double decrease line, ending on a WS row.
-
Shape Armhole:
1st row: (RS). Cast off 5 (6-7-8-10-12) sts. Rib to 1 st before marked st. Sl2K. K1. P2sso (center marked st). Rib to end of row. 144 (159-176-193-223-255) sts.
2nd row: Cast off 5 (6-7-8-10-12) sts. Rib to marked st. Sl2P. P1. P2sso. Rib to end of row. 137 (151-167-183-211-241) sts.
3rd row: Sl1. Rib to 1 st before marked st. Sl2K. K1. P2sso (center marked st). Rib to end of row.
4th row: Sl1. M1. Rib to marked st. Sl2P. P1. P2sso. Rib to to last st. M1P. P1.
Rep last 2 rows 4 (5-6-6-8-8) times more. 127 (139-153-169-193-223) sts.
Next row: Sl1. M1. Rib to 1 st before marked st. Sl2K. K1. P2sso (center marked st). Rib to last st. M1. K1.
Next row: Sl1. Rib to marked st. Sl1P. Rib to end of row.**
Rep last 2 rows until armhole measures 5 (5-5 1/2-6-6 1/2-7)" [12.5 (12.5-14-15-16.5-18) cm], ending on a WS row. -
Shape Neck:
1st row: Sl1. M1. Rib 28 (30-32-34-36-38) sts. K2tog. Turn. Leave rem sts on a st holder.
2nd row: P2tog. Rib to end of row.
3rd row: Sl1. M1. Rib to last 2 sts. K2tog.
4th row: As 2nd row.
Rep last 2 rows 4 times more. 25 (27-29-31-33-35) sts.
Next row: (RS). Sl1. M1. Rib to last 2 sts. K2tog.
Next row: Sl1. Work in pat to end of row.
Rep last 2 rows until armhole measures 8 (8-8 1/2-9-9 1/2-10)" [20.5 (20.5-21.5-23-24-25.5) cm], ending on a WS row. Cast off.
With RS of work facing slip next 65 (73-83-95-115-141) sts onto a st holder. Join MC to rem sts and proceed as follows:
1st row: ssk. Rib to last st. M1. K1.
2nd row: Sl1. Rib to last 2 sts. P2togtbl.
3rd row: ssk. Rib to last st. M1. K1.
4th row: As 2nd row.
Rep last 2 rows 4 times more. 25 (27-29-31-33-35) sts.
Next row: (RS). ssk. Rib to last st. M1. K1.
Next row: Sl1. Pat to end of row.
Rep last 2 rows until armhole measures same length as Back before shoulder, ending on a RS row. Cast off.
Back
Work from ** to ** as given for Front, picking up sts along unworked edges of Left and Right Side Diamonds.
Rep last 2 rows, until armhole measures 8 (8-8 1/2-9-9 1/2-10)" [20.5 (20.5-21.5-23-24-25.5) cm], ending on a WS row.
-
Shoulder Shaping:
Cast off 25 (27-29-31-33-35) sts in pat beg next 2 rows. Leave rem 77 (85-95-107-127-153) sts on a st holder.
Sleeves
With B, cast on 49 (49-53-53-57-57) sts.
Work 4" [10 cm] in Mistake Rib Pat, inc 8 sts evenly across last row. 57 (57-61-61-65-65) sts. Break B.
With MC, work in (K1. P1) ribbing, inc 1 st each end of needle on 9th (7th-5th-5th-5th-3rd) and every following 10th (6th-6th-4th-4th-alt) row until there are 75 (81-65-65-93-81) sts, then every following 12th (8th-8th-6th-6th-4th) row until there are 77 (83-89-95-107-117) sts, taking inc sts into ribbing.
Cont even in rib until work from beg measures 18 (18-18 1/2-18-17 1/2-17)" [45.5 (45.5-47-45-44.5-43) cm], ending on a WS row.
-
Shape Top:
Cast off 3 (4-5-6-7-8) sts beg next 2 rows. 71 (73-79-83-93-101) sts.
Dec 1 st each end of needle on next and every following alt row until there are 35 (39-45-49-63-71) sts, then every row to 27 (27-29-29-31-31) sts. Cast off rem sts.
Finishing
Pin all garment pieces to measurements and cover with a damp cloth, leaving cloth to dry.
-
Neckband:
Sew right shoulder seam. With RS of work facing and A, pick up and knit 19 sts down left front neck edge. Rib 65 (73-83-95-115-141) sts from front st holder. Pick up and knit 19 sts up right front neck edge.
Rib 77 (85-95-107-127-153) sts from back st holder. PM at front and back center sts (where “Sl2K. K1. P2sso” were made). 180 (196-216-240-280-332) sts.
1st row: (WS). *Work in (K1. P1) ribbing as given for Back to 1 st before marked st. Sl2P. P1. P2sso. Rep from * once more. Rib to end of row.
2nd row: *Work in (K1. P1) ribbing to 1 st before marked st. Sl2K. K1. P2sso. Rep from * once more. Rib to end of row.
Rep last 2 rows until neckband from pick up row measures 3" [7.5 cm], ending on a WS row.
Cast off in ribbing.
Sew left shoulder and neckband seam. Sew in Sleeves. Sew side and Sleeve seams. -
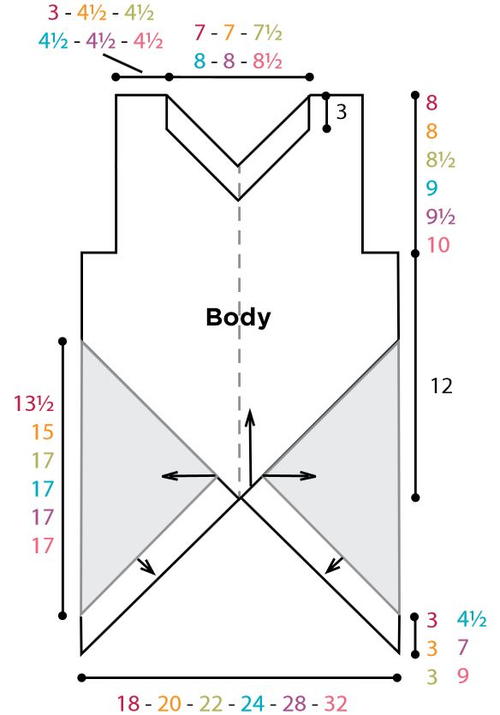
Body Diagram
-
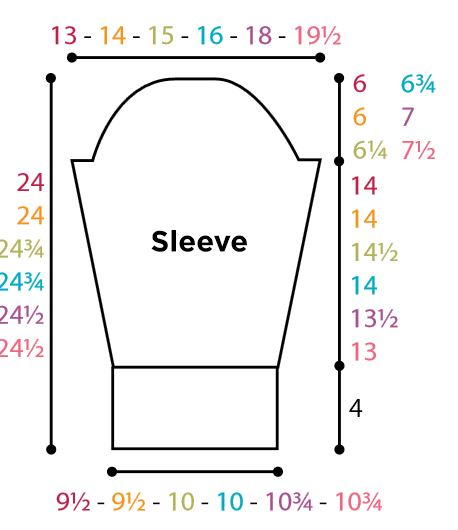
Sleeve Diagram
Abbreviations
- P2togtbl
- Purl next 2 stitches together through back loops
- P2sso
- Pass 2 slipped sts over
- Sl2k
- Slip next 2 stitches tog at a time, knitwise.
- Sl2p
- Slip next 2 stitches through back loops together at a time, purlwise.
- Ssk
- Slip next 2 stitches one at a time. Pass them back onto left-hand needle, then knit through back loops together.
- K2tog
- Knit next 2 stitches together
- P2tog
- Purl next 2 stitches together
- PM
- Place marker
Read NextOversized Garter Stitch Sweater
Your Recently Viewed Projects
Thanks for your comment. Don't forget to share!
helenp60 7848530
Jul 12, 2018
Clever design but the finished look is a bit odd, disjointed and rather clumsy looking for my taste. Think I'll give this one a miss.
lcarr
Mar 01, 2017
I have had this pattern for ages but have yet to make it. I love the fact it is made in pieces. It gives you so many options for colour, and helps to keep you from getting bored and moving on to another project. I really should get busy on this one!
evs2hui 5517848
Mar 19, 2016
I love the look but am tempted to change to a cardigan !! The colour combo is brilliant!!
rsdb
Mar 17, 2016
Simply stunning! The combination of black and grey go so well together!The sweater is a nice length that will look really good when worn with black slacks or skinny jeans. Knitting the sweater in smaller pieces and then sewing them together should make the project much easier to handle and work on. Has anyone tried making this sweater?
Report Inappropriate Comment
Are you sure you would like to report this comment? It will be flagged for our moderators to take action.
Thank you for taking the time to improve the content on our site.