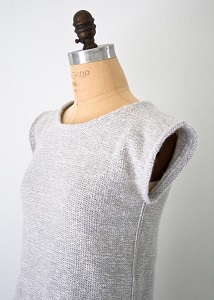
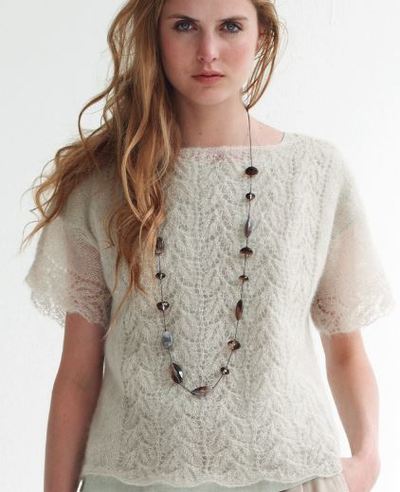
Audrey Hepburn Tunic
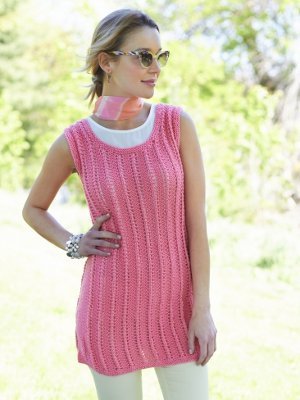
Channel the spirit of one of Hollywood's most iconic leading ladies in the Audrey Hepburn Tunic. This cute and casual tunic-style knit top pattern is perfect for lounging poolside, long summer drives along the ocean-side, or running a few quick errands. Featuring a darling eyelet stripe pattern, this light and airy knit top will keep you feeling pretty and poised all day long.

Knitting Needle Size6 or 4 mm, 8 or 5 mm, Circular Knitting Needles
Yarn Weight(4) Medium Weight/Worsted Weight and Aran (16-20 stitches to 4 inches)
Materials:
- Simply Soft (170 g/6. oz;288 m/315 yds); Main Color (MC) Strawberry (0015)
- One pair size US 8 (5mm) needles or size to obtain gauge
- One pair size US 6 (4mm) needles
- One circular size US 6 (4mm) 16"/40.5cm long
- Stitch markers
- Yarn needle
GAUGE
18 sts = 4"/10cm with larger needles in stockinette stitch.

MEASUREMENTS
Finished bust measurement
S 34 ins [86.5 cm]
M 40 ins [101.5 cm]
L 46 ins [116.5 cm]
XL 50 ins [127 cm]
2XL 56 ins [142 cm]
3XL 62 ins [157.5 cm]
Finished length measurement
S 30 ins [76 cm]
M 31 ins [78.5 cm]
L 31 ins [78.5 com]
XL 32 ins [81 cm]
2XL 32 ins [81 cm]
3XL 32 ins [81 cm]
PATTERN STITCH
Eyelet Stripes (multiple of 6 + 3)
Row 1 (RS) P3, *yo, k3tog tbl, yo, p3; repeat from * to end.
Row 2 *K3, p3; repeat from * to last 3 sts, k3.
Repeat Rows 1 and 2 for Eyelet Stripes pattern.
INSTRUCTIONS
NOTES
When working side, armhole and neck decreases, change stitch pattern to Reverse Stockinette stitch when there are not enough stitches to work a full pattern repeat.
BACK
Using smaller needles, CO 83 (101, 113, 119, 131, 143) sts. Knit every row for 1"/2.5 cm, ending after a WS row. Change to larger needles.
Next row (RS) K7, pm (place marker), work Eyelet Stripes pattern to last 7 sts, pm, k7.
Next row (WS) K7, work Eyelet Stripes to last 7 sts, k7.
Repeat last 2 rows until Back measures 4"/10cm from CO edge. Pm in each end of last row for seam placement.
Shape sides
Continue in Eyelet Stripes pattern, working first and last 7 sts in Reverse Stockinette st (p on RS, k on WS), dec 1 st at each end every 8th row 7 (10, 10, 10, 10, 10) times—69 (81, 93, 99, 111, 123) sts. Work even until Back measures 23 (23.5, 23, 23.5, 23, 22.5)"/58 (59.5, 58, 59.5, 58, 57)cm from CO edge.
Shape armholes
Continue in Eyelet Stripes, BO 4 (6, 8, 7, 9, 11) sts at beg of next 2 rows, then 2 sts at beg of next 2 (4, 6, 8, 10, 12) rows. Work even on 57 (61, 65, 69, 73, 77) sts until armhole measures 2 (2.5, 3, 3.5, 4, 4.5)"/ 5 (6, 7.5, 9, 10, 11)cm, ending after a WS row.
Shape neck
Next row (RS) Work in pattern across 21 (23, 25, 27, 29, 31) sts, join 2nd ball of yarn, BO center 15 sts, continue in pattern to end of row. Working both sides of neck at the same time with separate balls of yarn, BO 3 sts at each neck edge 3 times—12 (14, 16, 18, 20, 22) sts each side. Work even until armhole measures 7 (7.5, 8, 8.5, 9, 9.5)"/18 (19, 20.5, 21.5, 23, 24) cm. BO rem sts each side.
FRONT
Work same as Back.
FINISHING
Sew shoulder seams.
Armhole edging
With RS facing and smaller needles, pick up and k66 (74, 82, 90, 96, 106) sts along front and back armhole edge. Knit 4 rows. BO.
Sew side seams down to markers, leaving bottom slits open.
Neck edging
With RS facing, using circular needle, beginning at shoulder edge, pick up and k approximately 122 sts around neck edge. Place marker for beginning of round. *Purl 1 round. Knit 1 round. Repeat from * once. BO.
Using yarn needle, weave in ends.

Read NextAsymmetrical Rib Top
Your Recently Viewed Projects
Thanks for your comment. Don't forget to share!
Lisa
May 12, 2024
I've recently completed this pattern for the 2nd time, what I did find is that the "yo" before the purl stitch did walk, I suspect it walked because to do yo with purl stitches typically uses a yrn, so you are wrapping the yarn the other way so it's less likely to walk. I suspect this may be the issue with knitters that are losing stitches on the first pattern row. Hope this helps someone, happy knitting.
Hippie Chick
Mar 15, 2018
I see this pattern is rated for the Intermediate skill level knitter. The strawberry pink color is so pretty and so fitting for Spring and Easter. I am not sure if I would be able to make this before Easter, but I will make sure to save the pattern to work on for next year if I need a tunic top like this.
achumley0003 31706 34
Sep 01, 2017
This is one of those tunic tops I would wear all the time, so I would want one in every color. It is so cute and could be dressed up or down, depending on your plans and it is a classic enough design, so it will stay in style forever. Thank you for sharing another great pattern I wouldn't have found otherwise.
JacksonX3 1945160
Jul 19, 2017
Pretty-but I would do this tunic in a different colour. Maybe faded teal.
Gracie
May 05, 2017
This top is really cute and looks super comfortable and flattering. I'd love to make it, but I don't understand the instructions. What is "tbl"? I don't see any key to abbreviations. I also have no idea what reverse stockinette stitch is. Can someone explain that? (I know what stockinette stitch is, but not reverse stockinette stitch.).
alexa
May 05, 2017
Hi, it means "knit through the back loop". Reverse stockinette is purling on the right side and knitting on the wrong side (so the purl stitch is on the front). Good luck! )
The Designing Peng uin
May 06, 2016
Like the length and the flare - as someone said earlier it will fit nicely without 'scrunching up' when worn with pants or jeans and could be worn with leggings too - pattern seems straightforward and would look great in almost any colour - just wish it had sleeves sigh
quanahs 5032097
Mar 24, 2016
Pretty tunic in easy eyelet stripes and a great range of sizes to fit almost everyone. It's pretty enough to wear for an evening out and simple enough to use as a swimsuit coverup. The slightly flared shape means it should fit well over a pair of pants without scrunching up.
Member 9853054
Apr 17, 2015
I am having a problem as well. In the eyelet stripes...I have completed now three rows and my stitches have decreased from 101 stitches to 55 stitches. Is there something missing? I feel because we are knitting three together, there needs to be compensation for that. We knit three, but we aren't adding any stitches I'm still not coming back to 101 stitches that I started with. Any help would be appreciated.
Member 9853054
Apr 17, 2015
I found my problem...I was doing the yarn over wrong! - embarrassing-
marylarke 6814384
Apr 05, 2015
I have tried to leave 2 comments it does not go through. I will try again. After I completed Row 1 of Back, of the Audrey Hepburn Tunic, I went to next row under Back (WS) and ended up with 1 extra stitch. If I go to Row 2, under Pattern Stitch, I end up with 1 extra stitch. Please send instructions for this Tunic, because the instructions are not working and are not clear. I want the Tunic to look like the picture. Thanks
Lisa
Jul 16, 2021
The instructions are quite clear and the pattern is correct as written I see your question has sat here for years unanswered since this is an issue that could occur to any knitter I think I can help You are working two sets of instructions at this point you will work the instructions for the beginning and end of the row under back while working the instructions for the stripe pattern also Using the first row as an example with sts on need knit purl work yo k tog tbl yo p over the next sts knit to finish the row For clarity the yo k tog tbl yo p will be worked times across that row Following the directions exactly will keep the stitch count consistent from row to row in this section if you are really struggling with it you could place stitch markers every stitches after the border…Read More stitches and the P on row of the stripes pattern Hope this helps someone happy knitting
kaytea330 9676615
Jul 01, 2014
I have started this pattern and it is not looking at all like the pictures. The way I am reading this (and I am not the most experienced of knitters) there is no flat knitting between the ridges (stripe pattern). It says multiples of 6 and 3. Does this mean I should be doing the pattern for 6 or 3 and the stripe pattern of something else? I don't see any indication of what that something else should be
Editor AH
Jul 02, 2014
If you cast on the correct number of stitches at the beginning of the pattern [ 83 (101, 113, 119, 131, 143) sts], you do not need to worry about the 6+3 multiplier. That note is for knitters who wish to use the eyelet stripes pattern in other places, or who want to modify the pattern. If you need more in-depth help, most Local Yarn Stores are happy to assist with knitting problems. It is much easier to diagnose knitting mistakes in person. Editors of AllFreeKnitting
Report Inappropriate Comment
Are you sure you would like to report this comment? It will be flagged for our moderators to take action.
Thank you for taking the time to improve the content on our site.