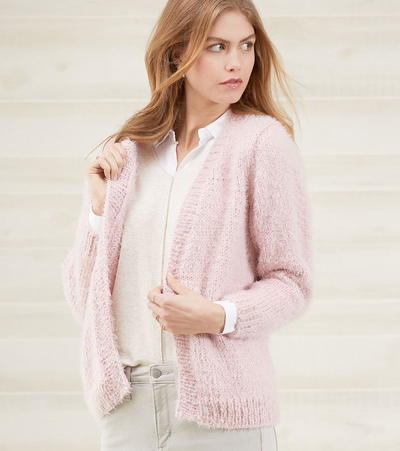
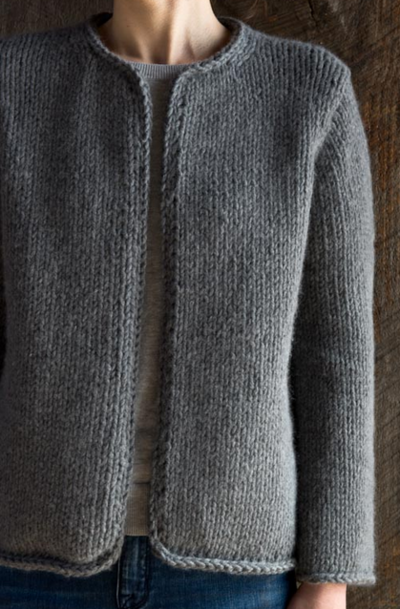
Moon Shadows Cardigan
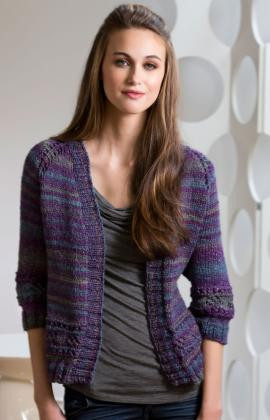
A simple cardigan can be one of the most versatile complementary pieces in your wardrobe. Perfect in the spring or winter, there whenever you need to chase away a chill, the cardigan is a lynchpin of the basic wardrobe. The Moon Shadows Cardigan will be a great addition to any outfit. Depending on your yarn choice, you can easily wear this knit sweater pattern in any season. The gorgeous lace knit border pattern of this cardigan make it tighter around the sleeve while the structure is still loose around the waist, meaning it will look fantastic on any body type.

Knitting Needle Size10 or 6 mm
Yarn Weight(4) Medium Weight/Worsted Weight and Aran (16-20 stitches to 4 inches)
MATERIALS
- RED HEART® Boutique Midnight®: 5 (5, 6, 7, 7) balls 1933 Aura
- Susan Bates® Knitting Needles: 6mm [US 10] circular needles, 29” (75 cm) and 16” (40 cm)
- Stitch markers
- stitch holders
- yarn needle
GAUGE: 16 sts = 4” (10 cm); 22 rows = 4” (10 cm) in Stockinette st (k on right side, p on wrong side).
CHECK YOUR GAUGE. Use any size needles to obtain the gauge.
Moon Shadows Cardigan Construction Diagram
INSTRUCTIONS
Directions are for size Small. Changes for sizes Medium, Large, 1X and 2X are in parentheses.
To Fit Bust: 34 (38, 42, 46, 50)” (86.5 (96.5, 106.5, 117, 127) cm)
Finished Bust: 36 (40, 44, 48, 52)” (91.5 (101.5, 112, 122, 132) cm)
Finished Length: 20 (20½, 21, 21½, 22½)” (51 (52, 53.5, 54.5, 57) cm)
Special Stitches
M1L (Make 1 Left Increase) = Insert left needle from front to back under strand between needles, knit strand through the back loop, twisting it to prevent a hole.
M1R (Make 1 Right Increase) = Insert left needle from back to front under strand between needles, knit strand through the front loop, twisting it to prevent a hole.
ssk = Slip next 2 stitches, one at a time as if to knit, to right needle, insert point of left needle through front of sts, knit these sts together through back loops.
Pattern Stitches
Lace Border Pattern (multiple of 8 sts)
Rows 1–3: Knit.
Row 4 (WS): P1, *p2tog, yo; repeat from * to last st, p1.
Rows 5 and 6: Knit.
Row 7: K3, *yo, ssk, k6; repeat from * to last 5 sts, yo, ssk, k3.
Rows 8: Purl.
Row 9: K2, *[yo, ssk] 2 times, k4; repeat from * to last 6 sts, [yo, ssk] 2 times, k2.
Row 10: Purl.
Row 11: K1, *[yo, ssk] 3 times, k2; repeat from * to last 7 sts, [yo, ssk] 3 times, k1.
Row 12: Purl.
Rows 13 and 14: Repeat Rows 9 and 10.
Row 15: Repeat Row 7.
Rows 16 and 17: Knit
Rows 18–20: Repeat Rows 4–6.
Lace Border Pattern in the Round
(multiple of 8 sts)
Round 1: Knit.
Round 2: Purl.
Round 3: Knit.
Round 4: K1, *k2tog, yo; repeat from * to last st, k1.
Round 5: Knit.
Round 6: Purl.
Round 7: K3, *yo, ssk, k6; repeat from * to last 5 sts, yo, ssk, k3.
Round 8: Knit.
Round 9: K2, *[yo, ssk] 2 times, k4; repeat from * to last 6 sts, [yo, ssk] 2 times, k2.
Round 10: Knit.
Round 11: K1, *[yo, ssk] 3 times, k2; repeat from * to last 7 sts, [yo, ssk] 3 times, k1.
Round 12: Knit.
Rounds 13 and 14: Repeat Rounds 9 and 10.
Round 15: Repeat Round 7.
Round 16: Purl.
Round 17: Knit.
Rounds 18–20: Repeat Rounds 4–6.
Note: Cardigan is worked in one piece beginning at neck edge. Piece is divided at underarms and body and sleeves worked separately down to lower edges.
YOKE
With longer needle, cast on 46 (48, 54, 56, 58) sts.
Set-Up Row (wrong side): P1, place marker, p1, place marker, p8 (8, 10, 10, 10), place marker, p1, place marker, p24 (26, 28, 30, 32), place marker, p1, place marker, p8 (8, 10, 10, 10), place marker, p1, place marker, p1. In all following rows, slip markers as you come to them.
Row 1 (neck and raglan increase – right side): K1, M1R, yo, slip marker, k1, slip marker, yo, [knit to marker, yo, slip marker, k1, slip marker, yo] 3 times, M1L, k1—56 (58, 64, 66, 68) sts.
Row 2: Purl.
Row 3 (raglan increase only): [Knit to marker, yo, slip marker, k1, slip marker, yo] 4 times, knit to end of row—64 (66, 72, 74, 76) sts.
Row 4: Purl.
Rows 5–24 (32, 32, 40, 48): Repeat last 4 rows 5 (7, 7, 9, 11) more times—154 (192, 198, 236, 274) sts.
Sizes Small (Medium) Only
Row 25 (33) (neck increase only): K1, M1R, knit to last st, M1L, k1—156 (194) sts.
Row 26 (34): Purl.
Row 27 (35) (raglan increase only): [Knit to marker, yo, slip marker, k1, slip marker, yo] 4 times, knit to end of row—164 (202) sts.
Row 28 (36): Purl.
Rows 29 (37)–44 (48): Repeat last 4 rows 4 (3) times—204 (232) sts.
Sizes Large (1X, 2X) Only
Rows 33 (41, 49) and 34 (42, 50): Repeat Rows 1 and 2—208 (246, 284) sts.
Row 35 (43, 51): Knit.
Row 36 (44, 52): Purl.
Row 37 (45, 53) and 38 (46, 54): Repeat Rows 1 and 2—218 (256, 294) sts.
Rows 39 (47, 55)–50 (54, 58): Repeat last 4 rows 3 (2, 1) more times—248 (276, 304) sts.
All Sizes
Work even in Stockinette st until piece measures 8½ (9, 9½, 10, 11)” (21.5 (23, 24, 25.5, 28) cm), end with a wrong side row.
Divide for Armholes
Dividing Row (right side): Removing markers as you come to the, k30 (34, 36, 40, 44) sts for left front, slip 42 (48, 52, 58, 64) sts to holder for left sleeve, cast on 12 (12, 16, 16, 16) sts for left underarm, k60 (68, 72, 80, 88) sts for back, slip 42 (48, 52, 58, 64) sts to holder for right sleeve, cast on 12 (12, 16, 16, 16) sts for right underarm, k30 (34, 36, 40, 44) sts for right front—144 (160, 176, 192, 208) sts remain on needle for body.
BODY
Work even in Stockinette st until body measures 6” (15 cm) from underarms, end with a wrong side row.
Work Rows 1-20 of Lace Border pattern.
Work even in Stockinette st until body measures 10” (25.5 cm) from underarms, end with a wrong side row.
Next Row (right side): K3, p2, *k2, p2; repeat from * to last 3 sts, k3.
Next Row: P3, k2, *p2, k2; repeat from * to last 3 sts, p3.
Repeat last 2 rows until body measures 11½” (29 cm) from underarms, end with a wrong side row.
Bind off in pattern.
SLEEVES (work 2)
With right side facing and shorter needle, beginning at center of underarm, pick up and k6 (6, 8, 8, 8) sts across cast-on edge of underarm, k42 (48, 52, 58, 64) sts from holder, pick up and k6 (6, 8, 8, 8) sts across cast-on edge of underarm—54 (60, 68, 74, 80) sts. Place marker for beginning of round. Prepare to work in the round.
Next Round: Knit.
Decrease Round: K2tog, knit to 2 sts before marker, ssk—52 (58, 66, 72, 78) sts.
Repeat last 2 rounds 6 (9, 10, 7, 4) more times—40 (40, 46, 58, 70) sts.
Repeat Decrease Round 0 (0, 3, 9, 15) times—40 sts.
Work Rounds 1-20 of Lace Border pattern in the Round.
Next 6 Rounds: Knit.
Note: Sleeve should measure about 7½ (8½, 9½, 9½, 9½)” (19 (21.5, 24, 24, 24) cm) from underarm.
Ribbing
Next Round: *K2, p2; repeat from * around.
Repeat last round until ribbing measures about 1½” (4 cm). Bind off.
FINISHING
Front and Neck Bands
Row 1 (right side): With right side facing and longer needle, beginning at lower right front corner, pick up an k54 sts across right front edge, 33 (34, 35, 36, 39) sts across right front neck edge, 8 (8, 10, 10, 10) across top of right sleeve, 28 (30, 32, 34, 36) sts across back neck, 8 (8, 10, 10, 10) sts across top of left sleeve, 33 (34, 35, 36, 39) sts across left front neck edge, and 54 sts across left front edge—218 (222, 230, 234, 242) sts.
Row 2: P2, *k2, p2; repeat from * to end of row.
Row 3: K2, *p2, k2; repeat from * to end of row.
Repeat last 2 rows until band measures about 1½” (4 cm), end with a wrong side row.
Bind off in pattern.
Weave in ends.
Read NextMidtown Cardigan
Your Recently Viewed Projects
Thanks for your comment. Don't forget to share!
melissasea22
Jul 21, 2018
I know for a fact the yarn used for this is not available anymore but it is listed here as a bulky? This yarn is NOT A BULKY YARN. This is where some of you ladies got this sized wrong. Not your faults! This yarn is a Aran (8 wpi) weight yarn, AKA US #4 worsted.
Lisa
Apr 14, 2024
This is why due diligence is so important in knitting, this yarn was indeed worsted weight, not understanding the comment of 8 WPI since that would be bulky, worsted is 9-12 WPI. This yarn went out of production over 10 years ago.
Hippie Chick
Feb 07, 2018
The lacey border at the bottom of the sleeves and main sweater is very lovely. It does a lot to add to an otherwise plain cardigan. This looks like a great daily sweater to wear with a pair of jeans or for casual Friday at work if your office allows this. Red Heart Boutique yarn is no longer available.
louisemccall7 6470 717
Nov 06, 2017
Hello. Bit of a learning curve here! I ve just started the Moon Shadows cardigan. Have done the first 4 rows. on starting the 5th row I have 5 and 3 stitches respectively before meeting the marker, and 2 sts between markers when it appears from the pattern there should only be one. Please clarify this as I m keen to get on with this nice project. Thanks, L
lggilman
Mar 08, 2017
I have started this sweater in size large and have just completed Row 4. I have the correct amount of stitches but when I begin Row 5 which I believe is Row 1 repeated, after I K1, M1R,YO there is no marker until 3 more stitches. Do I just knit until I reach the next marker and then pick up the pattern? I'm confused.
kathleenltmr13 527 1978
Apr 20, 2016
I have knitted this sweater in size large is way too big! The sleeves started at the elbows. I believe there is a flaw in the pattern. I'm planning on ripping it out,is not wearable!
Jacquie
Feb 25, 2017
I'm knitting the large and am just at the end of the yoke. I have the right number of stitches and have two more rows to do to reach the stated 9 1/2". If yours was down to your elbows either you made a fairly major mistake or your tension was way out. As you posted nearly a year ago, I hope you managed to get the problem sorted out and now have a lovely garment to wear.
PMTammaro 2029264
Feb 27, 2016
In the comments on this pattern it says depending on the yarn you use you can wear this sweater all year. Is there a pattern for a lighter weight yarn such as worsted or DK?
safdrn 3613963
Oct 02, 2015
How many yards of yarn are needed?
Kristina K
Oct 02, 2015
Hi, safdrn. That depends on the size you are knitting. For a small or medium cardigan, you will need approximately 765 yards, for a large, you will need approximately 918 yards, for an extra large or 2XL, you will need approximately 1,071 yards. I hope this helps. Happy knitting! -The Editors of AllFreeKnitting
smyers413 3171887
Aug 13, 2015
pattern calls for circular needles but I notice the beginning refers to working in rows not rounds. so then I need both straight needles and circular needles?
Samantha M
Aug 13, 2015
Good question! You can work any project on circular needles like on straight needles (just move back and forth to create the rows), but because they provide more room, circular needles tend to work better for larger projects like this one. Hope that helps! -Editors, AllFreeKnitting
Dildacurtis 655609 8
Sep 11, 2014
I am working on this sweater but need some help on the directions for Dividing for Armholes. I have knitted 34 stitches (K34) sts for left front, and slipped (48) sts on a holder for left sleeve. I am not sure about the casting on of 12 stitches for left underarm. Do I need to knit the (48 sts) that I put on the holder before I cast on the 12 stitches?
summerrain206 2718 746
Sep 12, 2014
You just continue as follows - put 48sts on holder, than get back to your right needle and cast on 12 stitches (they will be positioned above those 48 sts on holder), then knit 68sts for the back of the cardi, and repeat the same "put on hold, cast on" manipulation for right sleeve, knit 34 sts, end of row. Long story short - once you started on one side, you just keep going to the end of the row. Hope it helps :)
jeanettefurey 9905 405
Sep 25, 2013
what I mean is how many cast on stitches for row 1 on first page?? isn't that where I start pattern. never saw a pattern without being told how many stitches I would put on the needle!!!
hamneggs
Oct 31, 2013
The cast on is right under the YOKE (where the pattern actually begins after stitch explanations) "With longer needle, cast on 46 (48, 54, 56, 58) sts."
jeanettefurey 9905 405
Sep 25, 2013
you did not give cast on stiches instructions to start the sweater
jeanettefurey 9905 405
Sep 25, 2013
this pattern does not show the cast on stitches how many stitches shd I cast on to start this sweater on 10 circular needles??answer asap please
Lisa
Jul 27, 2014
Ladies, I implore you to read the pattern in its entirety, of course it tells you how many stitches to cast on-you can't just skim the pattern and expect to have any kind of success with it.
JudyVanderhoven
Aug 06, 2013
I have a problem knitting row 5 of the yoke. It says to just repeat row 1, but then I have stitches leftover. Can you give me row 5? I am knitting the smallest size. Thank you
Lisa
Sep 14, 2013
Row 5, you would use row 1, because you start the repeat of rows 1-4 here. So row 5 should be: K1, M1R, yo, slip marker, k1, slip marker, yo, [knit to marker, yo, slip marker, k1, slip marker, yo] 3 times, M1L, k156 (58, 64, 66, 68) sts So, you should have 56 sts. on the needle for the smallest size, if you have more than 56 sts. check your previous row, you may have a mistake.
Report Inappropriate Comment
Are you sure you would like to report this comment? It will be flagged for our moderators to take action.
Thank you for taking the time to improve the content on our site.