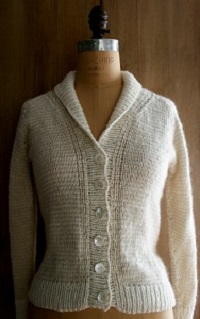
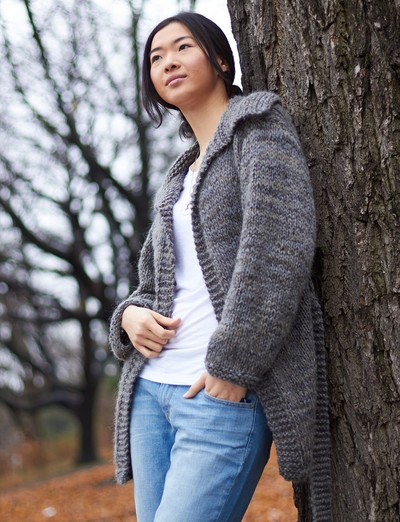
Cocoon Cardigan

Wrap yourself up in warmth like the caterpillar wraps himself in a cocoon with a Cocoon Cardigan. Like the caterpillar, emerge in the springtime revitalized and transformed. There's no reason to fear the winter chill with knit cardigans like these. We're sure this gorgeous moss-stitch cardigan will become a quick favorite. It has a clean, classic look that will have you reaching for it in your closet every chilly, wintry morning. The pale gray-teal coloring is flattering on any skin tone, but the classic look of this cardigan can accommodate any color.

Knitting Needle Size10 or 6 mm, 10.5 or 6.5 mm, Circular Knitting Needles
Yarn Weight(5) Bulky/Chunky (12-15 stitches for 4 inches)
Gauge12 sts and 16 rows = 4" [10 cm] with larger needles in stocking stitch.
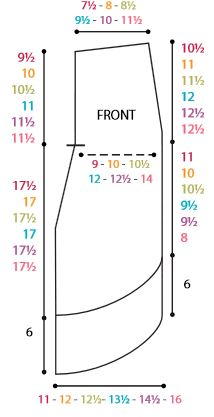
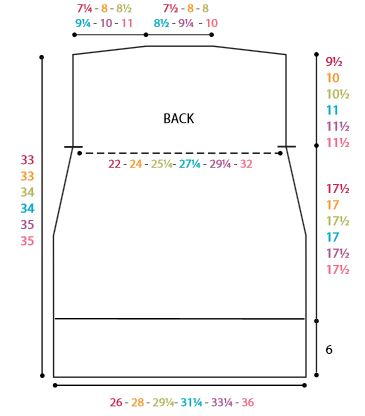
Finished SizeTo fit bust measurement: Extra-Small/Small: 28-34" [71-86.5 cm]; Medium: 36-38" [91.5-96.5 cm]; Large: 40-42" [101.5-106.5 cm]; Extra-Large: 44-46" [112-117 cm] 2/3 X-Large: 48-54" [122-137 cm]; 4/5 X-Large: 56-62" [142-157.5 cm]. Finished bust: Extra-Sm
Materials List
- Bernat® Roving™ (3.5 oz/100 g; 120 yds/109 m) Low Tide (00098) - 9, 10, 11, 12, 13, 14 balls
- Sizes U.S. 10 (6 mm) and U.S. 10 1/2 (6.5 mm) knitting needles.
- Size U.S. 10 (6 mm) circular knitting needle 40" [101.5 cm] long or size needed to obtain gauge.
- 2 stitch markers
Instructions
The instructions are written for smallest size. If changes are necessary for larger size(s) the instructions will be written thus ( ).
BACK
With larger needles, cast on 78 (84-88-94-100-108) sts.
1st row: (RS). K1. *K1. P1. Rep from * to last st. K1.
2nd row: P1. *K1. P1. Rep from * to last st. P1.
3rd row: K1. *P1. K1. Rep from * to last st. K1.
4th row: P1. *P1. K1. Rep from * to last st. P1.
These 4 rows form Irish Moss St Pat.
Cont in Irish Moss St Pat until work from beg measures 8 1/2" [21.5 cm], ending on a WS row.
Keeping cont of pat, dec 1 st at each end of next row and every following 10th row 5 times more. 66 (72-76-82-88-96) sts.
Cont even in pat until work from beg measures 27 (27-28-28-29-29) " [68.5 (68.5-71-71-73.5-73.5) cm], ending on a WS row.
-
Shape shoulders:
Cast off 7 (8-8-9-10-11) sts at beg of next 4 rows, then 8 (8-10-10-10-11) sts at beg of following 2 rows.
Cast off rem 22 (24-24-26-28-30) sts.
RIGHT FRONT
With larger needles, cast on 6 sts.
Work 2 rows in Irish Moss St Pat as given for Back.
Cont in pat, cast on 2 sts at beg of next 8 (6-6-5-5-3) RS rows, then cast on 3 sts at beg of following 4 (6-4-4-2-3) RS rows, taking inc sts into pat.
Sizes L, XL, 2/3XL and 4/5XL only:
Cast on 4 sts at beg of next 2 (3-3-3) RS rows.
Sizes 2/3XL and 4/5XL only:
Cast on 5 sts at beg of next 2 (3) RS rows.
All sizes:
Place marker at beg of last row. 34 (36-38-40-44-48) sts.
Cont even in pat until work from original cast on edge measures 8 1/2" [21.5 cm], ending on a WS row.
-
Shape side:
Keeping cont of pat, dec 1 st at end (side seam) of next RS row and every following 10th row 5 times more. 28 (30-32-34-38-42) sts.
Cont even in pat until work from original cast on edge measures 17 1/2 (17-17 1/2-17-17 1/2-17 1/2) " [44.5 (43-44.5-43-44.5-44.5) cm], ending on a WS row. -
Shape neck:
Keeping cont of pat, dec 1 st at beg of next row (neck edge) and every following 6th row 5 (5-5-5-7-7) times more. 22 (24-26-28-30-34) sts.
Cont even in pat until work from original cast on edge measures 27 (27-28-28-29-29) " [68.5 (68.5-71-71-73.5-73.5) cm], ending on a RS row. -
Shape shoulder:
Cast off 7 (8-8-9-10-11) sts at beg of next and following alt row.
Work 1 row even in pat. Cast off rem 8 (8-10-10-10-12) sts.
LEFT FRONT
With larger needles, cast on 6 sts.
Work 3 rows in Irish Moss St as given for Back.
Cont in pat, cast on 2 sts at beg of next 8 (6-6-5-5-3) WS rows, then cast on 3 sts at beg of following 4 (6-4-4-2-3) WS rows, taking inc sts into pat.
Sizes L, XL, 2/3XL and 4/5XL only:
Cast on 4 sts at beg of next 2 (3-3-3) WS rows.
Sizes 2/3XL and 4/5XL only:
Cast on 5 sts at beg of next 2 (3) WS rows.
All sizes:
Place marker at beg of last row. 34 (36-38-40-44-48) sts.
Cont even in pat until work from original cast on edge measures 8 1/2" [21.5 cm], ending on a WS row.
-
Shape side:
Keeping cont of pat, dec 1 st at beg of next RS row (side seam) and every following 10th row 5 times more. 28 (30-32-34-38-42) sts.
Cont even in pat until work from original cast on edge measures 17 1/2 (17-17 1/2-17-17 1/2-17 1/2) " [44.5 (43-44.5-43-44.5-44.5)cm], ending on a WS row. -
Shape neck:
Keeping cont of pat, dec 1 st end of next row (neck edge) and every following 6th row 5 (5-5-5-7-7) times more. 22 (24-26-28-30-34) sts.
Cont even in pat until work from original cast on edge measures 27 (27-28-28-29-29) " [68.5 (68.5-71-71-73.5-73.5) cm], ending on a WS row. -
Shape shoulder:
Cast off 7 (8-8-9-10-12) sts at beg of next and following alt row.
Work 1 row even in pat. Cast off rem 8 (8-10-10-11-11) sts.
SLEEVES
With smaller needles cast on 42 (42-42-47-47-47) sts.
1st row: (RS). K1. *K1. Sl1P. K1. P2. Rep from * to last st. K1.
2nd row: P1. *K2. P3. Rep from * to last st. P1.
Rep last 2 rows Slip St ribbing until work from beg measures 3" [7.5 cm], ending on a WS row and inc 0 (0-0-1-1-1) st in center of last row. 42 (42-42-48-48-48) sts.
Proceed in Irish Moss St Pat as given for Back, inc 1 st at each end of following 6th (6th-4th-6th-4th-4th) rows to 58 (60-64-66-70-70) sts, taking inc sts into pat.
Cont even in pat until work from beg measures 18 1/2 (18 1/2-18-18-17 1/2-17 1/2) " [47 (47-45.5-45.5-44.5-44.5) cm], ending on a WS row.
Cast off.
FINISHING
Pin pieces to measurements.
Cover with a damp cloth, leaving cloth to dry.
Sew shoulder seams. Place markers on sides of Fronts and Back 9 1/2 (10-10 1/2-11-11 1/2-11 1/2) " [24 (25.5-26.5-28-29-29)cm] down from shoulder seams. Sew in Sleeves between markers. Sew side and sleeve seams.
-
Bottom Ribbing:
With circular needle, RS facing and beg at Left Front marker, pick up and knit 32 (34-37-39-44-47) sts down shaped Left Front edge, 78 (84-88-94-99-108) sts across cast on edge of Back and 32 (34-37-39-44-47) sts up shaped edge of Right Front to marker. 142 (152-162-172-187-202) sts.
1st row: (WS). K2. *P3. K2. Rep from * to end of row.
2nd row: P2. *K1. Sl1P. K1. P2. Rep from * to end of row.
Rep last 2 rows until ribbing measures 6" [15 cm], ending on a WS row. Cast off in ribbing. -
Collar:
With circular needle and RS facing, pick up and knit 50 (49-49-47-43-42) sts up Right Front to beg of neck shaping, 32 (32-35-36-39-39) sts up Right Front neck edge, 23 (25-24-26-28-30) sts across back neck edge, 32 (32-35-36-39-39) sts down Left Front neck edge and 50 (49-49-47-43-42) sts down Left Front edge. 187 (187-192-192-192-192) sts.
1st row: (WS). K2. *P3. K2. Rep from * to end of row.
2nd row: P2. *K3. P2. Rep from * to end of row.
Rep last 2 rows 7 times more. -
Shape Shawl Collar:
1st row: (WS). Rib 135 (135-140-140-140-140) sts. W&T.
Leave rem sts unworked.
2nd row: Rib 83 (83-88-88-88-88) sts. W&T.
3rd row: Rib to 2 st before previously wrapped st. W&T.
Rep last row 13 times more. 55 (55-60-60-60-60) sts rem.
Next row: (WS). Rib to end of row, working sts and loops tog on wrapped sts to prevent 'gaps'.
Cast off all sts loosely in rib.

Abbreviations
- K
- Knit
- K2tog
- Knit next 2 stitches together
- P
- Purl
- Sl1P
- Slip next stitch purlwise
- W&T (Right Side Rows)
- Bring yarn to front of work. Slip next stitch purlwise. Bring yarn to back of work. Slip stitch back onto left-hand needle. Turn.
- W&T (Wrong Side Rows)
- Bring yarn to back of work. Slip next stitch purlwise. Bring yarn to front of work. Slip stitch back onto left-hand needle. Turn.
- Yo
- Yarn over
Read NextCabled Mustard Knit Cardigan Pattern
Your Recently Viewed Projects

Thanks for your comment. Don't forget to share!
Eve1950
Feb 19, 2021
I am doing the smallest size and have completed the back as per pattern but it does not mention place markers for the back, at what point are these to be placed? I am now doing the right front and have completed the decrease for the shaping and have the required 28 stitches, however, it tells me to continue without further shaping to 17.5 inches but my work is already 20 inches long, what has gone wrong?
dasajoma 8926465
Feb 23, 2021
I also reached 17.5 inches before I finished the side shaping when I made the large size. I just began the neck shaping in the next row after I finished the side shaping then knit as directed to reach the final length dimension.
Lisa
Apr 18, 2021
If you are arriving at the size measurements too early after shaping, then you have a gauge issue with the yarn you are using. Double check your gauge and be very careful to maintain it throughout the pattern.
kpas 2532856
Mar 31, 2020
I have a problem doing to increases on the Right front (and presumably left front) for size 3. It starts with 6 st, knit 2 rows in Irish Moss st, then increase 2 st, every RS, 6 times. (612 st). Then increase 3 st every RS, 4 times. (61212st=30 st). Then it gives instructions for increases for the following sizes, but I cannot see increases for Medium/3rd size? Sizes L, XL, 2/3XL and 4/5XL only Cast on 4 sts at beg of next 2 (3-3-3) RS rows. Sizes 2/3XL and 4/5XL only Cast on 5 sts at beg of next 2 (3) RS rows. All sizes Place marker at beg of last row. 34 (36-38-40-44-48) sts. How do I achieve 38 st, as shown above?
Lisa
Apr 03, 2020
The 3rd size is not medium it is large, so you should be using the instructions for the L size. So, you will start with 6 stitches, do 6 increases of 2 stitches, 12 stitches increased, then do the 4 increases of 3 stitches,12 stitches increased, then the next line is 4 stitch increase 2 times, so your row will be 612128=38 stitches total. I think the problem is in the third set of increases, since you believed you were doing medium and it is marked large for that increase section.
sahl1958 2058155
Mar 19, 2018
Hi if you have any problems with a pattern, go to dummies.com. Just type in knit and different categories for knitting comes up, like.....knit wrap/ for beginers/ etc etc It tells you how to wrap and turn. Its also useful for other things theirs a huge list of topics in the browse topics. Anyway hope this helps someone.
achumley0003 31706 34
Nov 26, 2017
I really like the design of this cocoon cardigan better than others I have seen. Most of them use the shrug shape (a rectangle) and make it extra large and I have seen some cute ones done this way, but, I always kind of felt that they are impractical. The whole point of the cocoon cardigan is to be like a comfy blanket that you wear, but all of that excess fabric seems like it would be in the way if you wore it out of the house . This one is made more like a traditional cardigan, but a little baggier.
RachelAnne
Feb 03, 2017
I don't have the skills for this yet, but I can't wait to try it someday! I love the color and the stitch pattern. Lovely.
The Designing Peng uin
May 09, 2016
A great pattern for spring and early fall when it is not warm enough for short sleeves or sleeveless and not cold enough for jackets - and very attractive too. Interesting pattern with loops and turn stitches and the Irish moss stitch adding texture
nutritionmuse
Mar 24, 2016
can anyone explain the last row of ribbing? Knit to end then the next row bind off? THere are still loops and stitches of wraps and turns to contend with. Do I just knit into the loop as I bind off? Thanks! So frustrated....I have an otherwise perfect sweater and now messed up the last row trying to unknit w t!! AT the very last row no less. )
Lisa
Mar 31, 2016
Its part of the wrap and turn stitch, you will be working the loops and stitch together, similar to k2tog to prevent little wholes from forming all the way across the row, difficult to explain here but if you google wrap and turn prevent holes, I'm certain you'll find a much better explanation than mine. Happy knitting.
rsdb
Mar 22, 2016
What a great name for a sweater - the word cocoon makes me want to curl up in this cozy sweater and read a book! The Irish moss pattern seems to make the sweater all fluffy and soft. And also love that the pattern is made up of only four rows!
Cherie_1809
Dec 02, 2015
"Keeping cont of pat, dec 1 st at each end of next row and every following 10th row 5 times more. 66 (72-76-82-88-96) sts." could you please pretty please explain the last part about the 10th row and 5 times more what?
Lisa
Mar 31, 2016
You will decrease 1 stitch at the end of the next row and each 10th row after the initial decrease 5 more times, so your decrease in this section will occur on the next row, the 10th row, the 20th row, the 30th row, the 40th row and the 50th row-between row 1 and row 51 you will decrease 6 stitches in total from the original stitch count bringing you down to the numbers in the round brackets after the instructions to do this. Hope this helps someone, happy knitting.
wychewood 1804924
Nov 26, 2015
what does wrap and turn mean, how is it done? I love the Cocoon pattern
knithard
Oct 30, 2015
This looks like the kind of pattern fat people make to hide the fact they are large, which only makes them look bigger and bulkier. Big, loose, and baggy makes you look big, loose, and baggy.
The Designing Peng uin
May 09, 2016
why, thank you. I happen to wear these sweaters because they are warm and comfortable as jacket substitutes in the time between jacket weather and short sleeve weather - and no one is going to call me fat or large -- the term usually used is underweight or too thin -- and worse, scrawny. Today I can say that someone called me fat, baggy, large, and bulky. You have made my day, but may have hurt a lot of other people.
Lisa
Oct 15, 2015
The yarn is actually a 6 weight, but I love it and shall find it and make this one for sure!
Report Inappropriate Comment
Are you sure you would like to report this comment? It will be flagged for our moderators to take action.
Thank you for taking the time to improve the content on our site.