Cabled Baby Cardigan Sweater
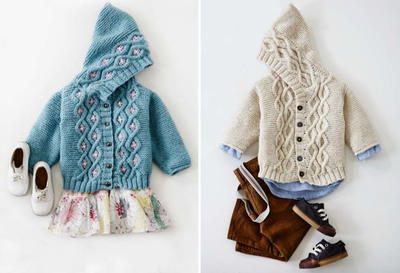
Knit the baby boy and girl adorably classic matching cardigans!
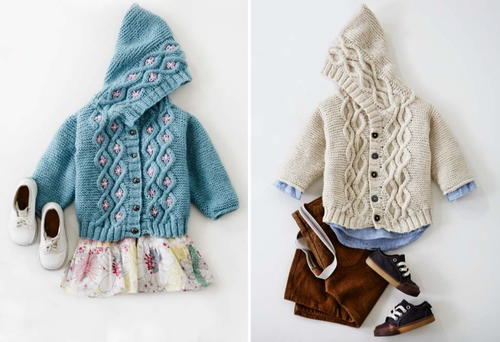
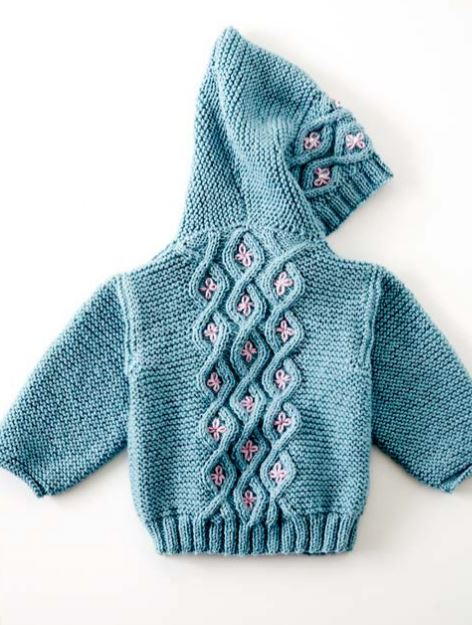
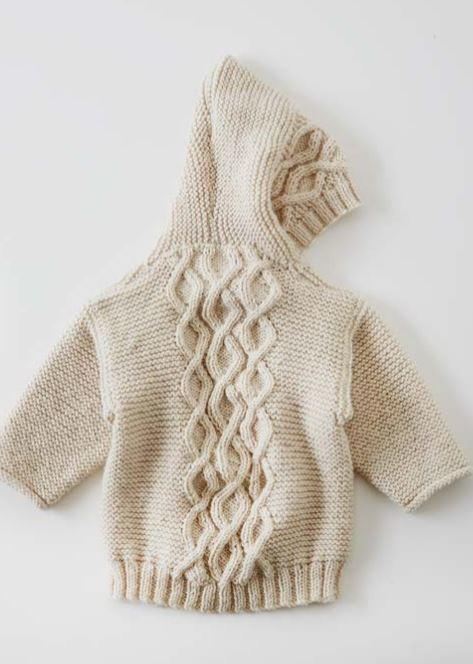
If you have a set of twins coming, you won't find cuter baby sweaters to knit than this Cabled Baby Cardigan Sweater set. The blue cardigan with the little flower embroideries is perfect for girls, and the cream, plain one is an instant classic for boys. The adorable little hood negates the need for a knit baby hat and makes it a perfect layering item for babies in the more volatile autumn and spring months. While the cables may seem complicated, just a little bit of practice and these baby cardigans will be a breeze.

Knitting Needle Size6 or 4 mm, 7 or 4.5 mm, Circular Knitting Needles
Yarn Weight(4) Medium Weight/Worsted Weight and Aran (16-20 stitches to 4 inches)
Gauge19 sts and 36 rows = 4” [10 cm] with larger needles in garter st.
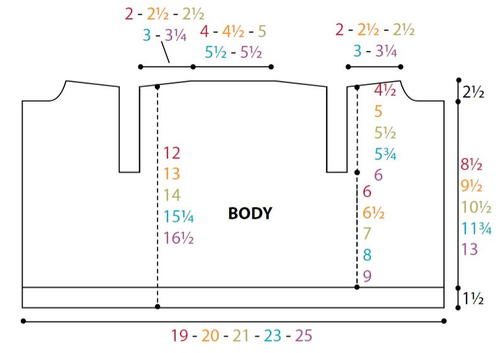
Finished SizeSizes to fit chest measuremen: 6 mos - 17" [43 cm]; 12 mos - 18” [45.5 cm]; 18 mos - 19” [48 cm]; 2 yrs - 21” [53.5 cm]; 4 yrs - 23” [58.5 cm]. Finished chest: 6 mos - 19” [48 cm]; 12 mos - 20” [51 cm]; 18 mos - 21” [53.5 cm]; 2 yrs - 23” [58.5 cm]; 4 yrs
Materials List
-
Patons Canadiana (3.5 oz/100 g; 192 yds/176 m) yarn:
Girl's Version:
- Pale Teal (10743): 2 (3, 3, 4, 5) balls
- Approx 2-3 yds [2-3 m] of Contrast A Cherished Pink (10420) and Contrast B Winter White (10006) for embroidery.
Boy's Version:
- Oatmeal (10022): 2 (3, 3, 4, 5) balls
- Sizes U.S. 6 (4 mm) and U.S. 7 (4.5 mm) circular knitting needles 24” [60 cm] long or size needed to obtain gauge.
- Cable needle
- Stitch markers
- 4 safety pins
- 5 buttons
Instructions
The instructions are written for smallest size. If changes are necessary for larger sizes the instructions will be written thus (). When only one number is given, it applies to all sizes.
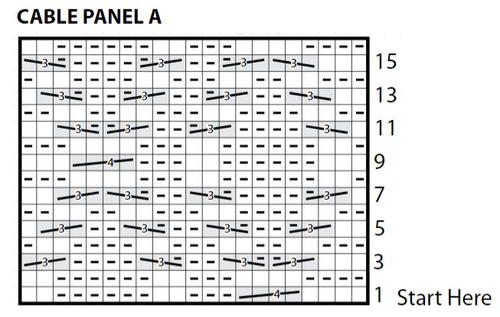
Cable Panel A (worked over 21 sts)
See chart below.
1st row: (RS). K4. C4B. P3. K2. P6. K2.
2nd row: P2. K6. P2. K3. P4. K4.
3rd row: K3. T3B. T3F. P2. T3F. P4. C3B.
4th row: K1. P2. K4. P2. K3. P2. K2. P2. K3.
5th row: K2. T3B. (P2. T3F) twice. P2. C3B. K1.
6th row: (K2. P2) twice. K3. P2. K4. P2. K2.
7th row: K1. T3B. P4. T3F. P2. T3F. C3B. K2.
8th row: K3. P4. K3. P2. K6. P2. K1.
9th row: K3. P6. K2. P3. C4B. K3.
10th row: As 8th row.
11th row: K1. C3F. P4. T3B. P2. T3B. T3F. K2.
12th row: As 6th row.
13th row: K2. C3F. (P2. T3B) twice. P2. T3F. K1.
14th row: As 4th row.
15th row: K3. C3F. T3B. P2. T3B. P4. T3F.
16th row: As 2nd row.
These 16 rows form Cable Panel A.
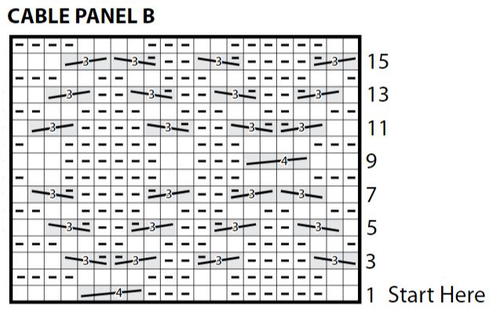
Cable Panel B (worked over 21 sts)
See chart below.
1st row: (RS). K2. P6. K2. P3. C4B. K4.
2nd row: K4. P4. K3. P2. K6. P2.
3rd row: C3F. P4. T3B. P2. T3B. T3F. K3.
4th row: K3. P2. K2. P2. K3. P2. K4. P2. K1.
5th row: K1. C3F. (P2. T3B) twice. P2. T3F. K2.
6th row: K2. P2. K4. P2. K3. (P2. K2) twice.
7th row: K2. C3F. T3B. P2. T3B. P4. T3F. K1.
8th row: K1. P2. K6. P2. K3. P4. K3.
9th row: K3. C4B. P3. K2. P6. K3.
10th row: As 8th row.
11th row: K2. T3B. T3F. P2. T3F. P4. C3B. K1.
12th row: As 6th row.
13th row: K1. T3B. (P2. T3F) twice. P2. C3B. K2.
14th row: As 4th row.
15th row: T3B. P4. T3F. P2. T3F. C3B. K3.
16th row: As 2nd row.
These 16 rows form Cable Panel B.
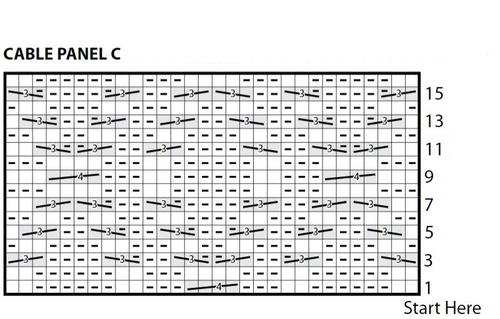
Cable Panel C (worked over 30 sts)
See chart below.
-
Cable Panel C
1st row: (RS). K2. P6. K2. P3. C4B. P3. K2. P6. K2.
2nd row: P2. K6. P2. K3. P4. K3. P2. K6. P2.
3rd row: C3F. P4. T3B. P2. T3B. T3F. P2. T3F. P4. C3B.
4th row: K1. P2. K4. P2. K3. P2. K2. P2. K3. P2. K4. P2. K1.
5th row: K1. C3F. (P2. T3B) twice. (P2. T3F) twice. P2. C3B. K1.
6th row: (K2. P2) twice. K3. P2. K4. P2. K3. (P2. K2) twice.
7th row: K2. C3F. T3B. P2. T3B. P4. T3F. P2. T3F. C3B. K2.
8th row: K3. P4. K3. P2. K6. P2. K3. P4. K3.
9th row: K3. C4B. P3. K2. P6. K2. P3. C4B. K3.
10th row: As 8th row.
11th row: K2. T3B. T3F. P2. T3F. P4. T3B. P2. T3B. T3F. K2.
12th row: As 6th row.
13th row: K1. T3B. (P2. T3F) twice. (P2. T3B) twice. P2. T3F. K1.
14th row: As 4th row.
15th row: T3B. P4. T3F. P2. T3F. T3B. P2. T3B. P4. T3F.
16th row: As 2nd row.
These 16 rows form Cable Panel C.
Body
Note: Body is worked in one piece to armholes.
With smaller circular needle, cast on 98 (102-110-122-134) sts. Do not join. Working back and forth across needle, proceed as follows:
1st row: (RS). K2. *P2. K2. Rep from * to end of row.
2nd row: P2. *K2. P2. Rep from * to end of row.
Rep these 2 rows of (K2. P2) ribbing for 1½” [4 cm], ending on a 2nd row and inc 6 (8-10-8-8) sts evenly across last row. 104 (110-120-130-142) sts.
Change to larger circular needle and proceed in Cable Pat as follows:
1st row: (RS). Work 1st row of Cable Panel A. K16 (19-24-29-35). Work 1st row of Cable Panel C. K16 (19-24-29-35). Work 1st row of Cable Panel B.
2nd row: Work 2nd row of Cable Panel B. K16 (19-24-29-35). Work 2nd row of Cable Panel C. K16 (19-24-29-35). Work 2nd row of Cable Panel A.
Cable Panels A, B and C and garter st between are now in position
Cont in garter st, keeping cont of Cable Panels as established until work from beg measures 7½ (8-8½-9½-10½)” [19 (20.5-21.5-24-26.5) cm], ending on a WS row.
-
Divide for Back and Fronts:
Pat 25 (26-29-31-34) sts. Cast off next 4 sts.
Pat 46 (50-54-60-66) sts. Cast off next 4 sts.
Pat to end of row.
Sts are now divided as: 25 (26-29-31-34) sts for Right and Left Front. 46 (50-54-60-66) sts for Back. -
Left Front:
Cont in pat until work from armhole measures 2½ (3-3½-3¾-4)” [6 (7.5-9-9.5-10) cm], ending on a RS row. -
Shape neck:
1st row: (WS). Cast off 8 (9-11-11-12) sts. Pat to end of row.
Dec 1 st at neck edge on next 3 rows, then every following alt row 3 times. 11 (11-12-14-16) sts rem.
Cont even until armhole measures 4½ (5-5½-5¾-6)” [11.5 (12.5-14-14.5-15) cm], ending on a WS row. -
Shape shoulder:
Cast off 6 (6-6-7-8) sts beg next row. Work 1 row even. Cast off rem 5 (5-6-7-8) sts. -
Back:
With WS facing, join yarn to 46 (50-54-60-66) sts for Back. Pat to end of row.
Cont in pat until work from armhole measures 4½ (5-5½-5¾-6)” [11.5 (12.5-14-14.5-15) cm], ending on a WS row. -
Shape shoulders:
Cast off 6 (6-6-7-8) sts beg next 2 rows, then 5 (5-6-7-8) sts beg following next 2 rows. Cast off rem 24 (28-30-32-34) sts. -
Right Front:
With WS facing, join yarn to rem 25 (26-29-31-34) sts for Right Front.
Pat to end of row.
Cont in pat until work from armhole measures 2½ (3-3½-3¾-4) ” [6 (7.5-9-9.5-10) cm], ending on a WS row. -
Shape neck:
1st row: (RS). Cast off 8 (9-11-11-12) sts. Pat to end of row.
Work 1 row even.
Dec 1 st at neck edge on next 3 rows, then every following alt row 3 times. 11 (11-12-14-16) sts rem.
Cont even until armhole measures 4½ (5-5½-5¾-6)” [11.5 (12.5-14-14.5-15) cm], ending on a RS row. -
Shape shoulder:
Cast off 6 (6-6-7-8) sts beg next row. Work 1 row even. Cast off rem 5 (5-6-7-8) sts. -
Sleeves
With smaller needle, cast on 26 (29-31-33-35) sts. Do not join. Working back and forth across needle, proceed as follows:
Work 4 rows in stocking st.
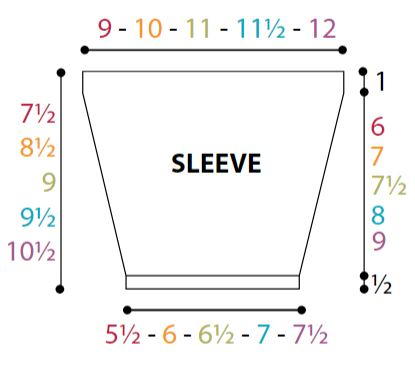
Change to larger needles and proceed in garter st (knit every row), inc 1 st at each end of 3rd and every following 8th (8th-6th-6th-6th) row until there are 40 (45-49-53-55) sts.
Cont even until sleeve from beg measures 6½ (7½-8-8½-9½) ” [16.5 (19-20.5-21.5-24) cm]. PM at each end of last row. Knit 6 rows more. Cast off.
Hood
-
Cable Panel:
With larger needles cast on 22 sts.
1st row: (RS). Work 1st row of Cable Panel A. K1 (outer edge).
2nd row: K1. Work 2nd row of Cable Panel A.
Cable Panel A is now in position.
Cont in pat until work from beg measures 18 (18-19-20-21½) ” [45.5 (45.5-48-51-54.5) cm], ending on a WS row. Cast off.
With RS facing, pick up and knit 88 (88-92-97-102) sts evenly across inner edge of Cable Panel.
Work in garter st (knit every row), dec 1 st each end of next and every following alt row 7 times more. PM at each end of last row.
72 (72-76-81-86) sts.
Cont even in garter st until work from marked row measures 2¼ (2¾-2¾-3¼-3½) ” [5.5 (7-7-8.5-9) cm], ending on a WS row. -
Shape back:
Cast off 5 sts beg next 10 rows. Cast off rem 22 (22-26-31-36) sts.
Finishing
Sew shoulder seams.
Fold Hood in half and sew Back seam.
Sew Hood in position along neck edge, matching back seam with center back neck.
-
Hood and Front Bands:
Place 5 markers for buttons on Button band, having top button at beg of neck shaping, bottom button 1” [2.5 cm] up from cast on edge and rem 3 buttons spaced evenly between.
Work buttonholes to correspond to button markers on buttonhole band as follows:
1st row: (RS). *Rib to marked st. Cast off 2 sts. Rep from * 4 times more. Rib to end of row.
2nd row: Rib, casting on 2 sts over cast off sts.
With RS facing and smaller circular needle, pick up and knit 49 (55-59-66-74) sts up right front, 88 (88-92-98-102) sts around Hood and 49 (55-59-66-74) sts down left front. 186 (198-210-230-250) sts.
1st row: (WS). Knit.
2nd row: K2. *P2. K2. Rep from * to end of row.
3rd row: P2. *K2. P2. Rep from * to end of row.
4th row: As 2nd row, noting buttonholes for Girl’s Version on right front or for Boy’s Version on left front.
5th row: As 3rd row, casting on 2 sts over cast off sts.
6th and 7th rows: As 2nd and 3rd rows.
Cast off in ribbing.
Sew in Sleeves, placing rows above markers across cast off sts at front and Back to form square armhole. Sew side and sleeve seams. Sew buttons to correspond to buttonholes. -
Girl's Version only:
Finishing:
With A, embroider flowers using Lazy-Dazy stitch in every cable medallion.
With B, embroider center of flower using French Knot. -
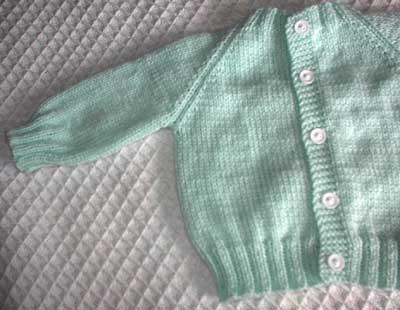
Back of the Cabled Baby Cardigan Sweater - Girl's Version
-
Back of the Cabled Baby Cardigan Sweater - Boy's Version
Read Next5 Hour Knit Baby Sweater
Your Recently Viewed Projects
meldowden 2558429
Feb 24, 2020
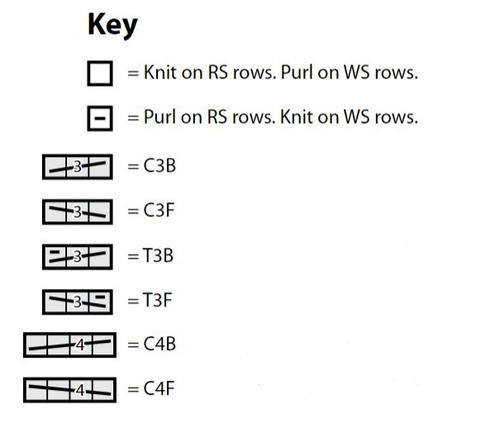
hi im having trouble locating the cable instructions and what does T3F mean. Please help me...
Lisa
Feb 28, 2020
T3F and T3B mean twist 3 front and twist 3 back, but without an abbreviations key for the pattern, its nearly impossible to verify which method they want you to use in this pattern. British patterns have you twist right for this stitch and US patterns have you twist left.
paver2
Jul 10, 2018
Those cabled baby hoodies are just adorable! I looked through the pattern and it seems easy enough to do if it's followed carefully. I have some reddish brown yarn that ould be perfect for a little boy I know, so I am going to try this and hopefully have it ready for this fall.
Report Inappropriate Comment
Are you sure you would like to report this comment? It will be flagged for our moderators to take action.
Thank you for taking the time to improve the content on our site.

