Fall 2022 Mystery Knit Along

Welcome one and all to our Fall 2022 Mystery Knit Along! With this fun event, we'll release the instructions for a mystery pattern over 4 weeks. By the end of the month, you'll have knit a brand new (and awesome!) pattern.
We've joined forces with the incredibly talented Rachel Hill from Ravin Sekai Designs to bring you this knit along, so you know the finished project is going to be something stylish and practical. But here's the twist- you won't know what you're knitting right away! Looking for a hint? It's something you're going to reach for every day!
Our mystery knit along is not one to miss. Join us every Tuesday in November for each exciting new installment of an exclusive pattern by the amazingly talented Rachel Hill.
How do I join? In order to be updated with the latest set of instructions every week, make sure that you're subscribed to the Knit Picky Patterns newsletter from AllFreeKnitting, and keep an eye on your inbox! We'll be sure to send you an email each week to bring you the next step in the knit along.
PLUS! Don't forget to share with us your progress every week in the comments down below. We can't wait to see how yours turn out!
Week 1: Intro + Materials + Gauge
Hi there! My name is Rachel and I am the owner and designer for Ravin Sekai Designs. Today, I’m excited to be sharing a new Mystery Item for us to make together in this Knit Along! At the end of this knit along, you will have learned how to create multiple different textured fabric, how to wet block a project (with video), and have practiced how to seam pieces together.
Skill Level: Easy
Materials:
Needles: Size 5mm or size needed to obtain gauge
Yarn:Worsted Weight 4 yarn. Sample is knit in Caron Simply Soft. You will need 2 colors for this project. 456 yards total. 228 yards of each color.
Other: scissors, blocking pins, blocking space, and measuring tape
Gauge:18 st/24 rows = 4” in stockinette. Gauge isafter blocking. Check out how to make a gauge swatch below.
Abbreviations:
CO: cast on.
RS: right side
WS: wrong side
St/sts: stitch/stitches
C1, C2: Color 1, Color 2
Rep: repeat
Cont: continue
Sl1kw: slip one stitch knitwise. slip your stitch knitwise from your left needle to the right without knitting it.
K: knit
P: purl
BO: bind off.
Helpful Notes:
For this project, we will be using the Long Tail CO. Here is a helpful video on how to do the Long Tail CO.
Gauge: The gauge for this project is 18st / 24 rows = 4”. The best way to make a gauge swatch is to not only knit the amount of stitches androws you need to make 4”, but to also knit a border around those rows to make sure that your swatch does not curl, making it easier tomeasure your knitting. A lot of people are in the “why do I need to make a gauge swatch” camp. Well, I have answers for you here.Follow the directions below to create your swatch.
CO 24 sts
Row 1 - 3: k all sts
Row 4: k3, p18, k3
Row 5: k all sts
Row 6 - 26: rep Rows 4 - 5
Row 27 - 29:k all sts
BO knitwise.
Mystery Knit Along Schedule
Week 1: Intro + Materials + Gauge
Week 2:Pattern Part 1
Week 3:Pattern Part 2
Week 4:Finishing

Week 2: Pattern Part 1
Mystery Knit Along Schedule
Week 1: Intro + Materials + Gauge
Week 2: Pattern Part 1
Week 3: Pattern Part 2
Week 4: Finishing
Welcome back! My name is Rachel and I am the owner and designer for Ravin Sekai Designs. Let’s get started! This week weare going to be working on the first portion of the pattern. We’ll be laying out the stitches to create the fun texture that will become one half of the item you will be creating.
Abbreviations:
CO: cast on.
RS: right side
WS: wrong side
St/sts: stitch/stitches
Rep: repeat
Cont: continue
C1, C2: Color 1, Color 2
Sl1kw: slip one stitch knitwise. slip your stitchknitwise from your left needle to the right without knitting it.
K: knit
P: purl
BO: bind off.
Helpful Notes:
● For this project, we will be using the Long Tail CO. Here is a helpful video on how to do the Long Tail CO.
The Pattern:
Long Tail CO 54 sts with C1
Row 0: p all sts
Row 1: sl1kw, k2, *k4, p8, k4*, rep * * twice more, k2, sl1kw
Row 2: p1, k2, *p4, k8, p4*, rep * * twice more, k2,p1
Row 3: sl1kw, k2, *k4, p8, k4*, rep * * twice more, k2, sl1kw
Row 4: p1, k2, *p4, k8, p4*, rep * * twice more, k2, p1
Row 5: sl1kw, k2, *p8, k8*, rep * * twice more, k2, sl1kw
Row 6: p1, k2, *p8, k8*, rep * * twice more, k2, p1
Row 7: sl1kw, k2, *p8, k8*, rep * * twice more, k2, sl1kw
Row 8: p1, k2, *p8, k8*, rep * * twice more, k2, p1
Row 9: sl1kw, k2, *p4, k8, p4*, rep * * twice more, k2, sl1kw
Row 10: p1, k2, *k4, p8, k4*, rep * * twice more,k2, p1
Row 11: sl1kw, k2, *p4, k8, p4*, rep * * twice more, k2, sl1kw
Row 12: p1, k2, *k4, p8, k4*, rep * * twice more, k2, p1
Row 13: sl1kw, k2, *k8, p8*, rep * * twice more, k2,sl1kw
Row 14: p1, k2, *k8, p8*. Rep * * twice more, k2, p1
Row 15: sl1kw, k2, *k8, p8*, rep * * twice more, k2,sl1kw
Row 16: p1, k2, *k8, p8*. Rep * * twice more, k2, p1
Row 17 - Row 176: Rep Rows 1-16 until piece reaches approx 29 inches

Week 3: Pattern Part 2
Mystery Knit Along Schedule
Week 1: Intro + Materials + Gauge
Week 2: Pattern Part 1
Week 3: Pattern Part 2
Week 4: Finishing
Welcome to WEEK 3! My name is Rachel and I am the owner and designer for Ravin Sekai Designs. This week we’ll be workingon the second half of the pattern with another new and fun texture to keep things interesting!
Abbreviations:
CO: cast on.
RS: right side
WS: wrong side
St/sts: stitch/stitches
Rep: repeat
Cont: continue
C1, C2: Color 1, Color 2
Sl1kw: slip one stitch knitwise. slip your stitch knitwise from your left needle to the right without knitting it.
K: knit
P: purl
BO: bind off.
Helpful Notes:
● Starting this week, we’ll be adding a second color. If you’re curious about how to do this, check out this video. Make sure you add the second color after slipping the first stitch of the row to maintain pattern.
The Pattern:
Change to C2
Row 1: sl1kw, k2, *p1, k9, p1, k1*, rep * * until last 3 sts, k2, sl1kw
Row 2: p1, k2, *k1, p1, k1, p7, k1, p1*, rep * * until last 3 sts, k2, p1
Row 3: sl1kw, k2, *p1, k1, p1, k5, p1, k1, p1, k1*, rep * * until last 3 sts, k2, sl1kw
Row 4: p1, k2, *p2, k1, p1, k1, p3, k1, p1, k1, p1*,rep * * until last 3 sts, k2, p1
Row 5: sl1kw, k2, *k2, p1, k1, p1, k1, p1, k1, p1,k3*, rep * * until last 3 sts, k2, sl1kw
Row 6: p1, k2, *p4, k1, p1, k1, p1, k1, p3*, rep ** until last 3 sts, k2, p1
Row 7: sl1kw, k2, *k4, p1, k1, p1, k5*, rep * * until last 3 sts, k2, sl1kw
Row 8: p1, k2, *p4, k1, p1, k1, p1, k1, p3*, rep ** until last 3 sts, k2, p1
Row 9: sl1kw, k2, *k2, p1, k1, p1, k1, p1, k1, p1,k3*, rep * * until last 3 sts, k2, sl1kw
Row 10: p1, k2, *p2, k1, p1, k1, p3, k1, p1, k1, p1*, rep * * until last 3 sts, k2, p1
Row 11: sl1kw, k2, *p1, k1, p1, k5, p1, k1, p1, k1*, rep * * until last 3 sts, k2, sl1kw
Row 12:p1, k2, *k1, p1, k1, p7, k1, p1*, rep * * until last 3 sts, k2, p1
Row 13 - Row 174: rep Rows 1-12 until reaches approx 29”
Row 175: sl1kw, k to last st, sl1kw
BO purlwise

Week 4: Finishing
Mystery Knit Along Schedule
Week 1: Intro + Materials + Gauge
Week 2: Pattern Part 1
Week 3: Pattern Part 2
Week 4: Finishing
Welcome to Week 4! My name is Rachel and I am the owner and designer for Ravin Sekai Designs. This week we’ll be finishing up this fun knit along.The first thing we’re going to want to do this week is block out our item. If you’ve noticed, your garment is probably a little scrunchie and your stitches might not be very even. That’s ok! We’re going to fix that now!
Blocking
One of the most important parts of finishing a knit item is blocking it. Blocking helps relax the knitting into a more even andconsistent fabric. (No more scrunched up shapeless items!) It makes your stitches more even and consistent. Also, it’s usuallywhat is needed to get your pieces to the exact measurements stated in any pattern. There are a few different ways to block a knit; you can wet block, steam block, or spray block. They all consist of getting your item wet, pinning it into shape, then letting it dry completely. Each of these methods have their pros and cons associated with them. You can find a lot of other awesome tips and tricks about blocking here.
For this project, I am going to use wet blocking. If you are blocking man-made fibers and most wools and wool-blends, wetblocking is usually the best way to go. It’s a good catch all blocking method and doesn’t require you to have any appliances that you might not already own. However, if you are not careful, more delicate fibers, like silk or cashmere, can become overstretched when pulling the item out of the water due to the weight of the water logged fabric pulling on the stitches. So, you need to be mindful to squeeze (never twist) as much water out of your knit before you pick it up. To wet block, fill a sink or basin big enough to hold the knitted item and water to soak the item completely through for 20 minutes. You can add a gentle detergent, a wool wash such as SOAK, or even a gentle shampoo to the water to clean the fabric while it soaks. (If what you add needs to be rinsed, make sure you rinse it thoroughly but gently). Drain the water and gently (always gently) squeeze the water out making sure to distribute the weight evenly so as to not stretch the item. Pin the item out to thecorrect measurements on towels, a sheet, or blocking mats and allow it to dry completely.
Block piece to 12”x58”. Please watch the video on how to block.
Seaming
It’s time to sew the 2 ends together to make the scarf into a cowl! You can use any method of seaming that you like, but I preferto use the Mattress Stitch. Once the 2 ends are seamed, weave in all your ends and enjoy!


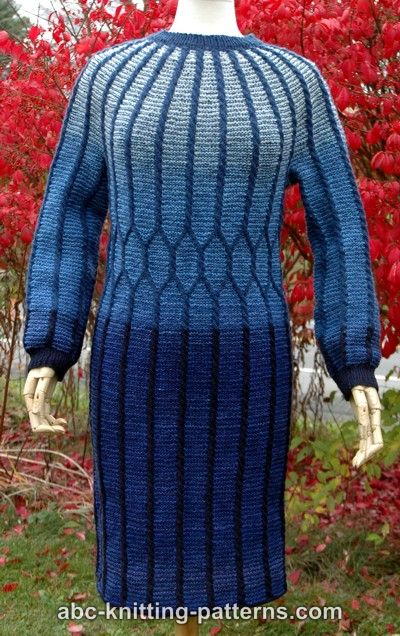
Read NextClassical Elegance Cable Dress
Your Recently Viewed Projects

Thanks for your comment. Don't forget to share!
mal0603
Nov 02, 2022
Last week the instructions indicated that we needed two colors. Are we doing one color this week and the second next week? The instructions do not refer to color this week. Thanks
Ravin Sekai Design s
Nov 05, 2022
We will start using the second color next week. Thank you for joining the KAL
Report Inappropriate Comment
Are you sure you would like to report this comment? It will be flagged for our moderators to take action.
Thank you for taking the time to improve the content on our site.