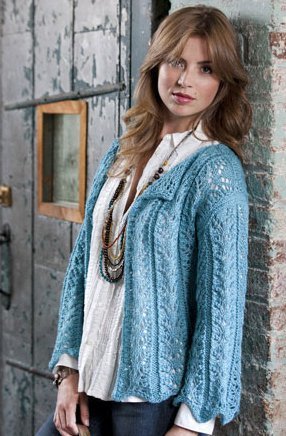
Carrara Knit Jacket
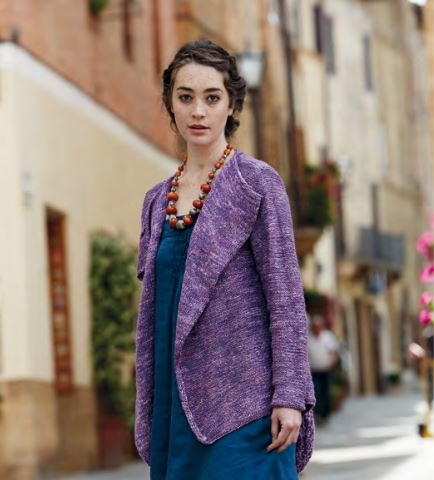
This Carrara Knit Jacket might just be the most versatile knit jacket pattern we've ever seen. The royal purple color is in fashion in every season, and the front is attractive and professional while the back is innovative and daring. It takes some experience knitting sweaters and cardigans to complete this jacket, but it will be well worth the time to those who have had the practice. If you love it as much as we do, we bet you'll have one in every color before you know it!

Knitting Needle Size3 or 3.25 mm, 6 or 4 mm
Yarn Weight(4) Medium Weight/Worsted Weight and Aran (16-20 stitches to 4 inches)
Gauge1 stitches, 2 rows, 3 inches. stockinette stitch
Materials:
- Silkystones - 12, 13, 13, 14, 15 x 50gm (photographed in Dell 088)
- 1 pair 3 1/4 mm (no 10) (US 3) needles
- 1 pair 4mm (no 8) (US 6) needles
- Stitch markers
- Stitch holder
 Measurements:
To fit bust:
SM: 81-86 cm, 32-34 in
M: 91-97 cm, 36-38 in
L: 102-107 cm, 40-42 in
XL: 112-117 cm, 44-46 in
XXL: 122-127 cm, 48-50 in
Abbreviations:
st(s): stitch(es)
RS: right side
WS: wrong side
k: knit
p: purl
st st: stockinette stitch
rev st st: reverse stockinette stitch
cont: continue
meas: measure(s)
dec: decrease
tog: together
foll: follow(ing)
yrn: yarn round / yarn over
patt: pattern
alt: alternate
g st: garter stitch
Gauge: 20 sts and 28 rows to 10 cm measured over rev st st using 4mm (US 6) needles.
Instructions
Using the thumb method and 3 1/4 mm (US 3) needles cast on 119 [129: 141: 153: 167] sts.
Row 1 (RS): K34 [39: 45: 51: 58], place marker on needle, K51, place second marker on needle, K34 [39: 45: 51: 58].
Sts between markers form centre back panel.
Row 2: K to marker, slip marker onto right needle, P to next marker, slip marker onto right needle, K to end.
Row 3: K to marker, slip marker onto right needle, K to next marker, slip marker onto right needle, K to end.
Row 4 : As row 2.
Change to 4mm (US 6) needles.
Row 5 (RS): P to marker, slip marker onto right needle, K to next marker, slip marker onto right needle, P to end.
Row 6: K to marker, slip marker onto right needle, P to next marker, slip marker onto right needle, K to end.
These 2 rows set the sts – centre back panel sts between markers in st st with all other sts in rev st st.
Keeping sts correct as set, cont straight until back meas 13 [14: 15: 16: 17] cm, ending with RS facing for next row.
Dec 1 st at each end of next and foll 36th row. 115 [125: 137: 149: 163] sts.
Work 11 rows, ending with RS facing for next row.
Next row (RS): P to marker, slip marker onto right needle, (K3, drop next st and unravel this st back down to cast-on edge) 12 times, K3, slip marker onto right needle, P to end. 103 [113: 125: 137: 151] sts.
Next row: K to marker, slip marker onto right needle, P2, (P2tog, P1) 12 times, P1, slip marker onto right needle, K to end. 91 [101: 113: 125: 139] sts, with 27 sts now in centre panel between markers.
Keeping sts correct as set, cont straight until back meas 39 [40: 41: 42: 43] cm, ending with RS facing for next row.
Shape armholes
Keeping sts correct, cast off 2 [3: 4: 5: 6] sts at beg of next 2 rows. 87 [95: 105: 115: 127] sts.
Dec 1 st at each end of next 3 [3: 5: 7: 9] rows, then on foll 1 [3: 3: 3: 4] alt rows, then on foll 4th row. 77 [81: 87: 93: 99] sts.
Cont straight until armhole meas 20 [21: 22: 23: 24] cm, ending with WS facing for next row.
Next row (WS): K to marker, slip marker onto right needle, (P1, drop next st and unravel this st back down to cast-on edge, yrn) 13 times, P1, slip marker onto right needle, K to end. 77 [81: 87: 93: 99] sts.
Shape shoulders and back neck
Next row (RS): Cast off 5 [5: 6: 6: 7] sts, patt until there are 19 [21: 22: 25: 26] sts on right needle and turn, leaving rem sts on a holder.
Work each side of neck separately.
Dec 1 st at neck edge of next 4 rows and at same time cast off 5 [5: 6: 7: 7] sts at beg of 2nd row, then 5 [6: 6: 7: 7] sts at beg of foll alt row.
Work 1 row, ending with RS facing for next row.
Cast off rem 5 [6: 6: 7: 8] sts.
With RS facing, slip centre 29 [29: 31: 31: 33] sts onto a holder, rejoin yarn and patt to end.
(Note: Some of the sts to be left on holder are “yrn” sts at top of ladders – take care to include these sts on holder.)
Complete to match first side, reversing shapings.
LEFT FRONT
Using the thumb method and 3 1/4 mm (US 3) needles cast on 73 [78: 84: 90: 97] sts.
Work in g st for 4 rows, ending with RS facing for next row.
Change to 4mm (US 6) needles.
Row 5 (RS): P to last 2 sts, K2.
Row 6: Knit.
These 2 rows set the sts – front opening edge 2 sts in g st with all other sts in rev st st.
Keeping sts correct as set, cont straight until left front meas 13 [14: 15: 16: 17] cm, ending with RS facing for next row.
Dec 1 st at beg of next and foll 36th row. 71 [76: 82: 88: 95] sts.
Cont straight until left front matches back to beg of armhole shaping, ending with RS facing for next row.
Shape armhole
Keeping sts correct, cast off 2 [3: 4: 5: 6] sts at beg of next row. 69 [73: 78: 83: 89] sts.
Work 1 row.
Dec 1 st at armhole edge of next 3 [3: 5: 7: 9] rows, then on foll 1 [3: 3: 3: 4] alt rows, then on foll 4th row. 64 [66: 69: 72: 75] sts.
Cont straight until left front matches back to beg of shoulder shaping, ending with RS facing for next row.
Shape shoulder
Cast off 5 [5: 6: 6: 7] sts at beg of next and foll 3 [1: 3: 0: 2] alt rows, then - [6: -: 7: 8] sts at beg of foll - [2: -: 3: 1] alt rows. 44 [44: 45: 45: 46] sts.
Work 1 row, ending with RS facing for next row.
Break yarn and leave sts on a holder.
RIGHT FRONT
Using the thumb method and 3 1/4 mm (US 3) needles cast on 73 [78: 84: 90: 97] sts.
Work in g st for 4 rows, ending with RS facing for next row.
Change to 4mm (US 6) needles.
Row 5 (RS): K2, P to end.
Row 6: Knit.
These 2 rows set the sts – front opening edge 2 sts in g st with all other sts in rev st st.
Keeping sts correct as set, cont straight until right front meas 13 [14: 15: 16: 17] cm, ending with RS facing for next row.
Dec 1 st at end of next and foll 36th row. 71 [76: 82: 88: 95] sts.
Cont straight until right front matches back to beg of armhole shaping, ending with RS facing for next row.
Shape armhole
Work 1 row.
Keeping sts correct, cast off 2 [3: 4: 5: 6] sts at beg of next row. 69 [73: 78: 83: 89] sts.
Dec 1 st at armhole edge of next 3 [3: 5: 7: 9] rows, then on foll 1 [3: 3: 3: 4] alt rows, then on foll 4th row. 64 [66: 69: 72: 75] sts.
Cont straight until right front matches back to beg of shoulder shaping, ending with RS facing for next row.
Shape shoulder
Work 1 row.
Cast off 5 [5: 6: 6: 7] sts at beg of next and foll 3 [1: 3: 0: 2] alt rows, then - [6: -: 7: 8] sts at beg of foll - [2: -: 3: 1] alt rows, ending with RS facing for next row. 44 [44: 45: 45: 46] sts.
Leave sts on a holder but do NOT break yarn – set aside this ball of yarn to be used for neckband.
SLEEVES
Using 3 1/4 mm (US 3) needles cast on 40 [42: 44: 44: 46] sts.
Work in g st for 4 rows, ending with RS facing for next row.
Change to 4mm (US 6) needles.
Beg with a P row, work in rev st st, shaping sides by inc 1 st at each end of 3rd and every foll 6th row to 46 [52: 60: 76: 86] sts, then on every foll 8th [8th: 8th: 8th: -] row until there are 70 [74: 78: 82: -] sts.
Cont straight until sleeve meas 46 [47: 48: 48: 48] cm, ending with RS facing for next row.
Shape top
Cast off 2 [3: 4: 5: 6] sts at beg of next 2 rows. 66 [68: 70: 72: 74] sts.
Dec 1 st at each end of next 5 rows, then on every foll alt row until 44 sts rem, then on foll 9 rows, ending with RS facing for next row.
26 sts.
Cast off 5 sts at beg of next 2 rows.
Cast off rem 16 sts.
MAKING UP
Press.
Join both shoulder seams using back stitch, or mattress stitch if preferred.
Neckband
With RS facing, using 3 1/4 mm (US 3) needles and ball of yarn set to one side with right front, K across 44 [44: 45: 45: 46] sts on right front holder, pick up and knit 5 sts down right side of back neck, K across 29 [29: 31: 31: 33] sts on back holder, pick up and knit 5 sts from up left side of back neck, then K across 44 [44: 45: 45: 46] sts on left front holder. 127 [127: 131: 131: 135] sts.
Work in g st for 4 rows, ending with WS facing for next row.
Cast off knitwise (on WS).
Set in sleeves using the set-in method.

Read NextCabled Mustard Knit Cardigan Pattern
Your Recently Viewed Projects
Thanks for your comment. Don't forget to share!
CCUK 2272297
Dec 13, 2018
I am on the short side so would change the back, which might make a matching bag or accessory. Experienced knitters could change it be knitting straight, check the size needles for the right effect, or add vents. My dear old computer cannot send photos. However, this pattern is not easy to forget. The schematic looks easy to follow so you could change it to a gentle shallow upward curve, aligning with the front. Please excuse typos. Make a tiny version or a few sketches. Or look at other patterns for ideas. Creative Carol Rating 5 our 5 for creative possibilities. How does one enter the rating, unable to find.
kekepanialee 33609 13
Sep 11, 2016
i agree with theduffers... the front is very cute... the back is very unflattering..... any way to continue the front pattern along to the back.
theduffers
Oct 31, 2015
Love the color and the style of the FRONT, but do NOT care for the back styling. Would it be possible to simply continue the existing pattern between the markers to eliminate the "dropped" back style? Or would the tighter stitches leave the back took tight?
Lisa
Mar 02, 2017
I think you could just not do the drop stitch portion. I don't care for the drop stitch look in anything, never have so I just don't do it.
Report Inappropriate Comment
Are you sure you would like to report this comment? It will be flagged for our moderators to take action.
Thank you for taking the time to improve the content on our site.