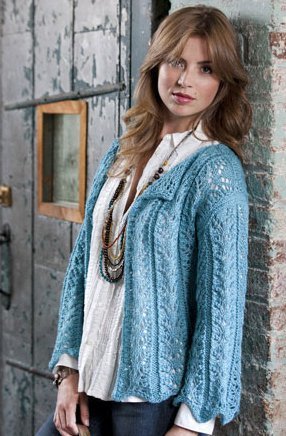
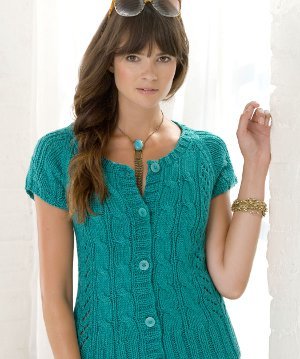
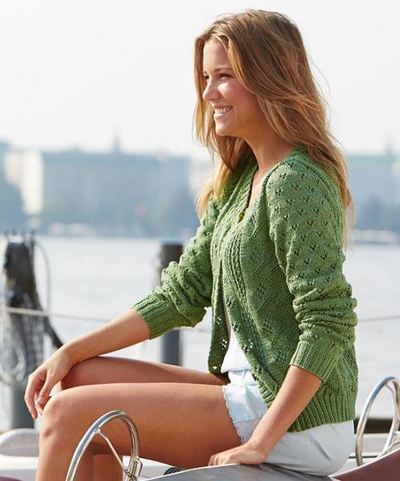
Breezy Lace Cardigan

This Breezy Lace Cardigan is the perfect piece of summer attire. We love patterns like this here, because it always seems like there's just never enough to knit in the warmer months! You will love this beautiful lace cardigan knitting pattern. The intricate lace details make this an advanced project, and more suited to experienced knitters. However, you seasoned knitters out there will find it to be worth every minute. You can knit this cardigan in the green as pictured, or choose a more neutral color like black, gray, or white so it will match more of your favorite summer outfits.
Knit lace cardigans are such a great addition your wardrobe, because they can be worn for so many different occasions. If you're up for a challenge, this free knitting pattern will certainly not disappoint. It will take a bit of hard work and concentration, but the end result will be well worth your time. Even when the sun is shining and the air is thick during the summer months, the temperature can quickly take a nosedive at night. Lace cardigans such as this one are perfect for those nights when you need a little something to cover your shoulders. Get started on this knit lace cardigan pattern today and never look back.

Knitting Needle Size1 or 2.25 mm, 2 or 2.75 mm, Circular Knitting Needles
Yarn Weight(1) Super Fine (27-32 stitches to 4 inches)
Gauge1 stitches, 2 rows, 3 inches. stockinette stitch
Materials:
- Schachenmayr Catania, 500 (500, 550) g kiwi color #00212
- 1 Milward circular needle each sizes US 1 and 2 (2 and 2.5mm) 23“/60 cm long
- Blunt yarn needle.
- 5 buttons from Dill (ref 300964, color #20, 18 mm Durchmesser)
Sizes: XS (S, M). Instructions are for smallest size with larger sizes in parentheses. If there is only one number, it applies to all sizes.
Measurements: Measurement Table
Gauge: 24 stitches and 32 rows = 4 x 4“/10 x 10 cm, over lace patterns using size US 2 (2.5 mm) needle.
Border Pattern:
Row 1 (RS): * knit 2, purl 2; repeat from *.
Row 2 (WS): Knit the knit stitches and purl the purl stitches.
Lace Pattern:
Follow the charts 1, 2 and 3 as described in the instructions.
Eyelet Pattern:
Worked over a multiple of 8 stitches + 3. Follow chart 4.
Please see links below pattern for this cardigan's diagram and charts.
Instructions
Back:
- With US 1 (2 mm) needle, cast on 102 (114, 122) stitches and work in Border Pattern, beginning and ending the 1st RS row with knit 2. Work even until piece measures 2"/5 cm = 18 rows, and increase 2 (0, 2) sts on last row = 104 (114, 124) stitches.
- Change to US 2 (2.5 mm) needle and work in lace pats as follows:
- 30 stitches chart 1
- 7 (12, 17) stitches chart 2
- work 15-stitch repeat of chart 3 twice
- 7 (12, 15) stitches chart 2
- and 30 stitches chart 1.
- Continue in pats as established until piece measures 11 1/2"/29 cm above border.
- For the armhole shaping, bind off 4 stitches at beginning of next 2 rows, 3 stitches at beginning of next 2 rows, 2 stitches at beginning of next 4 rows and decrease 1 st each side every 2nd row 3 times = 76 (86, 96) stitches. Work even until piece measures 19 1/4"/49 cm above border.
- For the neck and shoulder shaping, bind off the center 18 (22, 26) stitches and working both sides at once, bind off 9 stitches from each neck edge twice.
- At the same time, when piece measures 19 3/4"/50 cm above border, for the shoulder shaping, bind off from each shoulder edge 3 (4, 5) stitches once and 4 (5, 6) stitches twice.
Right Front:
- With US 1 (2 mm) needle, cast on 47 (51, 55) stitches and work in Border Pattern, working the 1st RS row as follows: k3, *p2, k2; repeat from * to end.
- Cont in pat until border measures 2"/5 cm = 18 rows from beginning, and dec 1 st (0, inc 1 st) on last row = 46 (51, 56) sts.
- Change to US 2 (2.5 mm) needle and work in lace pats as follows:
- 9 stitches chart 3, beginning with the 7th stitch of chart
- 7 (12, 17) stitches chart 2
- and 30 stitches chart 1.
- Continue in pats as established until piece measures 11 1/2"/29 cm above border.
- For the armhole shaping, work decreases at armhole edge (beginning of WS rows or end of RS rows) same as back = 32 (37, 42) stitches. Work even until piece measures 16 1/2"/42 cm above border.
- For the neck shaping, bind off from neck edge (beginning of RS rows) 4 (5, 6) stitches once, 3 (4, 5) stitches once, 3 stitches once, 2 stitches twice, dec 1 st at neck edge (beginning of RS rows) every 2nd row 5 times and every 4th row twice.
- At the same time, when piece measures 19 3/4"/50 cm above border, for the shoulder shaping, bind off from shoulder edge (beginning of WS rows) 3 (4, 5) stitches once and 4 (5, 6) stitches twice.
Sleeves:
- With US 1 (2 mm) needle, cast on 58 (58, 66) stitches and work in Border Pattern, beginning and ending the 1st RS row with knit 2. Work even until piece measures 2"/5 cm = 18 rows, and increase 1 (1, 3) sts on last WS row = 59 (59, 69) stitches.
- Change to US 2 (2.5 mm) needle and work in eyelet pat. For the side shaping, increase 1 stitch each side, working increase stitches into eyelet pat, every 8th row 15 times = 89 (89, 99) stitches. Work even until piece measures 16"/40 cm above border.
- For the cap shaping, bind off 2 (2, 3) stitches at beginning of next 10 rows, 2 stitches at beginning of next 2 rows, decrease 1 st each side every 2nd row 12 times and bind off 2 stitches at beginning of next 12 rows.
- Bind off remaining 17 stitches loosely.
Neckband:
- With US 1 (2 mm) needles, cast on 144 (164, 172) stitches and work in Border Pattern, beginning and ending the 1st RS row with knit 3.
- When piece measures 1"/2.5 cm, with a length of contrasting yarn, knit one row, or place stitches on a stitch holder. These open stitches will later be sewn to cardigan.
Left front band:
- With US 1 (2 mm) needles, cast on 140 stitches and work in Border Pattern and complete same as neckband.
Right front band:
- Work same as left front band, but on the 6th row, work 5 buttonholes (bind off 2 stitches for each buttonhole) evenly spaced and on the next row, cast on 2 stitches over each set of bound-off stitches. Complete same as left front band.
Finishing:
Sew shoulder seams. Set in sleeves. Sew side and sleeve seams. Using back stitch, sew on neck and front bands, sewing the open stitches (unravel the contrasting yarn if necessary while sewing) to the right sides of the neck and front edges. Sew on buttons.
Work left front to correspond to right front, reversing all shaping.
Cardigan Diagram with Measurements
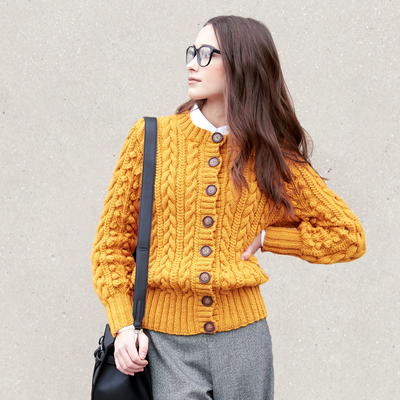
Read NextCabled Mustard Knit Cardigan Pattern
Your Recently Viewed Projects
Thanks for your comment. Don't forget to share!
flohnes 0481895
May 29, 2016
The measurements are in inches, but the schematic is in metric. Is there a correct version of this pattern.? I would like to try it, but whoever wrote the pattern seems do have done a sloppy job. My rating would be much higher, if the pattern was correctly written.
17415ne31 2331965
Feb 20, 2016
I think there is an error for the right front. It says and 30 stitches chart 3. Should this not be chart 1?? Also, were are the instructions for left front?
17415ne31 2331965
Feb 22, 2016
Is anybody able to help me with this??? I'd like to get back to finishing this sweater....thanking you in advance
sally 4370789
Mar 30, 2016
I'm with you - have just come to the fronts. I reckon it should be chart 1 instead of 3, and you have to reverse the order for the left front. I'm going to knit the two fronts at the same time. Hopefully it will be easier.
serenaforrestsf 38 10702
Jun 12, 2017
I was just reading the pattern and noticed that the left side is missing and was going to reverse it. I'm glad to have the comments to find out that stated the wrong chart on the front
rkenney1 7309558
Jan 07, 2021
Ive come across the same error after knitting the right front with chart 3!!! In the only picture it shows chart 1 so I agree there is an error in the pattern. We are now almost 5 years later, why has the pattern not been corrected? Very pretty sweater.
sally 4370789
Mar 30, 2016
I'm also knitting the fronts on one long circular needle, left front then right front facing, and it's just the same as knitting the back except it's split up the middle! No need to work back to front.
swegert 2540852
Jul 13, 2015
Why are so many patterns only written for skinny folks? Even patterns written for 2X size vary widely. I like stylish patterns just as much as my skinny friends! Please keep us in mind.
Kristina K
Jul 14, 2015
Hi swegert, unfortunately here at AllFreeKnitting, we do not create the grand majority of the patterns; we simply host them to share with everyone. The full patterns you see on this site are mostly patterns from other companies, such as Red Heart or, in this case, Schachenmayr. That said, we would be absolutely delighted to have more patterns for plus-size folk on our site, and are always looking for submissions, so if you have created any patterns, we encourage you to send them our way via the "Submit Your Project!" button near the top of the page. Otherwise, we are always on the lookout for new patterns and will be sure to post plus-sized ones that we can find. Thanks for your understanding. -The Editors of AllFreeKnitting
Report Inappropriate Comment
Are you sure you would like to report this comment? It will be flagged for our moderators to take action.
Thank you for taking the time to improve the content on our site.