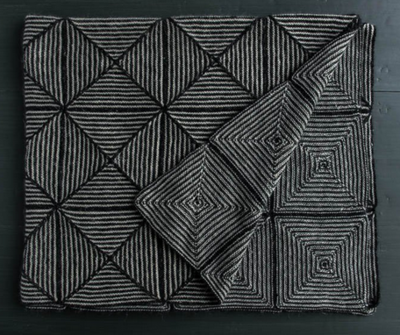
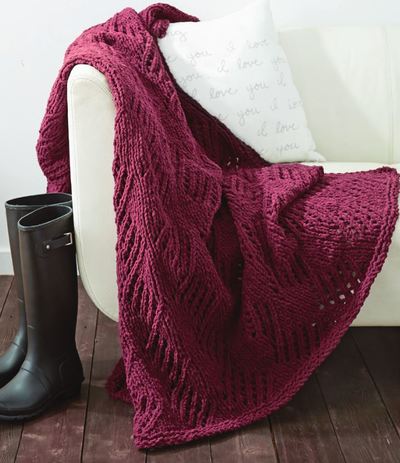
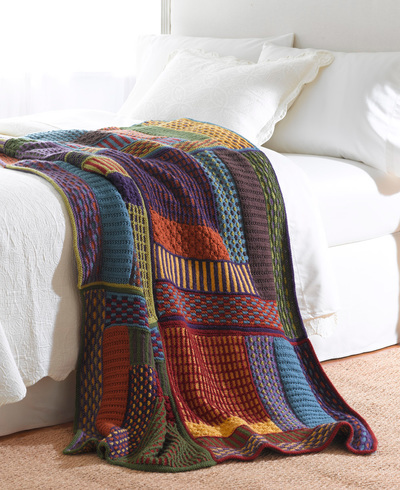
Slip Stitch Sampler Afghan

Add a bit of color to your life with this Slip Stitch Sampler Afghan. The plethora of colors in this knit afghan pattern might look intimidating, but you'll find that it's actually quite easy to make. You knit the squares of this sampler pattern one by one, honing your knitting skills as you go, and stitch the pieces together at the end. The bright colors in this afghan will cheer up any room. This throw is a handy and practical decoration it's perfect for cuddling with on a cold night.

Knitting Needle Size8 or 5 mm
Yarn Weight(4) Medium Weight/Worsted Weight and Aran (16-20 stitches to 4 inches)
Size:
About 50 x 75 in. (127 x 190.5 cm)
Materials:
-
LION BRAND® VANNA’S CHOICE® (Art. #860)
- #108 Dusty Blue 3 balls (A)
- #126 Chocolate 2 balls (B)
- #135 Rust 2 balls (C)
- #174 Olive 3 balls (D)
- #146 Dusty Purple 3 balls (E)
- #133 Brick 2 balls (F)
- #170 Pea Green 2 balls (G)
- #158 Mustard 2 balls (H)
- #147 Purple 2 balls (I)
- or colors of your choice.
- LION BRAND® knitting needles size 8 (5 mm)
- LION BRAND® large-eyed blunt needle
Gauge:
16 sts + 24 rows = 4 in. (10 cm) in slip st patterns.
BE SURE TO CHECK YOUR GAUGE.
When you match the gauge in a pattern, your project will be the size specified in the pattern and the materials specified in the pattern will be sufficient. If it takes you fewer stitches and rows to make a 4 in. [10 cm] square, try using a smaller size hook or needles; if more stitches and rows, try a larger size hook or needles.
Stitch Explanations:
RT (Right Twist) K2tog and leave on left needle, then with right needle, go between the 2 sts and k the first st again.
LT (Left Twist) Knit 2nd st on left needle through the back loop and leave on left needle. Then knit both the first and 2nd sts together through the back loop.
Notes:
1. Afghan is made from 6 Squares. The Squares are arranged as shown in Assembly Diagram and sewn together. All the Squares are worked the same, using different color combinations.
2. Each Square is worked in a log-cabin fashion, beg with a central square with each "Log" picked up along edges. The central square and each "Log" are worked in a different slip st pattern.
3. Slip st patterns are worked in 2 colors. In each row, one of the colors is knit while the contrast color is slipped. The knit color is changed every other row.
4. With yarn in front (wyif) refers to the side of the work facing you as you work the row; with yarn in back (wyib) refers to the side of the work that is away from you as you work the row.
Square 1
Central Square
With A, cast on 49 sts.
Knit 1 row.
Row 1 (RS): With B, sl 1 wyib, *k3, sl 1 wyib; rep from * to end of row
Row 2: Sl 1 wyif, *p3, sl 1 wyif; rep from * to end of row.
Rows 3 and 4: With A, knit.
Rep Rows 1–4 until piece measures 13 in. (33 cm) from beg, end with a Row 4. Note: End with a Row 4 means that the last row you work should be a Row 4, and the next row that you are ready to work will be a Row 1.
Bind off, but do not fasten off last st.
Pivot piece to work across side edge and pick up and k54 sts evenly across edge.
Knit 1 row.
Bind off as if to knit.
First Log
With RS facing and B, pick up and k54 sts across opposite side edge of Central Square.
Row 1 (WS): K1, *p4, k4; rep from * to last 5 sts, p4, k1.
Row 2: K1, *RT, LT, p4; rep from * last 5 sts, RT, LT, k1.
Row 3: Rep Row 1.
Row 4: K1, *LT, RT, p4; rep from * to last 5 sts, LT, RT, k1.
Row 5: K5, *p4, k4; rep from * to last st, k1.
Row 6: K1, *p4, RT, LT; rep from * to last 5 sts, p4, k1.
Row 7: Rep Row 5.
Row 8: K1, *p4, LT, RT; rep from * to last 5 sts, p4, k1.
Rep Rows 1–8 until First Log measures 4 in. (10 cm), end with a WS row. Note: End with a WS row means that the last row you work should be a WS row, and the next row that you are ready to work will be a RS row.
Bind off.
2nd Log
With RS facing and C, pick up and k68 sts evenly spaced across side edge of First Log and bind-off edge of Central Square.
Purl 1 row.
Row 1 (RS): With D, *k2, sl 2 wyib; rep from * to end of row.
Row 2: *Sl 2 wyif, k2; rep from * to end of row.
Row 3: With C, knit.
Row 4: Purl.
Row 5: With E, *sl 2 wyib, k2; rep from * to end of row.
Row 6: *K2, sl 2 wyif; rep from * to end of row.
Row 7: With C, knit.
Row 8: Purl.
Rep Rows 1–8 until 2nd Log measures 4 in. (10 cm), end with a Row 4 or a Row 8. Bind off.
3rd Log
With RS facing and A, pick up and k72 sts evenly spaced across bind-off row of First Log and side edge of 2nd Log.
Knit 1 row.
Row 1 (RS): With F, *k2, sl 2 wyib; rep from * to end of row.
Row 2: *Sl 2 wyif, p2; rep from * to end of row.
Row 3: With A, *sl 2 wyib, k2; rep from * to end of row.
Row 4: *P2, sl 2 wyif; rep from * to end of row.
Rep Rows 1–4 until 3rd Log measures 4 in. (10 cm), end with a WS row.
With A, knit 2 rows.
Bind off.
4th Log
With RS facing and D, pick up and k84 sts evenly spaced across side edge of 3rd Log and bind-off edge of 2nd Log.
Row 1 (WS): *K2, p2; rep from * to end of row.
Row 2: Knit.
Rep Rows 1 and 2 until 4th Log measures 4 in. (10 cm), end with a WS row.
Bind off.
5th Log
With RS facing and G, pick up and k83 sts evenly spaced across bind-off row of 3rd Log and side edge of 4th Log.
Knit 1 row.
Row 1 (RS): With C, k1, sl 3 wyib, *k3, sl 3 wyib; rep from * to last st, k1.
Row 2: K1, sl 3 wyif, *k3, sl 3 wyif; rep from * to last st, k1.
Row 3: With B, k4, *sl 3 wyib, k3; rep from * to last st, k1.
Row 4: K4, *sl 3 wyif, k3; rep to last st, k1.
Rows 5 and 6: With G, rep Rows 1 and 2.
Rows 7 and 8: With C, rep Rows 3 and 4.
Rows 9 and 10: With B, rep Rows 1 and 2.
Rows 11 and 12: With G, rep Rows 3 and 4.
Rep Rows 1–12 until 5th Log measures 4 in. (10 cm), end with a WS row.
With G, knit 2 rows.
Bind off.
6th Log
With RS facing and H, pick up and k102 sts evenly spaced across side edge of 5th Log and bind-off edge of 4th Log.
Knit 1 row.
Row 1 (RS): With E, *k2, sl 2 wyib, k2; rep from * to end of row.
Row 2: *P2, sl 2 wyif, p2; rep from * to end of row.
Rows 3 and 4: With H, knit.
Row 5: With I, *sl 1 wyib, k4, sl 1 wyib; rep from * to end of row.
Row 6: *Sl 1 wyif, p4, sl1 wyif; rep from * to end of row.
Rows 7 and 8: With H, knit.
Rep Rows 1–8 until 6th Log measures 4 in. (10 cm), end with a Row 4 or a Row 8. Bind off.
Edging
With RS facing and A, pick up and k102 sts along one edge of Square.
Knit 1 row.
Bind off, but do not fasten off last st.
*Rotate piece to work across next edge of Square. Pick up and k102 sts across edge. Knit 1 row. Bind off, but do not fasten off last st.
Rep from * 2 more times to work Edging across other 2 sides of Square. Fasten off.
Square 2
Work same as Square 1, using the following colors:
Central Square: Use I in place of A, and C in place of B.
First Log: Work with C.
2nd Log: Use A in place of C, use B in place of D, and use G in place of E.
3rd Log: Use I in place of A, use H in place of F.
4th Log: Work with B.
5th Log: Use E in place of G, use A in place of C, and use C in place of B.
6th Log: Use D in place of H, use G in place of E, and use E in place of I.
Edging: Work with I.
Square 3
Work same as Square 1, using the following colors:
Central Square: Use F in place of A, and H in place of B.
First Log: Work with H.
2nd Log: Use E in place of C, use A in place of D, and use G in place of E.
3rd Log: Use F in place of A, use D in place of F.
4th Log: Work with A.
5th Log: Use B in place of G, use E in place of C, and use H in place of B.
6th Log: Use I in place of H, use G in place of E, and use C in place of I.
Edging: Work with F.
Square 4
Work same as Square 1, using the following colors:
Central Square: Use E in place of A, and D in place of B.
First Log: Work with D.
2nd Log: Use F in place of C, use I in place of D, and use A in place of E.
3rd Log: Use E in place of A, use G in place of F.
4th Log: Work with I.
5th Log: Use H in place of G, use F in place of C, and use D in place of B.
6th Log: Use C in place of H, use A in place of E, and use B in place of I.
Edging: Work with E.
Square 5
Work same as Square 1, using the following colors:
Central Square: Use G in place of A, and I in place of B.
First Log: Work with I.
2nd Log: Use B in place of C, use A in place of D, and use C in place of E.
3rd Log: Use G in place of A, use F as indicated.
4th Log: Work with A.
5th Log: Use D in place of G, use B in place of C, and use I in place of B.
6th Log: Use E in place of H, use C in place of E, and use A in place of I.
Edging: Work with G.
Square 6
Work same as Square 1, using the following colors:
Central Square: Use D in place of A, and F in place of B.
First Log: Work with F.
2nd Log: Use I in place of C, use C in place of D, and use H in place of E.
3rd Log: Use D in place of A, use B in place of F.
4th Log: Work with C.
5th Log: Use A in place of G, use I in place of C, and use F in place of B.
6th Log: Use E in place of H, use H in place of E, and use G in place of I.
Edging: Work with D.
Finishing:
Arrange Squares as shown in Assembly Diagram and sew together. Weave in ends.
Assembly Diagram
Abbreviations:
beg = begin(ning)(s)
k = knit
p = purl
rep = repeat
RS = right side
sl = slip
st(s) = stitch(es)
WS = wrong side
wyib = with yarn in back
wyif = with yarn in front
If you like this Slip Stitch Sampler Afghan, be sure to check out more warm, cozy afghans here.
Read NextHarlequin Afghan
Your Recently Viewed Projects
Thanks for your comment. Don't forget to share!
joycem0223 3128670
Feb 19, 2024
I loved making this. I used leftover yarn so it was virtually free.
bethbach469 344067 5
Dec 01, 2020
I have been trying to get this pattern correct. I honestly cannot get the blocks to "square" out. i consider myself to be an advanced knitter and i have given up as i have pulled it out so many times. I honestly have no idea how to work out how many stitches i need to have to avoid it being too short and where do i do the increases especially where it pulls in on the sides. i feel so helpless. rating 4 stars because i just love the colour combos and look of it.
janspicer112 29495 48
Sep 27, 2020
I have made two of these lovely blankets - I have found them so relaxing to do, used up a lot of my mixed wools, and am amazed how cleverly it all comes together colourwise.
mummy5
Apr 18, 2020
Vanna Pea Green is discontinued but the colour matches this one - https//www.knittingwool.com/bergere-de-france-file == co/ This wool works well as a substitute
Pamela
Mar 31, 2020
I have ordered yarn for this afghan throw and awaiting delivery. Would love to see other knitter's pictures of their efforts to see different colour schemes etc.
Chava
Mar 31, 2020
Where did you order your yarn from for this afghan? I ordered from LionBrand but they have not confirmed my order they don't answer emails they don't answer their phone. Just wondering if you have found another source for all the Vanna's colors... thanks
janspicer112 29495 48
Aug 03, 2020
I have made this during lockdown and am very pleased with it. Very clever how the 9 colour combination worked out so well.
Chava
Mar 26, 2020
Is anyone answering these comments? I just ordered all the yarn and getting worried that if there are problems with the thing, I'll be "up a creek".
Chava
Mar 26, 2020
Is this using straight or circular needles? Is the blue color in the picture represented by any on the list of yarns?
Kristina K
Mar 30, 2020
Hi Chava, this afghan is knitted on straight needles in panels and sewn together, as depicted in the 'finishing' section. As for the blue color, this is represented with color A or 'dusty blue,' as listed in the 'Materials' section. We hope this helps! Happy knitting! -Editors of AllFreeKnitting
Hippie Chick
Sep 04, 2018
This is a totally new stitch for me, but I do think this afghan is very pretty and the bright colors give it such an art deco type look. Looks like this afghan is made by knitting a total of six squares. All stitching is not just slip stitching as the name implies. I was wondering how just slip stitching would produce such a lovely throw.
Tricia108
Mar 07, 2018
What a lovely looking afghan! There is nothing ordinary about it. It looks complicated but it really isn't. You have to be a bit careful but sometimes a good challenge is worth it. And it does not require a lot of sewing together. It is a good stash buster as well. This will go on my list. I always need afghans with the change of weather here in NYC. Thank you for the patten.
3cats2love
Jul 31, 2017
Sometimes you come across a pattern that requires a fair amount of work to make, but the results are so eye-catching that it is worth all the effort. This afghan seems to be one of those kinds of projects. You could mix and match colors differently than what was done here and still get a great look.
cthomas 396
Jul 13, 2017
Wow, I love this pattern! I am usually not a fan of patchwork crochet patterns, but somehow this one jumps out at me. Putting this pattern on the list!
Cessie123
Jan 12, 2017
make sure you have all the pieces perfectly aligned when ready to sew together or the end result looks awful. This means you must knit every strip with same number or rows or the end result will not look nice and will be out of alignment.
therosary4 3493704
Nov 08, 2016
how can I print this pattern off? its too small to read it from my phone
KathrynAllison
Nov 08, 2016
Hi therosary4 3493704! If you have access to a desktop computer, you can copy and paste the instructions into a Word document and print from there. Hope this helps! -Editors of AllFreeKnitting
Cessie123
Aug 27, 2016
I found the diagram a little complicated so just followed the main diagram. I also found I went up to a 6mm needle and my square still only measured eleven inches. I also needed more purple yarn than was recommended. All that said I am enjoying knitting this bright and lovely afghan.
wblaz 5144809
May 18, 2016
I've made this afghan twice and find it's very quick and easy. Instead of binding off at the end of each section , I slip the stitches onto long circular needle while I work on the perpendicular section. Then I don't have to pick up stitches, just knit them off the circular needle. I've been knitting for 60 years and it's my all time favorite afghan. Looking forward to making another.
The Designing Peng uin
Apr 26, 2016
What a great travel project each section done separately makes it a project one can take along to an appointment to knit in the waiting room or on a long drive (in the passenger seat of course). The finished afghan has such a complicated look to it - the rich colours and complex-seeming pattern, when I get it done I shall feel quite smug - and thanks to all the warnings posted, shall be careful in the areas mentioned thanks my friends
quanahs 5032097
Mar 17, 2016
This is a very clever pattern that looks far more complex than it actually is. The pieces are small and portable so it might make a good summer knitting project. Just wait until cooler weather to put it together. I love the designer's choice of colors and the generous size of this blanket.
hr
Feb 06, 2016
Look just below the first sentence after the bolded "Finishing". It's there. I'll try to send a screen shot w this reply.
wblaz 5144809
May 18, 2016
I used a neutral color, taupe, and knit one row around each square, then used taupe and a crochet hook to connect all the squares.
Avantgarde35 09103 92
Nov 27, 2015
I have all 6 of the squares completed and blocked. I'm ready to assemble them. What stitch should I use to put them all together. Also, what color yarn should I use?
mpskinner3 7611088
Apr 30, 2015
I am trying to upload my sample gauge using the slip stitch pattern. it does not look right. can someone please explain how the main square pattern is to be followed. there are 2 colors, but the instructions about knitting and slipping do not produce the result pictured with the pattern. HELP. I have just bought a lot of yarn and I cannot figure out what to do next. I have tried to upload the picture, but that does not seem to be working either.
Lisa
Apr 12, 2015
2nd Log With RS facing and C, pick up and k68 sts evenly spaced across side edge of First Log and bind-off edge of Central Square. Purl 1 row. This means using colour C with the right side of work facing, pick up and knit 68 stitches, you will pick up a stitch and as you pick it up with one needle you will knit it before putting it on the other needle to use, you are picking up along the side edge and the bound off edge of the first log, after you have picked up and knit the stitches onto the working needle you will purl the next row on the stitches you have just picked up and knit with colour C. Hope this helps, happy knitting.
mpskinner3 7611088
Apr 29, 2015
Am I doing this right? It is supposed to be the slip stitch pattern. It does not look like the illustration. Which yarn do I hold in front or in back? The contrasting color? The main color? And they do not line up front and back, are they supposed to?
Lisa
Jan 06, 2022
The pattern specifies which yarn to use for each section, so when you see "with yarn b" in the instructions, that is the yarn you will use until you are instructed to change to a different colour. The pattern also specifies which stitches to use line by line for each section. Based on your questions this may be a pattern that you may not be quite ready for since it is an intermediate pattern that you do need to have a decent amount of knitting experience to complete the project.
hansonbeverly67 18 49682
Jun 05, 2014
I am knitting this afghan and am at 2nd log. It says "with C, pick up and k68 sts evenly spaced across the adge of first log and bind-off edge of Central square. It then says to purl 1 row. How can I purl one row when I have bound off and with what color? Should this be purl 1 row and then bind off?
ladyjane060848 640 5034
Jun 18, 2013
has anyone done this afghan? l feel that log five should have more stitches than 83 as log four is 84 ,and each log is bigger than the one before,l wonder if it's a misprint,apart from this it's looking amazing !
pattiroth 2269942
Apr 27, 2013
This is a beautiful and colorful afghan! I just love that it is made with slip stitches and I am putting on my "to do" list right now. The other good thing is that is very affordable; for us budget conscious knitters. It will be a fun project, thanks, All Free Knitting! Patti
ginaebowler 613133 4
Apr 17, 2013
It looks really complicated but I might have a go as it's such a lovely effect.
Report Inappropriate Comment
Are you sure you would like to report this comment? It will be flagged for our moderators to take action.
Thank you for taking the time to improve the content on our site.