Happy Holidays Tree Skirt
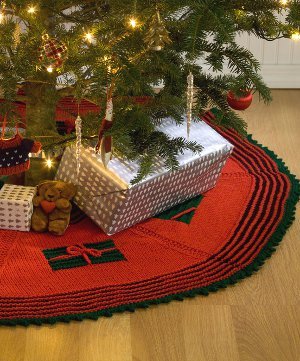
If you've ever coveted your grandmothers old knitted tree skirt pattern but weren't too fond of the moth ball scent, the Happy Holidays Tree Skirt is the pattern for you. This classic DIY Christmas tree skirt features a regal red design adorned with forest green gift boxes. With just a little knowledge of crochet, you'll be able to create your very own Happy Holidays Tree Skirt. This timeless tree skirt is sure to add a familiar holiday feel to all of your seasonal celebrations.

Knitting Needle Size10 or 6 mm
Yarn Weight(1) Super Fine (27-32 stitches to 4 inches)
Materials:
- RED HEART® “Super Saver®” (Art. E300 available in solid color – 7oz (198g), 364yd (333m) or multi or fleck color – 5oz (141g), 244yd (223m) skeins.) : 3 Skeins 319 Cherry Red A, 2 skeins 389 Hunter Green B, and 1 skein 312 Black C
- Knitting Needles: 6mm [US 10]
- Crochet Hook: 6mm [US J-10]
- 2 Stitch markers
- yarn needle
GAUGE: 18 sts = 5”; 20 rows = 4” in St st.
CHECK YOUR GAUGE. Use any size needles to obtain the gauge.
ABBREVIATIONS:
A, B, C = color A, B, C
ch = chain
K = knit
mm = millimeters
P = purl
sc = single crochet;
St st = Stockinette stitch (Knit on right side rows; Purl on wrong side rows.)
st(s) = stitch (es)
tog = together
[ ] = work directions in brackets the number of times specified.
SPECIAL ABBREVIATION:
ssk (slip, slip, knit) = Slip next 2 sts knitwise, one at a time, to right needle; insert point of left needle into the fronts of these 2 sts and knit them together from this
position.
TREE SKIRT
WEDGE (Make 7):
With A, cast on 68 sts. Knit 1 row.
Row 1 (Right Side): With C, Knit.
Row 2: With C, K2, P to last 2 sts, K2.
Rows 3 and 4: With A, Knit.
Rows 5 and 6: With C, repeat Rows 1 and 2.
Row 7: With A, K2, ssk, K to last 4 sts, K2tog, K2 – 66 sts.
Row 8: With A, Knit.
Rows 9 and 10: With C, repeat Rows 1 and 2.
Rows 11-18: Rep Rows 7-10 twice – 62 sts.
Rows 19 and 20: With A, repeat Rows 7 and 8 – 60 sts.
Row 21: With A, Knit.
Row 22: With A, K2, P to last 2 sts, K2.
Row 23: With A, K2, ssk, K to last 4 sts, K2tog, K2 – 58 sts.
Row 24: Repeat Row 22.
Rows 25-36: Repeat Rows 21-24 three times – 52 sts.
Place a marker each side of the center 20 sts.
Row 37: With A, K to marker, with B, K20, with a 2nd ball of A, K to end.
Row 38: With A, K2, P to marker, with B, K20, with A, P to last 2 sts, K2 – 1 ridge formed on right side of work.
Row 39: With A, K2, ssk, K to marker, with B, K20, with A, K to last 4 sts, K2tog, K2 – 50 sts.
Row 40: With A, K2, P to marker, with B, P20, with A, P to last 2 sts, K2.
Rows 41-56: Repeat Rows 37-40 four times – 42 sts and 5 ridges in B section.
Rows 57 and 58: Repeat Rows 37 and 38 – 6 ridges in B section. Cut B.
Row 59: With A, K2, ssk, K to last 4 sts, K2tog, K2 – 40 sts.
Row 60: With A, K2, P to last 2 sts, K2.
Row 61: With A, Knit.
Row 62: With A, K2, P to last 2 sts, K2.
Rows 63-74: Repeat Rows 59-62 three times – 34 sts.
Rows 75 and 76: Repeat Rows 59 and 60 – 32 sts.
Rows 77 and 78: With A, Knit.
Row 79: With C, Knit.
Row 80: With C, K2, P to last 2 sts, K2.
Row 81: With A, K2, ssk, K to last 4 sts, K2tog, K2 – 30 sts.
Row 82: With A, Knit.
Rows 83-98: Repeat Rows 79-82 four times – 22 sts and 5 stripes of C. Cut C and continue with A only.
Rows 99 and 100: Knit.
Row 101: Repeat Row 81 – 20 sts.
Rows 102-104: Knit.
Row 105: Repeat Row 81 – 18 sts.
Rows 106-108: Knit. Bind off.
FINISHING:
Sew wedges together, leaving one seam open.
Outer Picot Edge-Row 1:
With right side facing and crochet hook, join B to cast-on edge at corner of opening; ch 1, work sc evenly along entire cast-on edge of piece.
Fasten off.
Row 2: With right side facing, join B in first sc of last row; ch 1, sc in first 3 sc, * ch 3, slip st in 3rd ch from hook for picot, sc in next 3 sc; rep from * across adjusting as necessary at seams and end of row. Fasten off.
Inner Picot Edge:
Work same as Outer Picot Edge across inner bound-off edge.
Center Opening Picot Edge:
Work same as Outer Picot
Edge across each of the 2 open edges EXCEPT work 5 sc and ch-5 (instead of ch 3) for each picot.
Ties (Make about 8):
With A, ch 50. Fasten off. Thread through every other 5-st picot at side edges and tie into bows to close piece.
Box Decorations-Box 1 (Embellish 4):
With A, ch 20.
Fasten off. Attach horizontally along the center of the B box. With A, ch 13. Fasten off. Attach vertically across the box.
Box 2 (Embellish 3):
With A, ch 12. Fasten off. Attach diagonally across one corner. Make a second ch and attach across opposing corner.
Bow (Make 7):
With A, leaving a long tail, [ch 12, slip st in 12th ch from hook] twice. Fasten off, leaving a long tail again. Wrap one of the tails around the center of the bow to hide the slip st joins. Using remaining tail and, referring to photo, sew a bow to each box.
Read NextScarf Wrapped Wreath
Your Recently Viewed Projects
Thanks for your comment. Don't forget to share!
Lisa
Dec 03, 2022
Red Heart super saver is definitely not a #1 super fine yarn, it's a #4 worsted weight.
Report Inappropriate Comment
Are you sure you would like to report this comment? It will be flagged for our moderators to take action.
Thank you for taking the time to improve the content on our site.