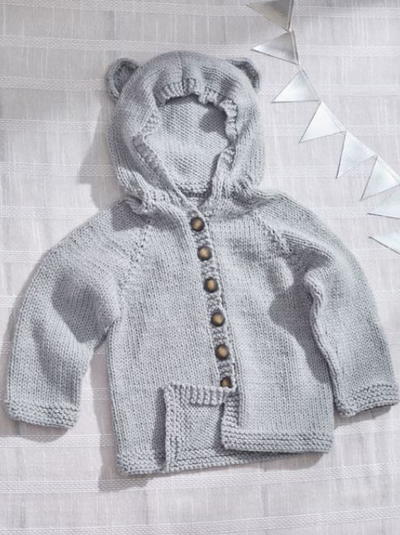
Baby Bear Hooded Cardigan
This easy knit baby cardigan is perfect for the bear-y cute baby in your life!

There's very little cuter than babies dressed up as animals. This Baby Bear Hooded Cardigan is the cutest knit baby sweater for mama bear to dress her little baby bear up in. The hood even has two adorable little ears! While the construction might look complicated, this cardigan is much easier than it looks, and the more advanced techniques are explained clearly in the pattern. While we love this knit baby cardigan in gray, we think it would be equally as adorable in brown, black, or white to look like a grizzly, black, or polar bear cub!

Knitting Needle Size8 or 5 mm, Circular Knitting Needles, Double-Pointed Knitting Needles (DPNs)
Yarn Weight(4) Medium Weight/Worsted Weight and Aran (16-20 stitches to 4 inches)
Gauge21 sts = 5" [12.5 cm]; 24 rows = 4" [10 cm], in Stockinette st (knit on right
side, purl on wrong side). CHECK YOUR GAUGE. Use any size needles to obtain the gauge.
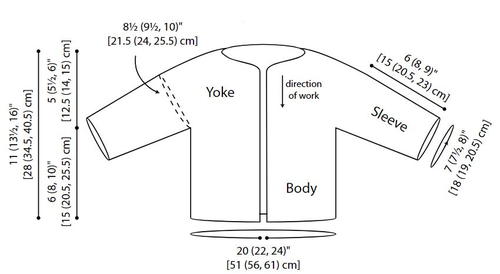
Finished SizeDirections are for size 6 months. Changes for sizes 12 months, and 18 months are in parentheses. Finished Chest: 20 (22, 24)" [51 (56, 61) cm]' Finished Length: 11 (13½, 16)" [28 (34.5, 40.5) cm], not including hood.
Materials List
- RED HEART® Bunches of Hugs™ yarn: 1 (1, 1) ball 5341 Rain
- Susan Bates® Knitting Needles: 5 mm [US 8] circular needles, 24" [60 cm] long or longer, 5 mm [US 8] double pointed needles.
- Stitch markers
- Stitch holders
- 5 (6, 7) buttons–¾" [19 mm]
- Yarn needle
Instructions
Notes
-
Sweater is worked in one piece from the neck downwards. Piece is divided at underarms and body is then worked back and forth in rows to lower edge.
-
Sleeve stitches are placed on double pointed needles and worked in rounds to cuff.
-
Stitches are picked up around the neck edge and hood is worked back and forth in rows from the neck upwards.
-
Ears are worked separately, back and forth in rows, and sewn to hood.
-
Circular needle is used to accommodate stitches and for ease when working along curves. Work back and forth in rows on circular needle as if working with straight needles.
-
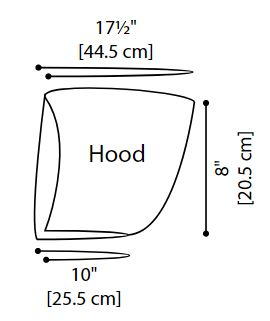
Diagrams:
Hood diagram
Body diagram
Special Stitches and Techniques
-
kfb (Knit into front and back) = Knit next stitch but do not remove from needle, knit into back loop of same stitch and remove from needle – 1 st increased.
-
ssk (slip, slip, knit) = Slip next 2 stitches, one at a time, as if to knit to right needle, insert point of left needle through front of stitches, knit these sts together through back loop – 1 st decreased.
-
3-Needle bind off = Hold needles of stitches to be seamed parallel and with right sides together, with 3rd needle knit together first stitch from each needle, *knit together next stitch from each needle, pass first stitch over 2nd stitch and off right needle; repeat from * until all stitches have been knit from the 2 parallel needles and only one stitch remains on the right needle. Fasten off.
-
Backward loop cast on = *Carry the working yarn from right to left behind your thumb or forefinger and then to the front and clasp it lightly in your palm. Insert the tip of the right needle from left to right under the front strand, forming a loop on the needle. Remove your finger from the loop. Tighten the loop on the needle; repeat from * until desired number of stitches have been cast on.
Sweater
-
Yoke
Beginning at neck edge with circular needle, cast on 2 sts for left front, place marker, cast on 7 sts for left sleeve, place marker, cast on 12 sts for back, place marker, cast on 7 sts for right sleeve, place marker, cast on 2 sts for right front (for a total of 30 sts and 4 markers on needle).
Row 1 (wrong side): Purl, slipping markers as you come to them.
Row 2 (increase row): [Kfb] twice, slip marker, *kfb, knit to 1 st before next marker, kfb, slip marker; repeat from * 2 more times, [kfb] twice—40 sts.
Row 3: Purl, slipping markers as you come to them.
Row 4 (increase row): *Kfb, knit to 1 st before next marker, kfb, slip marker; repeat from * 3 more times, kfb, knit to last st, kfb—50 sts.
Row 5: Cast on 4 sts for right front band, purl to end of row, slipping markers as you come them—54 sts.
Row 6: Cast on 4 sts for left front band, knit to 1 st before first marker, kfb, slip marker, *kfb, knit to 1 st before next marker, kfb, slip marker; repeat from * 2 more times, kfb, knit to end of row—66 sts.
Note: Continue to slip markers as you come to them, unless otherwise instructed.
Row 7: K4, p to last 4 sts, k4.
Row 8 (increase row): Knit to 1 st before first marker, kfb, slip marker, *kfb, knit to 1 st before next marker, kfb, slip marker; repeat from * 2 more times, kfb, knit to end of row—74 sts.
Row 9: K4, p to last 4 sts, k4.
Row 10 (increase row and buttonhole row): Knit to 1 st before first marker, kfb, slip marker, *kfb, knit to 1 st before next marker, kfb, slip marker; repeat from * 2 more times, kfb, knit to last 3 sts, yarn over, k2tog, k1—82 sts.
Row 11: K4, p to last 4 sts, k4.
Row 12: Repeat Row 8—90 sts.
Rows 13–18: Repeat Rows 11 and 12 for 3 more times—114 sts.
Row 19: K4, p to last 4 sts, k4.
Row 20: Repeat Row 10—122 sts.
Rows 21–29: Repeat Rows 11–19—154 sts.
At this point, you will have 22 sts for each front, 35 sts for each sleeve, and 40 sts for the back.
Size 6 months Only:
Notes:- Use backward loop cast-on to cast on underarm stitches (as instructed in dividing row).
- At this point, you will have 22 sts for each front, 35 sts for each sleeve, and 40 sts for the back.
Row 30 (dividing row and buttonhole row – right side): Knit to first marker, remove marker, place next 35 sts on a holder for left sleeve, remove marker, cast on 4 sts for underarm, knit next 40 sts, remove marker, cast on 4 sts for underarm, place next 35 sts on a holder for right sleeve, remove marker, knit to last 3 sts, yarn over, k2tog, k1—84 sts remain on needle for body.
Sizes 12 months and 18 months Only:
Rows 30–33 (37): Repeat Rows 10–13 (17)—170 (186) sts.
Notes:- Use backward loop cast-on to cast on underarm stitches (as instructed in dividing row).
- At this point, you will have 24 (26) sts for each front, 39 (43) sts for each sleeve, and 44 (48) sts for the back.
Row 34 (38) (dividing row – right side): Knit to first marker, remove marker, place next 39 (43) sts on a holder for left sleeve, remove marker, cast on 4 sts for underarm, knit next 44 (48) sts, remove marker, cast on 4 sts for underarm, place next 39 (43) sts on a holder for right sleeve, remove marker, knit last 24 (26) sts—92 (100) sts remain on needle for body. -
Body
Keeping first and last 4 sts of every row in Garter st (knit the first and last 4 stitches on every row) for front bands, continue to work in Stockinette stitch (knit on right side, purl on wrong side) and continue to work a buttonhole at the end of every 10th row (up to a total of 5 (6, 7) buttonholes) until body measures about 5 (7, 9)" [12.5 (18, 23) cm] from underarms, end with a wrong side row.
Work in Garter st (knit every st of every row) for 8 rows.
Bind off on right side. -
Sleeves
Place the 35 (39, 43) left sleeve sts on double pointed needles, pick up and k4 sts along underarm placing a stitch marker between the 2nd and 3rd stitch of the underarm for beginning of round—39 (43, 47) sts.
Distribute the stitches as evenly as possible over the double pointed needles.
Rounds 1–5: Knit.
Round 6 (decrease round): K2tog, knit to last 2 sts, ssk—37 (41, 45) sts.
Repeat Rounds 1–6 for 4 (5, 6) more times—29 (31, 33) sts.
Next Round: Knit.
Repeat last round until sleeve measures about 5 (7, 8)" [12.5 (18, 20.5) cm] from underarm.
Cuff
Round 1: Knit.
Round 2: Purl.
Rounds 3–8: Repeat Rounds 1 and 2 for 3 more times.
Bind off.
Repeat to work right sleeve. -
Hood
With right side facing and circular needle, pick up and k41 sts along neck edge. Work back and forth in rows as if working with straight needles.
Row 1: P10, [kfb] 20 times, p11—61 sts.
Row 2: K1, *p1, k1; repeat from * across.
Row 3: P1, *k1, p1; repeat from * across.
Row 4: Repeat Row 2.
Row 5: K4, p10, [kfb] 6 times, p21, [kfb] 6 times, p10, k4—73 sts.
Row 6: Knit.
Row 7: K4, p to last 4 sts, k4.
Repeat Rows 6 and 7 until hood measures about 8" [20.5 cm] from neck edge, end with a wrong side row.
Distribute 36 sts onto one end of needle and 37 sts onto the other end. Fold hood in half to bring the right side of stitches together.
Beginning at the front of the hood and working towards the back/fold, use 3-needle bind off to seam top of hood. -
Ears (Make 2)
With two double pointed needles or circular needle (whichever you prefer), leaving a long beginning tail, cast on 20 sts.
Row 1: Knit.
Row 2: *K2, k2tog, k1; repeat from * across—16 sts.
Row 3: Purl.
Row 4: *K2, k2tog; repeat from * across—12 sts.
Row 5: Purl.
Row 6: *K2tog, k1; repeat from * across—8 sts.
Row 7: Purl.
Row 8: *K2tog; repeat from * across—4 sts.
Cut yarn, leaving a long tail. Thread tail through remaining 4 stitches and remove them from the needle. Pull on tail to drawn last 4 stitches together and weave in securely. Use beginning tail to sew ear to hood, curving ear into a crescent shape toward the front as you sew.
Repeat for second ear. -
Finishing
Weave in ends. Block as desired. Sew buttons to left front, opposite buttonholes.
Abbreviations
- k
- knit
- k2tog
- knit the next 2 stitches together
- p
- purl
- st(s)
- stitch(es)
- *
- repeat whatever follows the * as indicated
Read NextBeginner Knit Baby Kimono
Your Recently Viewed Projects
Thanks for your comment. Don't forget to share!
wendylm421
Nov 20, 2024
I already left a comment about this but it didn't post - it just disappeared so I'm reposting Sorry if there are two comments br br I started this pattern and am on row and have hit a snag and can't tell if it's me or the pattern I am working the pattern so that all rows before row alternate between an increase row evens and a purl row odds In that pattern I've gotten to the amount of stitches that I should get to at row but I'm only on row If I keep going in this pattern I'll have more stitches than it says there should be at row Am I doing something wrong br br I'll admit it's a little confusing the way it's written Row tells you to repeat row and then later the pattern tells you to repeat rows - so it kind of buries the…Read More direction in multiple layers when it might have just been easier to say to repeat row again or just paste the directions again Perhaps I was confused because of this wording and I wasn't supposed to increase at every even row br br I'd really appreciate if the pattern creator could offer guidance I don't want to knit more rows if it's going to mess up the pattern and I'll have to undo it all br br So far - it does look like a really cute pattern and I am really excited to finish this I'm making it as a gift for a friend who is pregnant and I think she's going to love it assuming I can finish it
wendylm421
Nov 20, 2024
I am currently in the process of making this and have hit a roadblock and I just can't tell if it's me or the pattern. It looks like before row 30, all even rows are increase rows (8 for each row). I've been continuing in with that pattern and am only on row 25 and have the amount that the pattern says should be listed for row 30. If I keep going I'll have 16 more stitches by row 30 than the pattern calls for. Am I doing something wrong?
tggundry 5657350
Aug 31, 2021
knitting the bear hooded cardigan as a present. I loved knitting the body in one so straightforward and quick. The sleeves on dpn proved more challenging as I haven't used this method in over 30 years but YouTube tutorials and perseverance paid off and I mastered them. Now I just have the hood to do. Love this as not much sewing at all to join it together.
Report Inappropriate Comment
Are you sure you would like to report this comment? It will be flagged for our moderators to take action.
Thank you for taking the time to improve the content on our site.