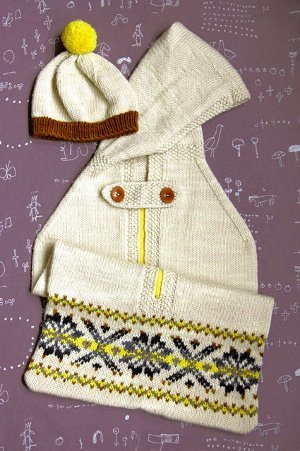
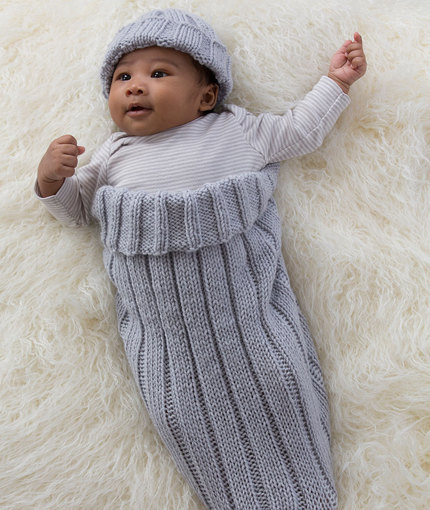
Paintbrush Baby Set
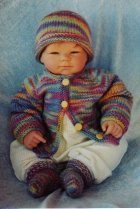
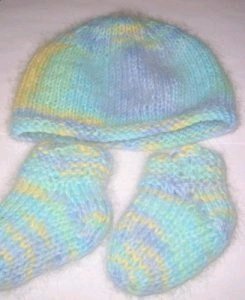
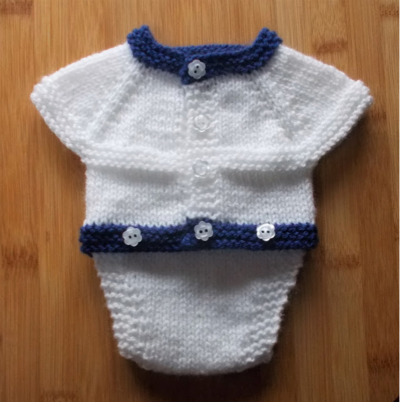
Stop the search. The Paintbrush Baby Set is the only knitting pattern you'll ever need for your tiny bundle of joy. With instructions for a knit baby hat, baby booties pattern, and matching baby cardigan pattern, your baby will be the best dressed at the nursery. This cute and colorful baby set looks darling in a color-changing yarn (as shown in the picture) or a solid colored fiber for a classic look.

Knitting Needle Size6 or 4 mm, 8 or 5 mm, Circular Knitting Needles, Double-Pointed Knitting Needles (DPNs)
Yarn Weight(4) Medium Weight/Worsted Weight and Aran (16-20 stitches to 4 inches)
Materials:
- Lorna's Laces Shepherd Worsted: 2-3 hanks
- 24 in. circular needles sizes 6 and 8
- Double point needles sizes 6 and 8, or sizes to get the gauge.
- 4 to 5 buttons, 3/4 to 1 inch.
- Scrap yarn and stitch markers
Gauge: Using the larger size needles, in stockinette stitch, 18 sts. equal 4 inches.
Abbreviations:
inc - knit into the front and back of the next st.
k - knit
K2 tog. - knit 2 sts. together as 1.
p - purl
rep. - repeat the directions between the *.
ssk - slip 1 st. as if to knit, slip 1 st. as if to purl, slip the tip of the left needle into the fronts of these sts. and knit them.
st - stitch
Stitches Used:
- Stockinet st. : when knitting back and forth, k 1 row, p 1 row, when knitting in the round, k every round.
- 1x1 rib- row 1; k 1, p 1. Row 2; k the k sts, p the p sts.
- Garter st- when knitting back and forth, k every row. When knitting in the round, p 1 round, k 1 round. 2 rows or rounds make 1 ridge.
Sweater
This sweater is knitted in one piece, beginning at the neck edge. The first couple of rows may be confusing, because you are shaping the back of the neck. Please just follow the directions carefully; it will make sense as you knit further along. Directions are written for size 6 months, with changes for larger size in parentheses.
Beginning at neck edge with larger size 24 in. needle cast on firmly 2 sts., place a marker, cast on 10(11) sts., place a marker, cast on 16(17) sts., place a marker, cast on 10(11) sts., place a marker, cast on 2 sts. You will have 40,(43) sts.
Working back and forth in stockinet st, and slipping all markers as you come to them;
Row 1; K into the front and back of the first st, (inc. made)* inc, slip marker, inc, k to within 1 st of next marker* rep at each marker to last st, inc. (You should have increased 10 times in this row).
Row 2; purl.
Row 3; inc, *k to within 1 st of next marker, inc, slip marker, inc*, rep at each marker, k to last st, inc.
Continue to work rows 2 and 3 until there are 22(23) sts between the back markers (these are the second and third markers that you placed). At the end of this last increase row, cast on to the right tip of the needle 3 sts.
Next row- p, and at the end of this row, cast on to the right tip of the needle 3 sts as before.
Next row- *k to within 1 st of marker, inc, inc*, rep at each marker, k to end of row.
Next row- p.
Continue to work the last 2 rows, increasing as established (on the k side of work, before and after each marker) until there are 40 (45) sts between the back markers, ending after working a p row.
Divide for sleeves
k to first marker; remove it (remove all markers now, as you come to them), k 1. Now using a blunt needle and a length of scrap yarn, slip all the sts between here and the next marker onto the length of yarn to hold for the left sleeve. Cast onto the right tip of the needle 5 sts. and join to the back sts. K across the back sts to the next marker, k 1, slip all the sts between here and the next marker onto a length of yarn to hold for the right sleeve. Cast on 5 sts as before and join to front sts. K to end of row.
You are now working on the body sts only. Work in stockinet st until work measures 9 1/2 (10 1/2) inches, measuring from the top of the shoulder. Change to smaller 24 in circular needle and work 3/4 in. of garter stitch (k every row). Bind off loosely.
Neckband
With right side of work facing you, using the smaller circular needle, beginning at right front (as worn) edge of neck, join yarn and pick up 8 sts across front,10 (11) across top of sleeve, 16 (17) sts across back neck,10 (11,12) across top of other sleeve, 8 across other front. Work 2 ridges of garter stitch, bind off.
Sleeves
Slip the sleeve sts off their length of yarn onto 2 of the larger size double point needles. With right side of work facing you, using a third double point needle, join yarn to right edge of armhole and pick up 7 sts across the armhole, placing a marker after 3. This is the beginning and end of the round.
K 1 round, then slip some of the sts from the needles that have lots of sts to the needle that only has 7 to make the amount of sts on each needle approx. even.
K 5 rounds.
Decrease round; k 1, ssk, k to within 2 sts of marker, k 2 tog.
K 4 (3) rounds, then do another decrease round as above.
Continue to work as established, decreasing every 5 ( 4) rounds, until sleeve measures 5 1/2 (6) ins., measured from the armhole, or 3/4 ins less than desired length.
Decrease evenly if needed over the next round to 24 (26) sts. Change to smaller double point needles, and work 2 ridges of garter stitch. Bind off loosely.
Front Bands
Left band; using the smaller circular needle, beginning at neck edge of left front, with the k side of the work facing you, pick up 3 sts for every 4 rows. Count these sts and make note. Mark buttonholes: using safety pins, mark 2 sts for each buttonhole desired, spacing them evenly, about 2 1/2 ins apart, with the first buttonhole 2 sts from upper edge. Buttonhole row; *k to marked sts, bind them off firmly* rep until all pinned sts are bound off, k to end of row. Next row; *k to bound off sts, cast on 2 sts firmly*, rep to end of band. K every row until there are 2 garter st ridges. Bind off
loosely.
Right band; beginning at lower edge of right front with k side of work facing you, pick up sts as for the left band, making sure the number of sts is the same. K same as left band, making buttonholes in this band also. Sew buttons on over the holes on left band for girl, right band for a boy.
Hat
With the larger double pointed needles, cast on 60 (66) sts.
Join, being careful not to twist, and p 1 round.
K 1 round.
P 1 round.
K around, increasing 4 stitches evenly. K every round until hat measures 3 3/4 (4) inches from cast on edge.
Decrease round
*K 2 k 2 tog* repeat to end of round.
K 4 rounds.
Repeat the decrease round above.
K 3 rounds.
Decrease round
*K 1, k 2 tog* repeat to end of round.
K 2 rounds.
K 2 tog all around.
Break yarn, and using a darning needle, gather remaining stitches. Weave in end.
Booties
With the smaller double point needles, cast on 20 (24) stitches evenly onto 3 needles.
Join, being careful not to twist, and p 1 round.
K 1 round.
Continue to work circular garter stitch until you have 5 ridges.
K 5 rounds.
Divide for heel
K 10 (12) stitches onto one needle for the heel.
Leave remaining 10(12) stitches on 2 needles to hold for instep.
Working back and forth on the heel sts, P 1 row.
Sl 1, k 9 (11).
Sl 1, p 9 (11).
Repeat the last 2 rows once more.
Turn heel
Row 1- Sl 1, k 5(6), ssk, turn.
Row 2- Sl 1, p 2, p 2 tog, turn.
Row 3- Sl 1, k 2, ssk, turn.
Repeat rows 2 and 3 once (twice) more, then row 2 once more. The heel is turned, 4 sts left on heel.
Slip all 10(12) instep stitches onto one needle.
K across 2 heel sts. Using another needle, k across the other 2 heel sts, and using this same needle, pick up 6 sts along side of heel. Using another needle, k across the instep stitches. Using another needle, pick up 6 sts along side of heel, and using this same needle, k across the 2 heel sts. K 1 round.
Shape gusset
Round 1- 1st needle- k to within 3 sts of end of needle, k 2 tog, k 1. 2nd needle- k. 3rd needle- k 1, ssk, k to end of needle.
Round 2- k.
Continue to work the last 2 rounds until there are 5 ( 6) sts left on 1st and 3rd needle.
Work 6 (8) rounds.
Shape toe
Round 1- first needle- k to within 3 sts of end of needle, k 2 tog, k 1. 2nd needle- k 1, ssk, k to within 3 sts of end of needle, k 2 tog, k 1. 3rd needle- k 1, ssk, k to end of needle.
Round 2- k.
Repeat the last 2 rounds until 8 sts are left, break yarn, and using a darning needle, gather stitches.
Read NextBaby Snuggle Sack + Hat
Your Recently Viewed Projects
Thanks for your comment. Don't forget to share!
quanahs 5032097
Mar 17, 2016
I am a little late to comment on your post kcgan25 2492913, but the smaller the circumference of the sleeve or booty, the more you will need to use double pointed needles. Remember the stitches have to fit comfortably on the cable without being pulled too tightly in order to knit in the round. On DPN you can knit as few as three stitches. While you can start a hat on circular needles, by the time you get into the decreases used to form the crown, circular needles will be far too long to accommodate your knitting.
kcgan25 2492913
Jul 27, 2015
I love this Baby Set. But I prefer using circular needles rather than dp needles whenever possible. To do the hat and booties can you tell me what length of cable is best? Or does it really have to be dp needles?
neria 1839322
Jun 09, 2015
I made this pattern in a solid yellow, then hand stitched a brown running stitch at the garter edge. Added brown buttons. Love it
sounder 3125790
Mar 19, 2015
I am curious what size set does this make. Looks like a great set for a new baby boy.
Kristina K
Mar 19, 2015
Hey there, sounder 3125790! Unfortunately, the original designer doesn't give any specific measurements, but she does state that the pattern was created for babies up to 1 year old. My best guess is that it would be a bit baggy on newborns, but from 6-12 months should fit very well. Please tell us what you think if you decide to knit this pattern, and happy knitting!
Mother Purl
Sep 25, 2014
This looks like a lovely pattern and I so badly want to make it, but since I can't print from my old version iPad I normally send the patterns to my email and print them from my laptop. However every time i try to open the link to your website on my laptop, internet explorer sends me a message that Internet Explorer has stopped working. This only happens on this website. Is there somewhere to get a PDF version so I could send it to my documents rather than to my email. Hope someone can help me
Editor JD
Sep 26, 2014
Hi Mother Purl, You can find the PDF version of this pattern on the Jimmy Beans Wool website here: www.jimmybeanswool.com/freeknittingpatternjimmmysweaterset.asp Hope this helps, -Editors of AllFreeKnitting
Report Inappropriate Comment
Are you sure you would like to report this comment? It will be flagged for our moderators to take action.
Thank you for taking the time to improve the content on our site.